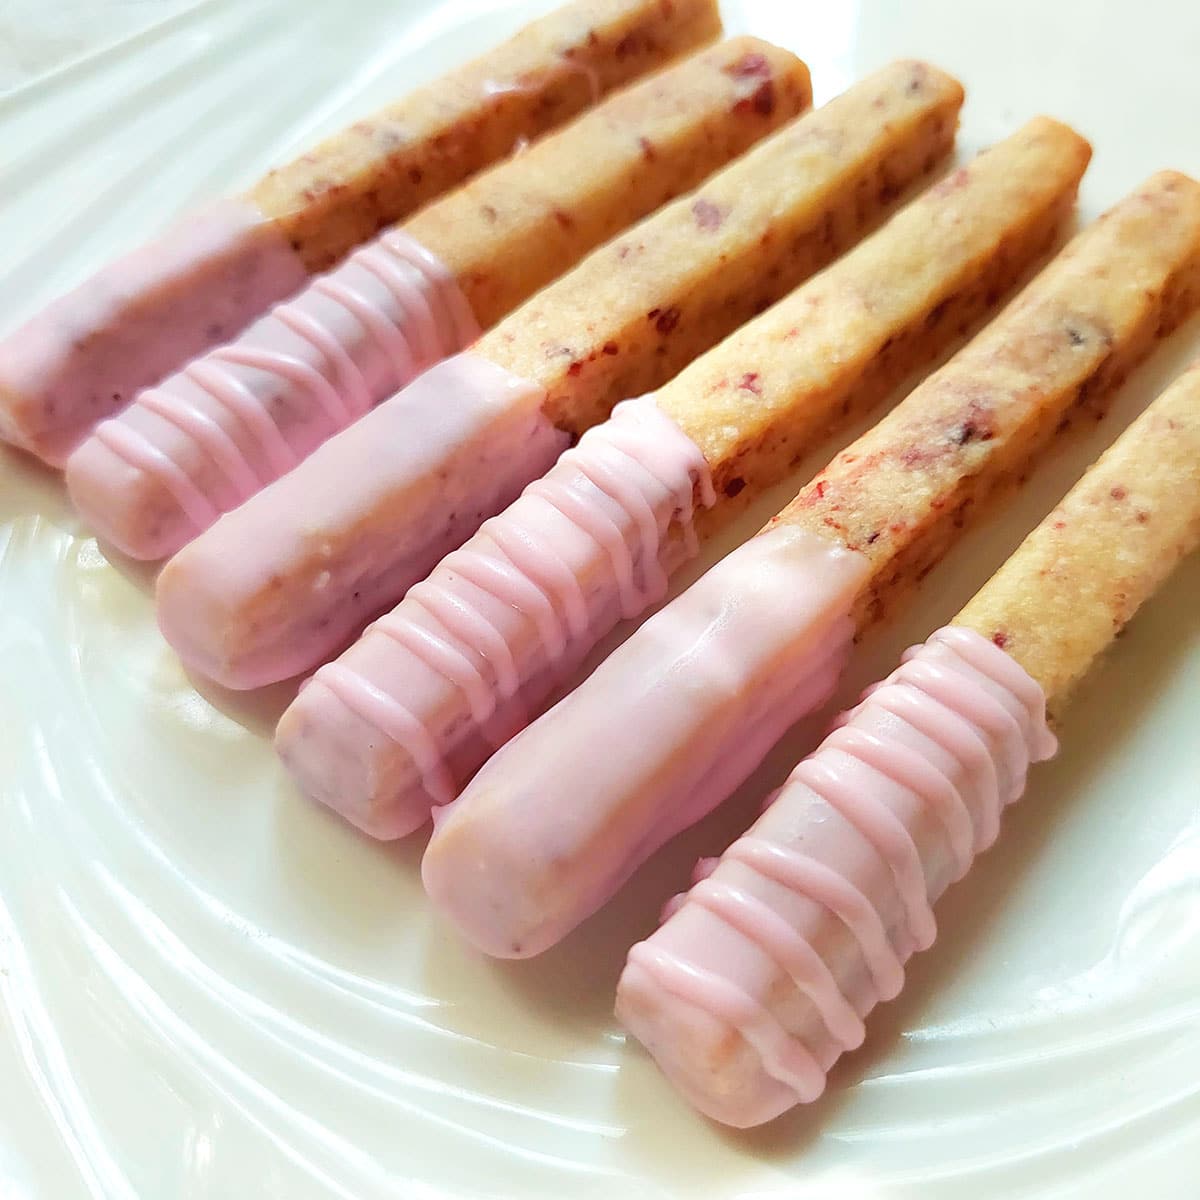
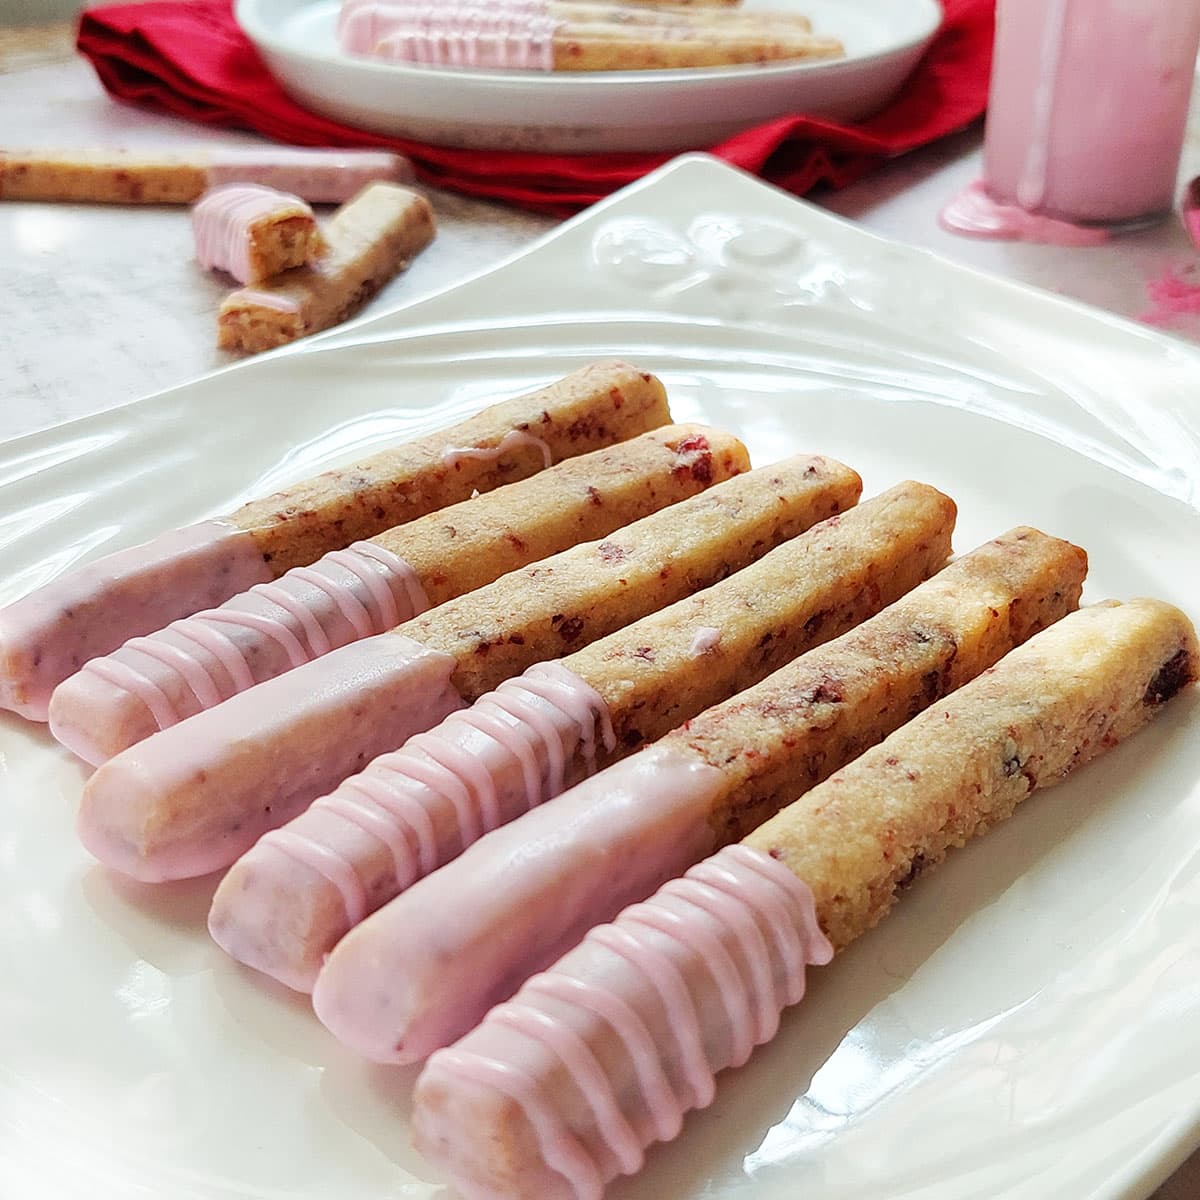
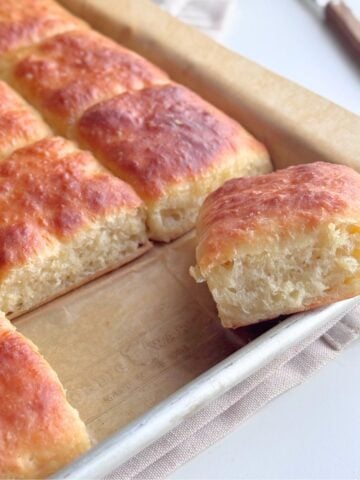
These White Chocolate Cranberry Cookie Sticks combine sweet white chocolate with tangy dried cranberries.
It's a classic combination of flavors and texture that are chewy, crispy, sweet, and tart all at once, making it hard to eat just one. They are perfect for any occasion all year round or an anytime, anyday treat.
Made with basic ingredients, the dough is super easy to work with. Plus during baking the cookies maintain their shape without spreading.
NOTE: If you're just starting out with baking, the information shared in this post will be super helpful in ensuring your baking turn out successful!
Perfect for beginners in the baking world or those trying out this recipe for the first time.
To find all the measurements and instructions, just scroll down to the recipe card at the end of the post.
Shopping List For Ingredients And Substitutes If Needed
This is just an ingredient overview, the full printable recipe card with amounts and recipe instructions are at the end of this post
For the dough:
2 cups (250g) All purpose (same as plain flour -UK) OR cake flour.
1 cup (120g)powdered sugar (same as confectioners or icing sugar) : instead of using granulated sugar, this recipe uses powdered. Powdered sugar contains a small amount of cornstarch which cuts down on the chill time while also making the dough easier to handle and of course spread less. Plus the powdery consistency of confectioners sugar keeps the cookies soft and tender.
¼ tsp salt
⅔ cup butter at room temperature
½ cup chopped dried cranberries
1 teaspoon vanilla extract
2 Tablespoons milk
For the white chocolate dipping:
5-6 ounces (about ⅔ cup) 150g white melting or baking chocolate.
¼ teaspoon coconut oil (optional):If you add a tablespoon of coconut oil while melting the chocolate , you'll achieve a super smooth consistency that's just perfect for dipping.
Tint / color (optional) If you choose to color the melted white chocolate, I suggest using oil-based or powdered food coloring. It's important to steer clear of water-based coloring because it can cause the chocolate to seize, resulting in hardening and making it unusable.
How to make White Chocolate Cranberry Cookie Sticks (visual)
This is just the overview so you can see the process. When you are baking, you’ll want to use the recipe the bottom of the page.
Make the dough
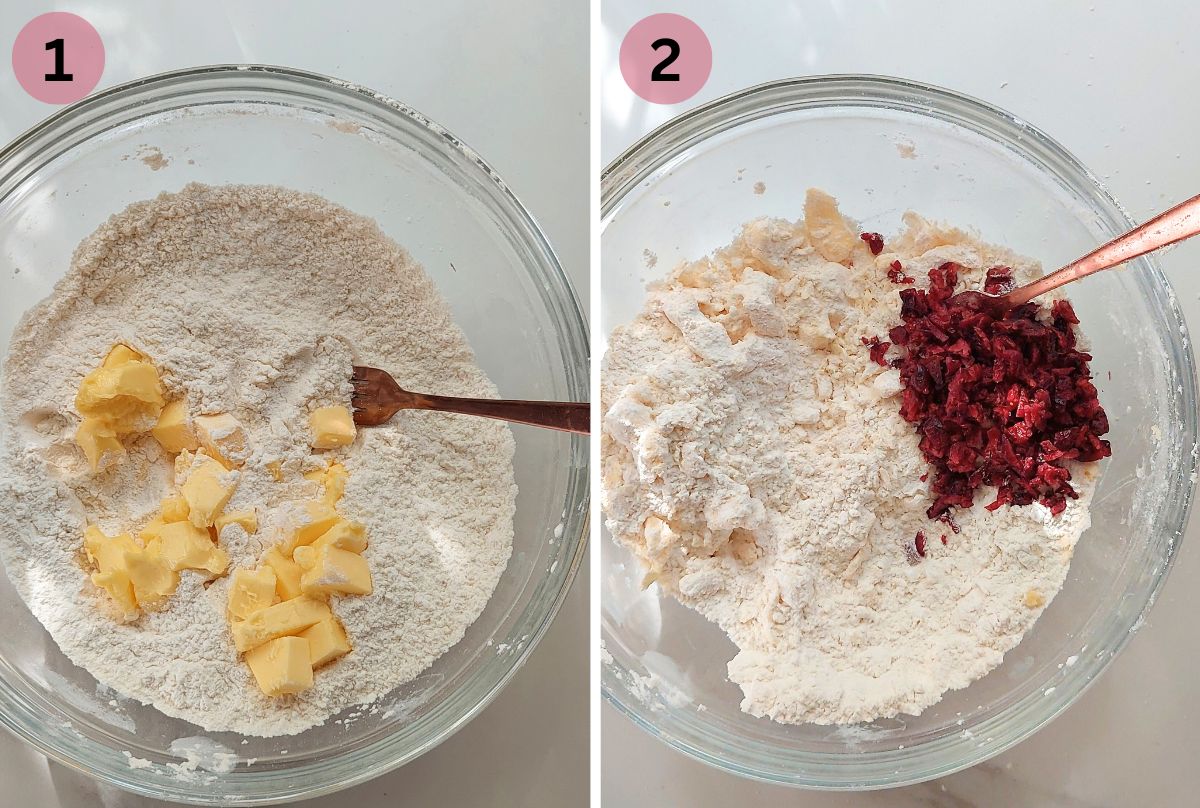
- Dry ingredients: In a large bowl combine the flour, sugar, salt and butter.
- Add in the chopped dried cranberries and mix with a fork until well distributed throughout the dry ingredients.
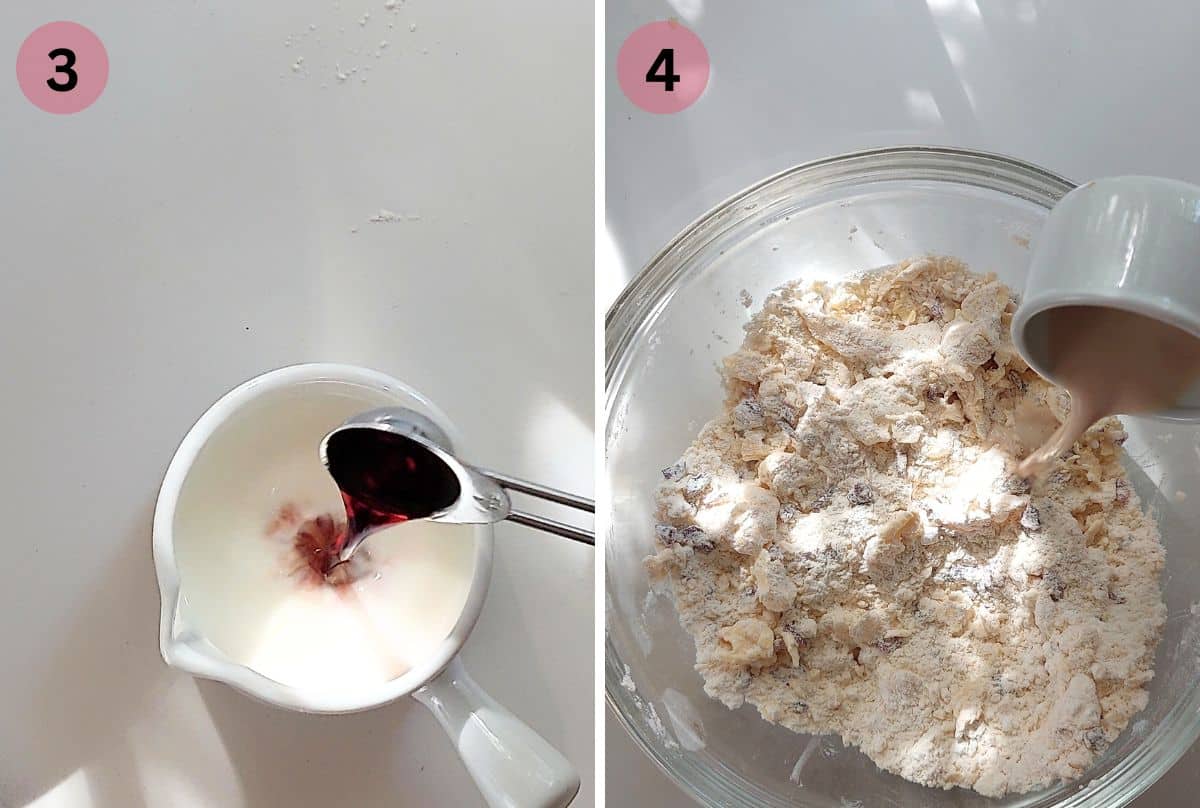
- Wet ingredients: In a separate small bowl mix together the lukewarm milk and vanilla extract.
- Add the milk mixture (wet ingredients) to the bowl with the dry ingredients.
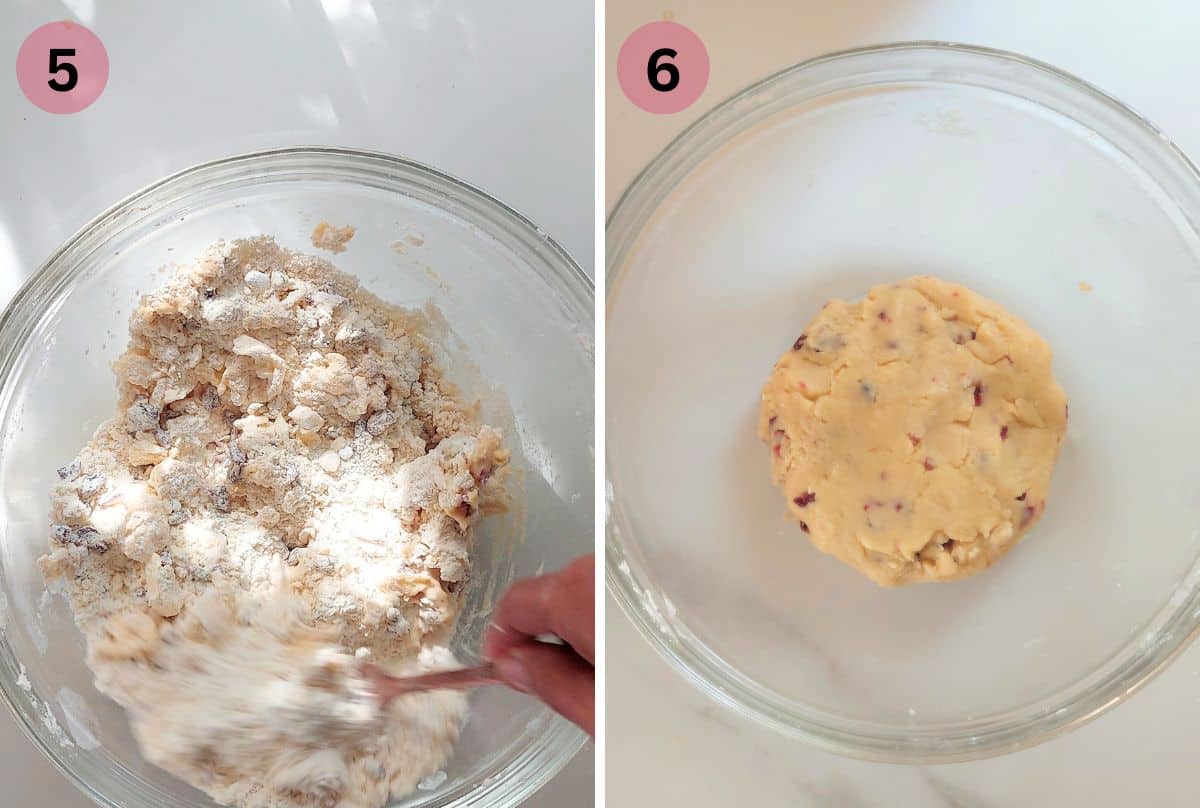
- Start by using a fork to mix until the dough becomes crumbly. Then, switch to your hands and continue gathering the dough.
- It might seem like the dough won't stick together initially, but continue to gather and press together all the ingredients for a few minutes.
- As it absorbs the milk mixture it will form a dough. Avoid the temptation to add extra milk, as this will result in a dough that is excessively soft, causing the cookies to spread during baking.
- Once you have formed the dough, place it in the fridge for 10 - 15 minutes.
Roll and cut the dough into sticks
Once chilled, the dough will be much easier to work with and shape.
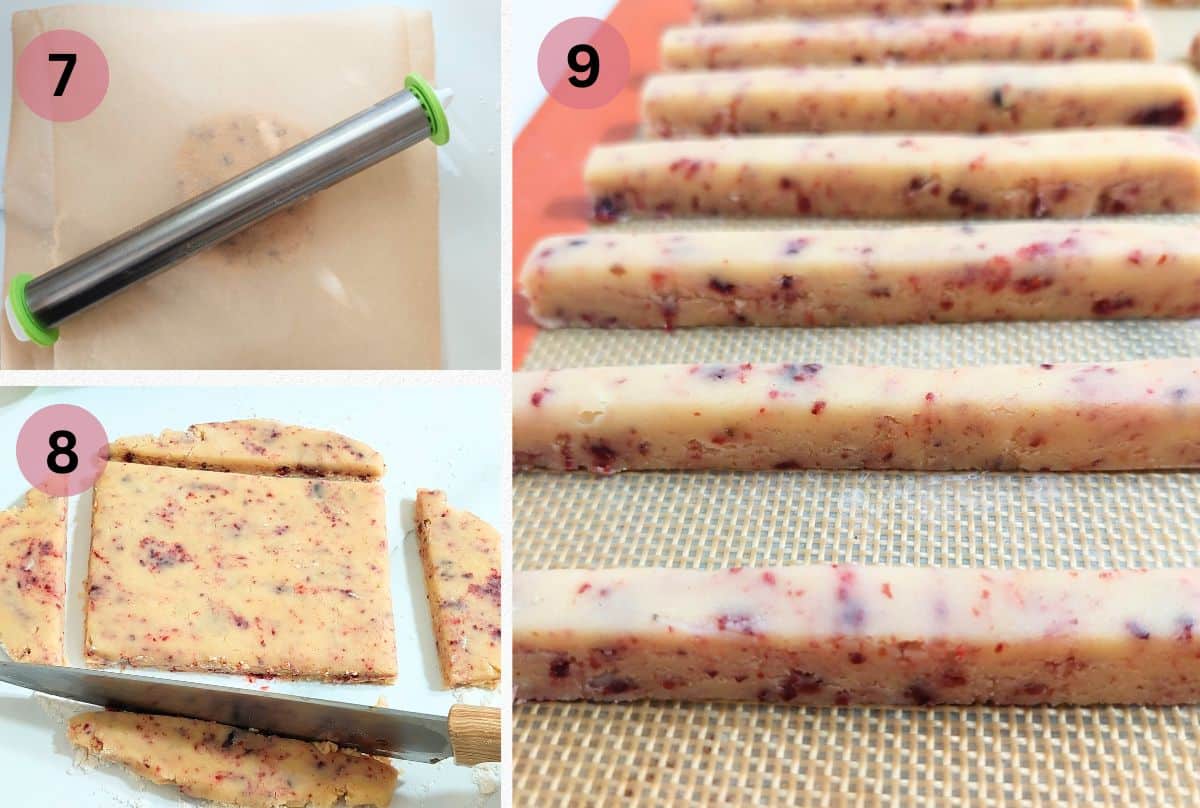
- Place the dough on a lightly floured surface and cover it with a sheet of parchment (baking) paper. This will make it easier to roll out without the need to add extra flour. Roll out the dough to ⅜ inch (1cm) thick.
- Lift off the parchment paper, you're likely to have rolled the dough into a circle. Cut off the uneven rounded edges to form a square shape.
- Slice the square into sticks. I shaped the cookie sticks to be ⅜ inch (1 cm) wide and 4 inches (10 cm) in length.
- Collect all the remaining dough cut-offs and continue the process until you've used up all of the dough.
- Arrange the dough sticks on a baking sheet lined with parchment paper and refrigerate them again for around 30 minutes. Alternatively, if you have freezer space, you can speed things up and chill them for around 15 minutes instead.
Bake directly from the fridge or freezer in a preheated oven of 350 °F / 180 °C (160°C fan forced) for 10 to 12 minutes.
Remove from the oven and leave the cookies on the baking sheet for 10 to 12 minutes before transferring to a cooling rack.
Allow to cool completely before dipping in the melted chocolate.
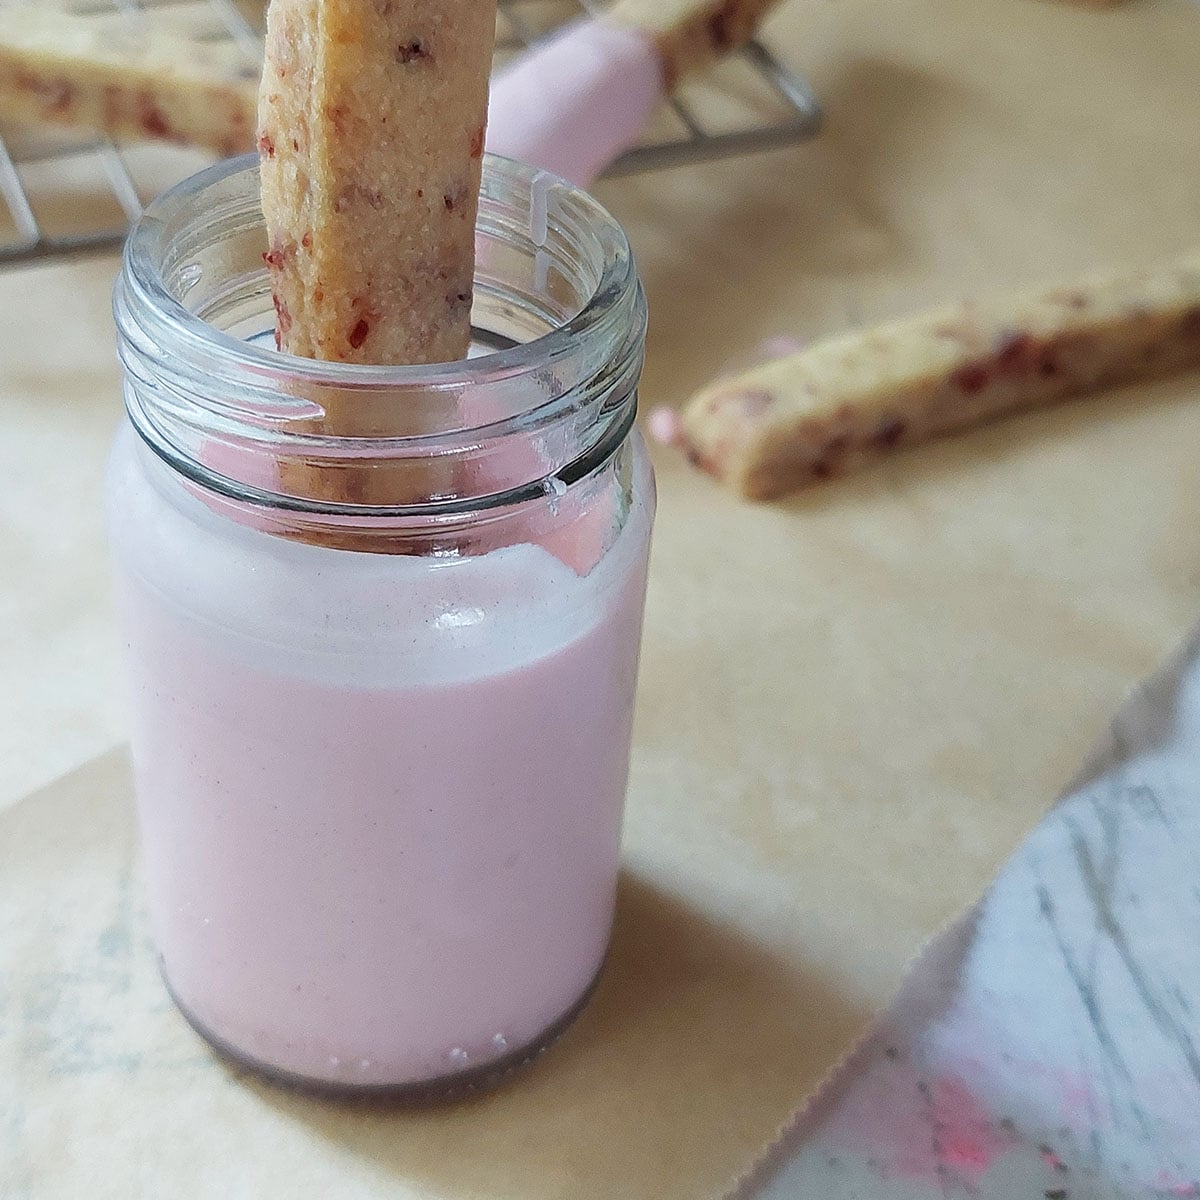
Dip in chocolate
First ensure that your utensils and cutlery are dry before melting the chocolate
Wet cutlery and utensils will cause the melted chocolate to seize (harden) and become unusable
The chocolate for the topping can either be melted in the microwave or on the stovetop
If you are melting the chocolate in the microwave:
- Melt the chocolate pieces in a dry bowl in the microwave. Check on it every minute, stirring with a dry spoon.
- Depending on the wattage of your microwave, it may take between 2 to 4 minutes for the chocolate to melt completely.
If you are melting the chocolate on the stovetop:
- Place the chocolate in a heat-resistant bowl, ensuring it fits snugly over a pot of simmering water. Make sure the water doesn't come into contact with the bottom of the bowl.
- Stir occasionally until the chocolate melts. Once melted, whisk the mixture until it becomes smooth and glossy.
Optional: You can add a tablespoon of coconut oil while melting the chocolate , you'll achieve a super smooth consistency that's just perfect for dipping.
If you're using powdered or gel tint/color, simply mix it into the melted chocolate.
Frequently asked questions and tips
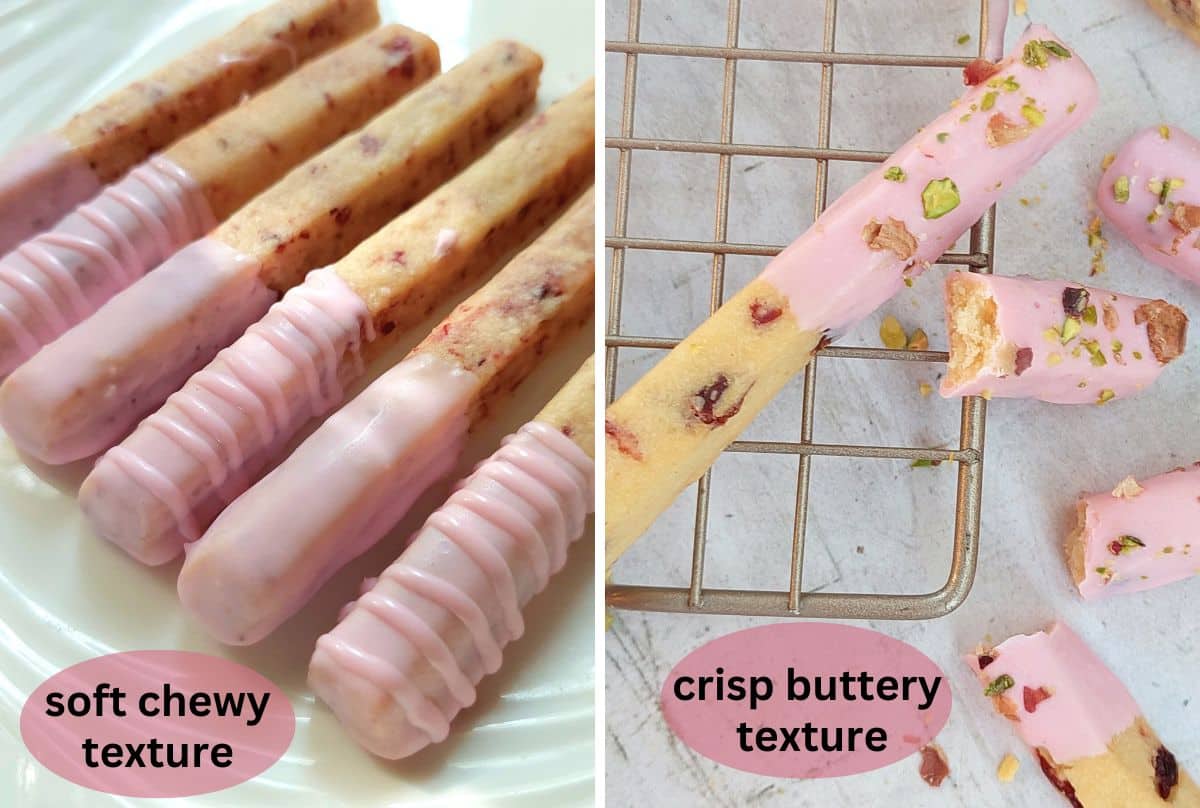
Are these sugar cookie sticks soft and chewy or crisp?
Some people prefer a soft and chewy sugar cookie while others enjoy a crisper one.
So seeing that this is a bit of personal preference I've tested the best of both worlds for you so, you can choose
Believe it or not, the texture of cranberries is what really matters here.
If you chop /mince them up real small with a food processor, make sure to mix them well into the dough so they're spread out nicely and don't clump up in one spot.
To get a soft chewy texture
- When you mince the cranberries, they become chewy, and since they're evenly distributed throughout the cookie, it gives it a nice chewy consistency.
- The great thing about this method is that it makes it easier to cut the cookies into clean slices without big chunks of cranberries getting in the way.
- If you chop /mince them up real small with a food processor, make sure to mix them well into the dough so they're spread out nicely and don't clump up in one spot.
To get a crisp and buttery texture
- But if you prefer to just chop the cranberries with a knife, you'll end up with cookies that have little bits of cranberries here and there. That way, you get a mix of a crispy, buttery cookie with bursts of chewy cranberries in every bite.
- So, Soft and all chewy or crisp, buttery and a bit of chew - both equally delicious, the choice is yours 🙂
Take a look at these pictures below, and you'll notice a noticeable contrast in both texture and color.
How to tint / color white chocolate
- If you choose to color the melted white chocolate, I suggest using oil-based or powdered food coloring.
- Remember to avoid adding any liquid, like water based flavoring extracts or coloring to your melted chocolate. This will have the same effect on the chocolate as adding water or moisture.
Add vibrance without tinting
- If you happen to be without oil-based or powdered food coloring but still want a touch of vibrant color, here are some alternatives to consider.
- After dipping the baked cookies in the melted white chocolate, you can sprinkle them with chopped nuts or crushed pistachios.
- Another option is to sprinkle them with colorful sprinkles, which adds a fun look.
- Make sure to try out either of the above suggestions before the chocolate completely dries. This way, the sprinkles or chopped nuts will stick to it perfectly.
- Enhance with a pretty design: Dip the cookies in white chocolate, allow to dry,and then drizzle a zigzag pattern over the dried chocolate.
- You can easily achieve this by using a spoon or a piping bag to create the chocolate pattern.
Jump to Recipe
White Chocolate Cranberry Cookie Sticks - Egg Free
For the dough:
- 2 cups All purpose (same as plain flour -UK OR cake flour)
- 1 cup powdered sugar (same as confectioners or icing sugar) see note 1
- ¼ teaspoon salt
- ⅔ cup butter at room temperature see note 2
- ½ cup chopped dried cranberries see note 3
- 1 teaspoon vanilla extract
- 2 Tablespoons lukewarm milk
For the white chocolate dipping:
- 5-6 ounces white melting or baking chocolate.
- ¼ teaspoon coconut oil (optional)
- Tint / color (optional)
Make the dough
- Dry ingredients: In a large bowl combine the flour, powdered sugar, salt and butter
- Add in the chopped dried cranberries and mix with a fork until well distributed throughout the dry ingredients.
- Wet ingredients: In a separate small bowl mix together the lukewarm milk and vanilla extract.
- Add the milk mixture (wet ingredients) to the bowl with the dry ingredients.
- Start by using a fork to mix until the dough becomes crumbly. Then, switch to your hands and continue gathering the dough.
- It might seem like the dough won't stick together initially, but continue to gather and press together all the ingredients for a few minutes.
- As it absorbs the milk mixture it will form a dough. Avoid the temptation to add extra milk, as this will result in a dough that is excessively soft, causing the cookies to spread during baking.
Chill the dough
- Once you have formed the dough, place it in the fridge for 10 - 15 minutes. Once chilled, the dough will be much easier to work with and shape.
Roll out and cut the dough into sticks
- Place the dough on a lightly floured surface and cover it with a sheet of parchment (baking) paper. This will make it easier to roll out without the need to add extra flour. Roll out the dough to ⅜ inch (1cm) thick.
- Lift off the parchment paper, you're likely to have rolled the dough into a circle. Cut off the uneven rounded edges to form a square shape.
- Slice the square into sticks. I shaped the cookie sticks to be ⅜ inch (1 cm) wide and 4 inches (10 cm) in length.
- Collect all the remaining dough cut-offs and continue the process until you've used up all of the dough
Chill the cut out cookie dough sticks
- Arrange the dough sticks on a baking sheet lined with parchment paper and refrigerate them again for around 30 minutes. Alternatively, if you have freezer space, you can speed things up and chill them for around 15 minutes instead.
Bake and cool
- Bake directly from the fridge or freezer in a preheated oven of 350 °F / 180 °C (160°C fan forced) for 10 to 15 minutes.
- Remove from the oven and leave the cookies on the baking sheet for 10 minutes before transferring to a cooling rack.
- Allow to cool completely before dipping in the melted chocolate.
Dip in melted chocolate
- First ensure that your utensils and cutlery are dry before melting the chocolate
- Wet cutlery and utensils will cause the melted chocolate to seize (harden) and become unusable
- The chocolate for the topping can either be melted in the microwave or on the stovetop:
- If you are melting the chocolate in the microwave: Melt the chocolate pieces in a dry bowl in the microwave. Check on it every minute, stirring with a dry spoon. Depending on the wattage of your microwave, it may take between 2 to 4 minutes for the chocolate to melt completely.
- If you are melting the chocolate on the stovetop: Place the chocolate in a heat-resistant bowl, ensuring it fits snugly over a pot of simmering water. Make sure the water doesn't come into contact with the bottom of the bowl. Stir occasionally until the chocolate melts. Once melted, whisk the mixture until it becomes smooth and glossy.
- Optional: You can add a tablespoon of coconut oil while melting the chocolate, you'll achieve a super smooth consistency that's just perfect for dipping.
- If you're using powdered or gel tint/color, simply mix it into the melted chocolate.
- Remember to avoid adding any liquid, like water based flavoring extracts or coloring to your melted chocolate. This will have the same effect on the chocolate as adding water or moisture.
- Try to find a cup for the melted chocolate that is not too wide. This way, you can dip the cookie sticks easily without needing a lot of chocolate. A shot glass or tall narrow cup works perfectly.
- Dip each cookie in the melted chocolate and set on parchment paper to dry.
Storage:
- Store at room temperature in an airtight container for up to 5 days.
- Powdered sugar contains a small amount of cornstarch which cuts down on the chill time while also making the dough easier to handle and of course spread less.
- Plus the powdery consistency of confectioners sugar keeps the cookies soft and tender.
- The correct temperature of the butter will ensure the perfect textured sugar cookies that do not spread when baking.
- The temperature of the butter used in the recipe is very important. Ensure you use proper room temperature butter, which should still be cool to the touch at about 65°F (18°C).
- If it’s too cold, it cannot blend easily into the flour and if it’s melty in the slightest it will be very difficult to handle the soft dough.
- So seeing that this is a bit of personal preference I've tested the best of both worlds for you so, you can choose.
- Believe it or not, the texture of cranberries is what really matters here.
- The post above has some really helpful info on how to achieve the perfect texture for your baked cookies, whether you prefer them chewy or crispy. I recommend reading the Frequently asked questions section to make sure you get the desired outcome you're looking for.
Want even more delicious recipes? Subscribe free to receive new post notifications emailed to you. Or follow along on Facebook, Pinterest, and Instagram. If you love sharing recipes please come and join my All about cooking and baking Facebook group or Subscribe to my YouTube channel


Leave a Reply