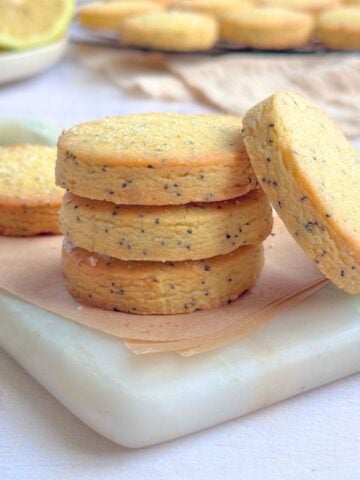
My French Butter cookies recipe creates crisp, rich, buttery, melt in your mouth deliciousness. These classic cookies are super easy to make with just 5 basic ingredients!
French Butter cookies or Sable as they are known in French are probably the most loved cookies in France.
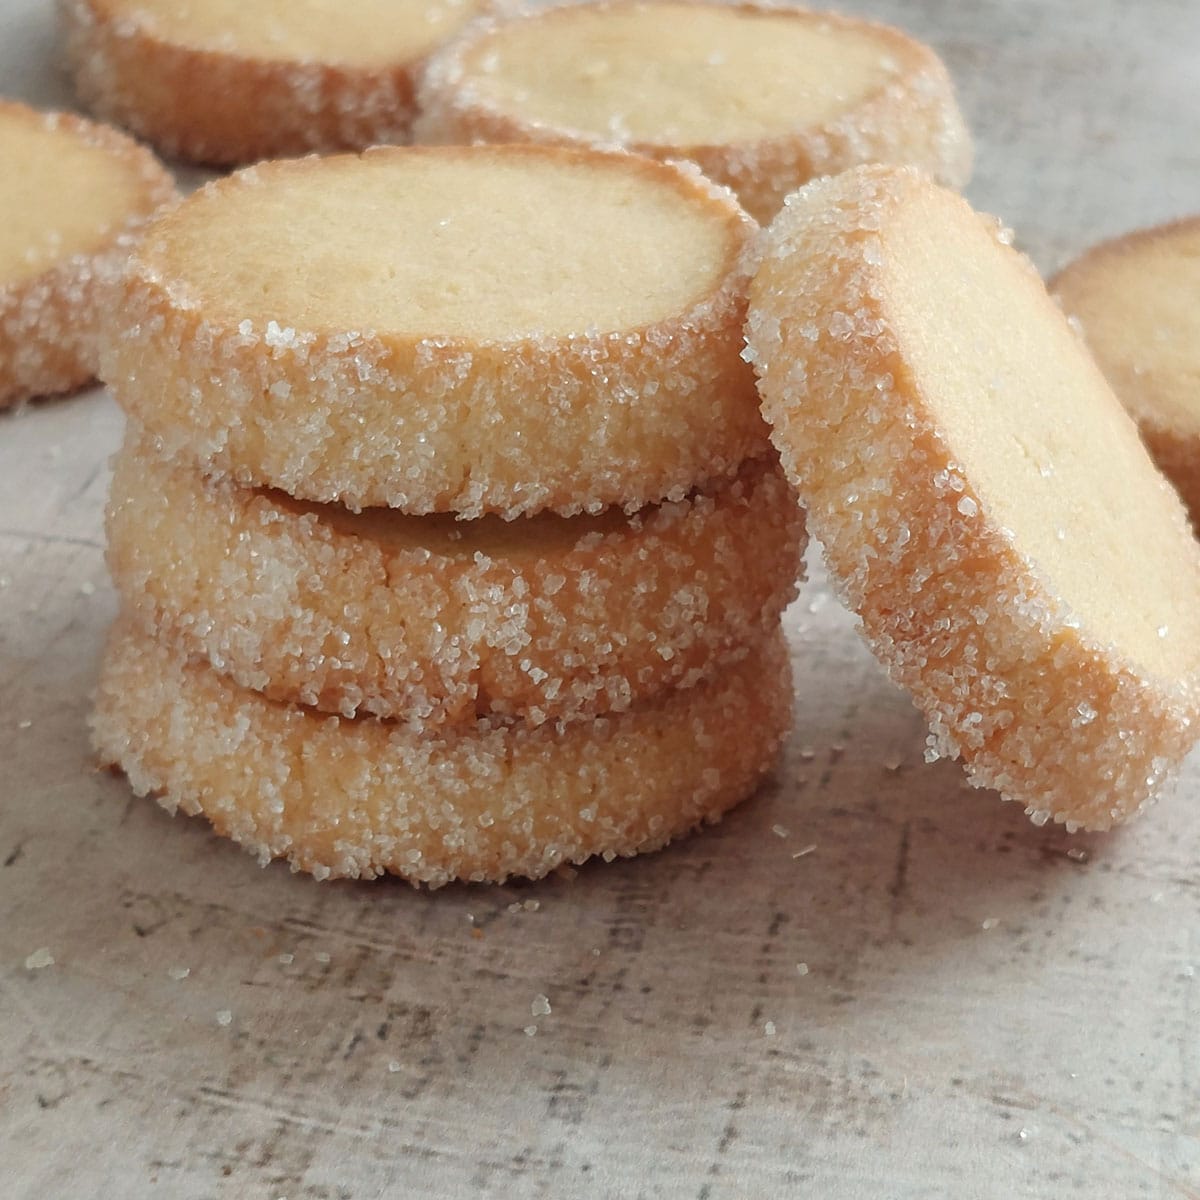
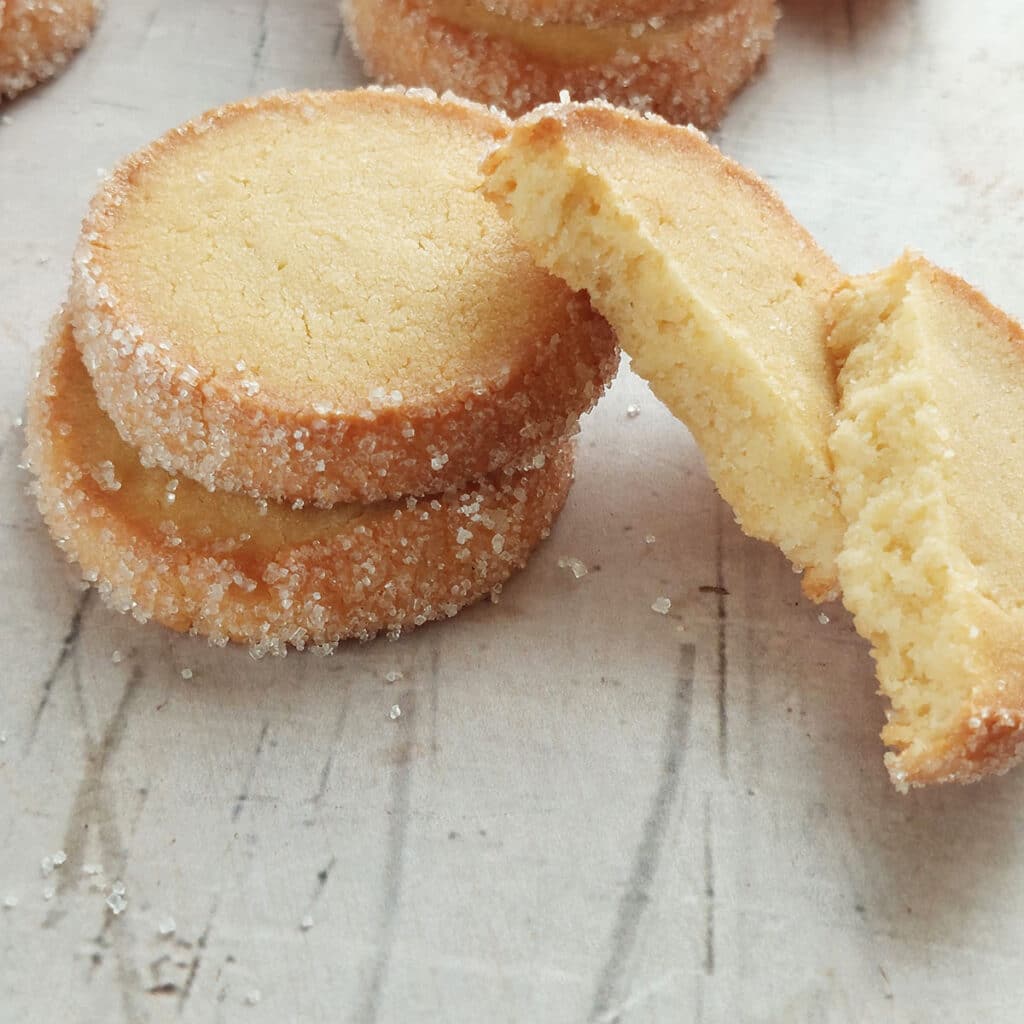
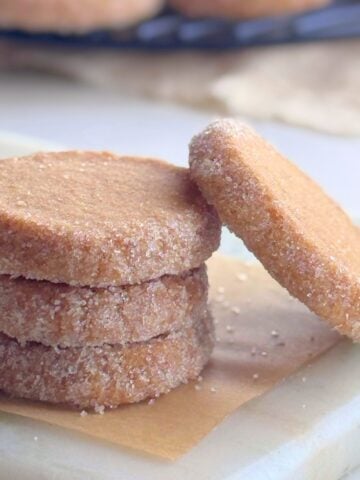
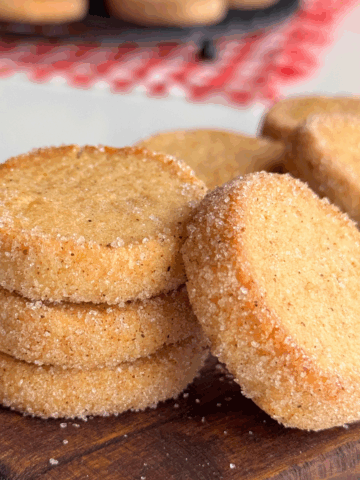
Deliciously crisp on the outside and buttery and crumbly on the inside. Rolled in sugar and sliced creates a beautiful glittery ring around the baked cookies. They make the ideal gift or perfect for any celebration.
As with my Danish butter cookies, Italian Butter cookies, Strawberry butter cookies and 3 ingredient butter cookies, these are incredibly easy to make.
The dough is super easy to be made in advance, ready for you to simply slice and bake.
Ingredients for French Butter Cookies
You need a few staple ingredients to make French Butter cookies. With so little ingredients, you want to make sure you’re using the right ones, and the best quality ones.
Scroll down to the end of the page for the printable recipe card with all measurements and complete instructions
- Butter: Use what you have, either salted or unsalted. If you are using unsalted butter, then add a pinch of salt to your flour. Salted butter will not require adding salt to the recipe. Make sure that you are using room temperature butter.
- Powdered sugar: Also known as confectioners sugar or icing sugar, it mixes easily with the butter to form a smooth creamy consistency.
- Egg yolk: Just one egg yolk is needed to help bind the dough together. It also contributes to the flavor and texture of the cookies. Its best to let the egg yolk come to room temperature before mixing in.
- Vanilla extract
- Flour: Use either cake flour, all purpose or plain flour. Do not use self rising flour. Self raising flour is not recommended as it changes the flavor and texture, making it dense instead of crisp and light.
How to make French butter cookies
This is just the overview so you can see the process. When you are baking, you’ll want to use the full recipe at the bottom of the page.
All you need to mix the dough is a bowl and spatula. That is why its best if your butter is softened to room temperature. It makes it much easier to work with when combining with a spatula.
- Make the dough
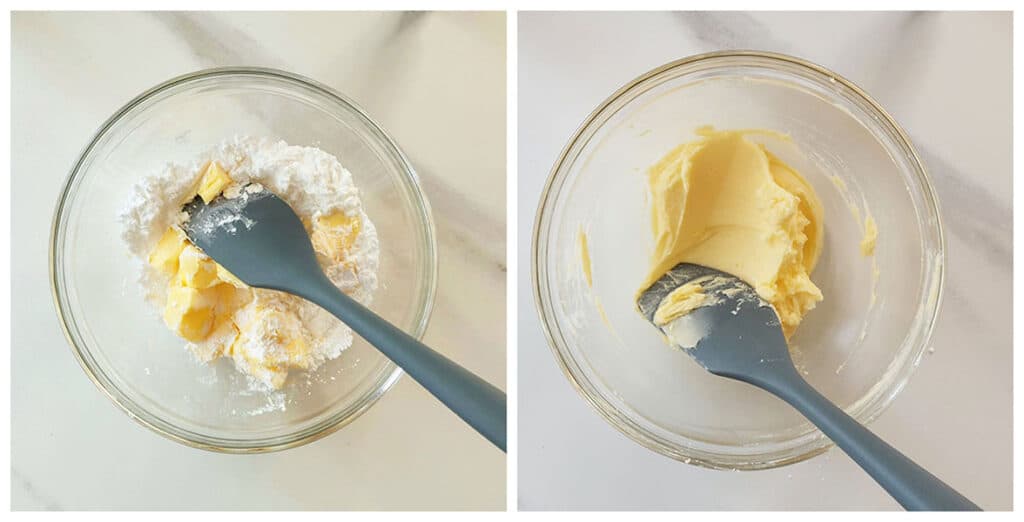
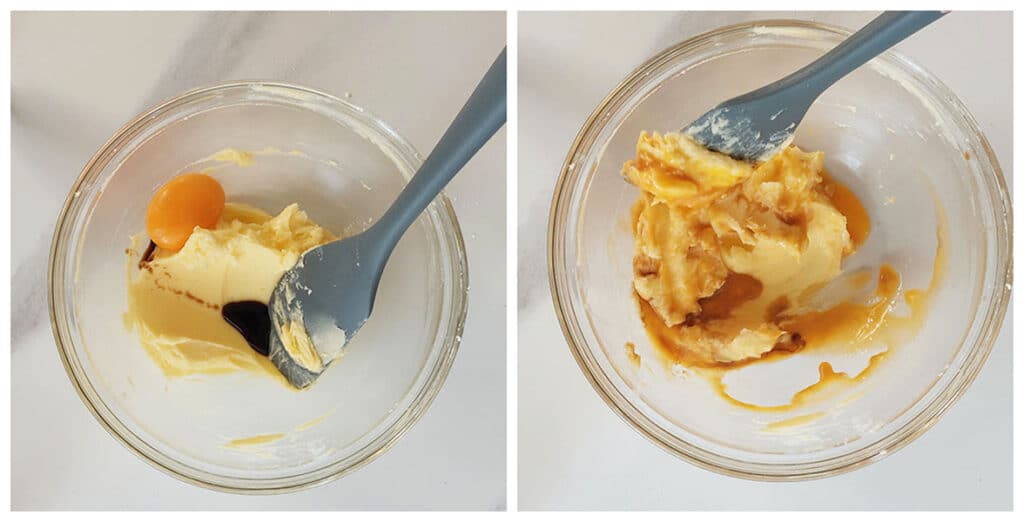
Cream the butter and sugar: Use a spatula to mix the butter and powdered sugar until it turns pale in color and light in texture.
Add the egg yolk and vanilla extract: Mix in until combined.
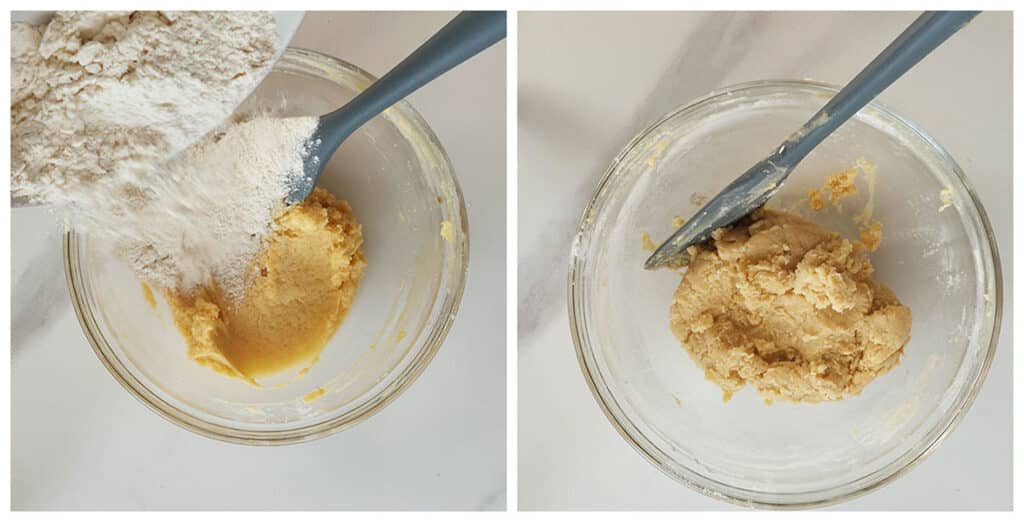
Sift in the flour: Add the sifted flour and mix to form a soft dough.
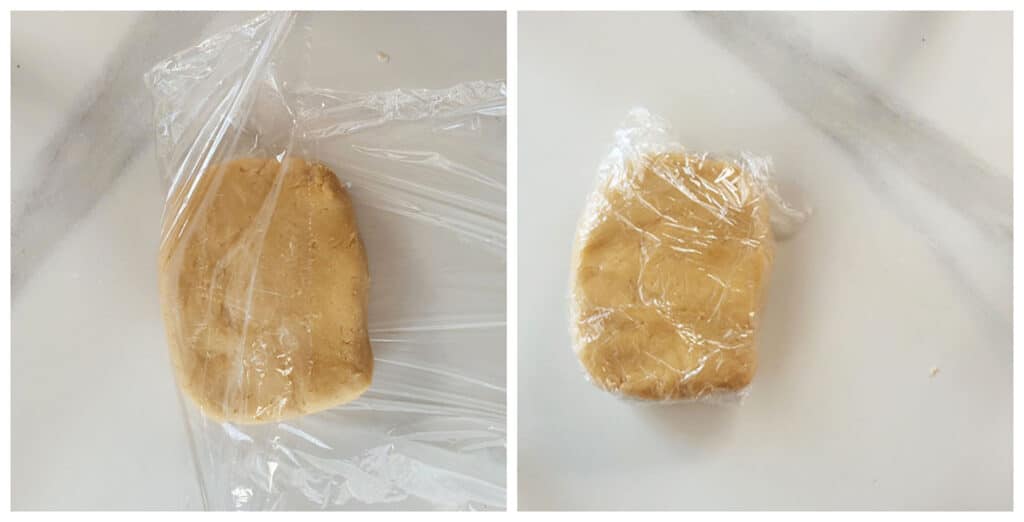
- Refrigerate the dough
Wrap the dough in plastic wrap and refrigerate for 20 minutes
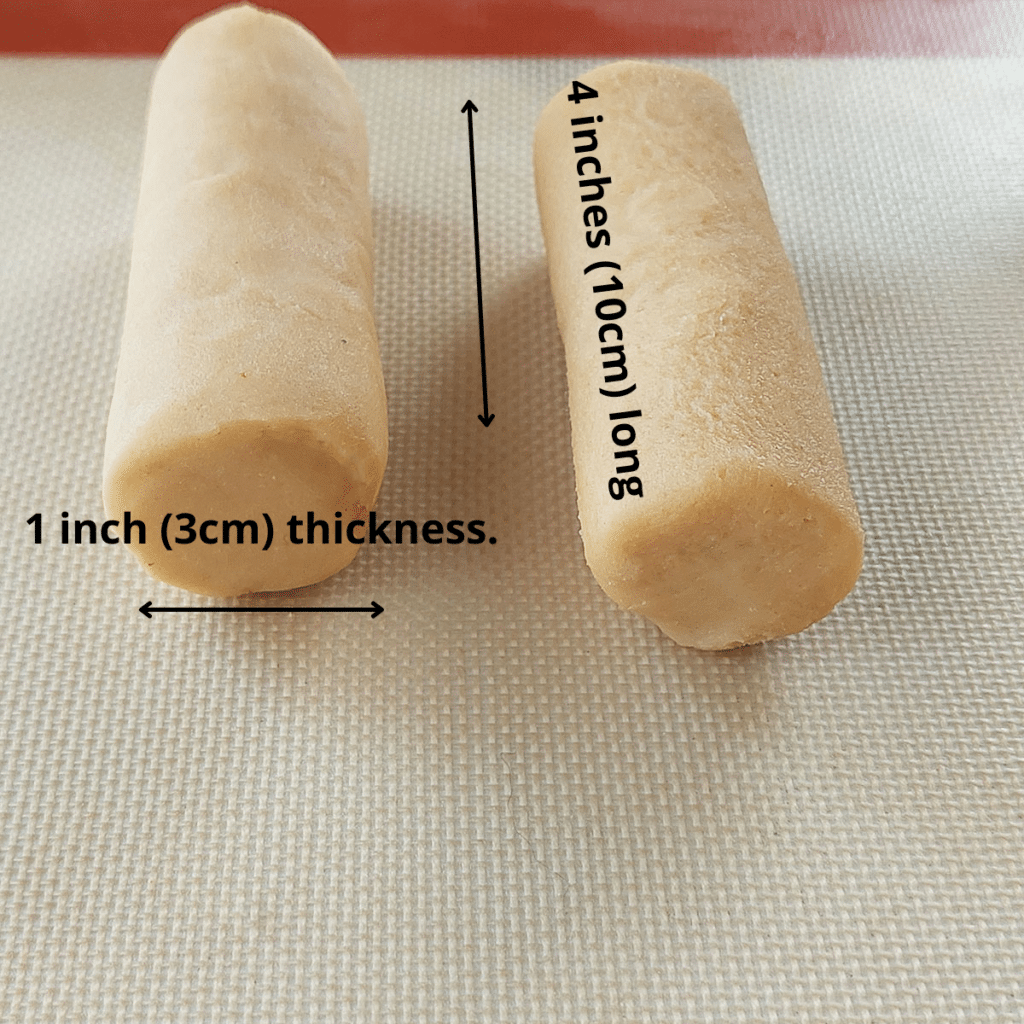
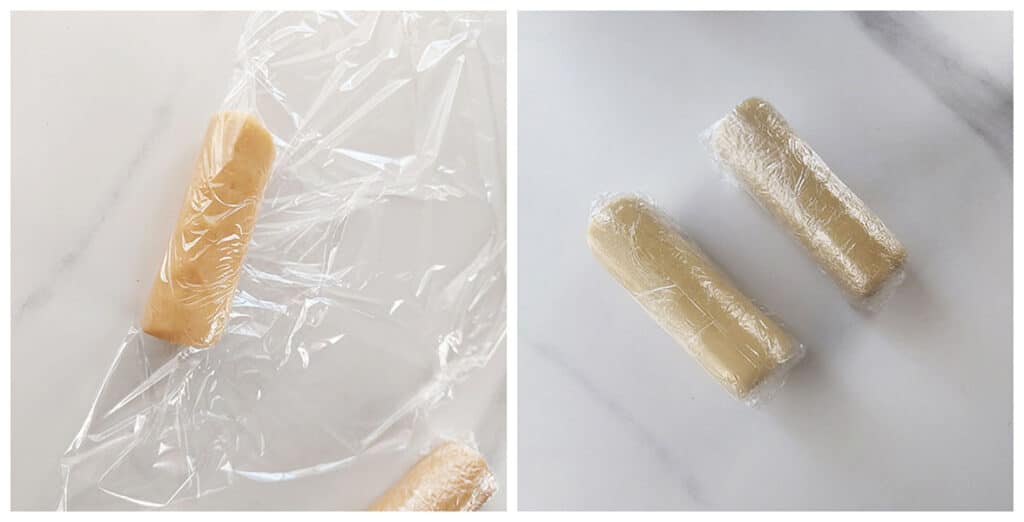
- Divide and roll the dough
Remove the dough from the refrigerator and divide it in 2 pieces
Roll each piece into a log shape of approximately 4 inches (10cm) in length and 1 inch (3cm) in thickness (diameter)
- Freeze the shaped dough
Wrap the log shapes separately in plastic wrap and freeze for 45 minutes.
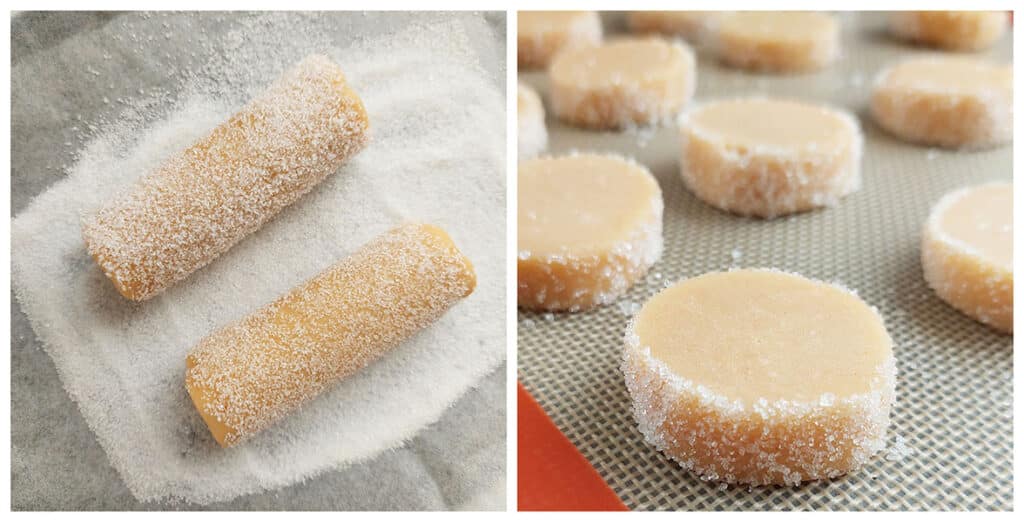
- Roll in sugar, slice and bake
Remove from the freezer and unwrap the shaped dough
Roll each of the log shaped dough in sugar, coating them evenly.
Cut each log into slices that are ⅜ inch (1 cm) thick, and then arrange them on a baking sheet.
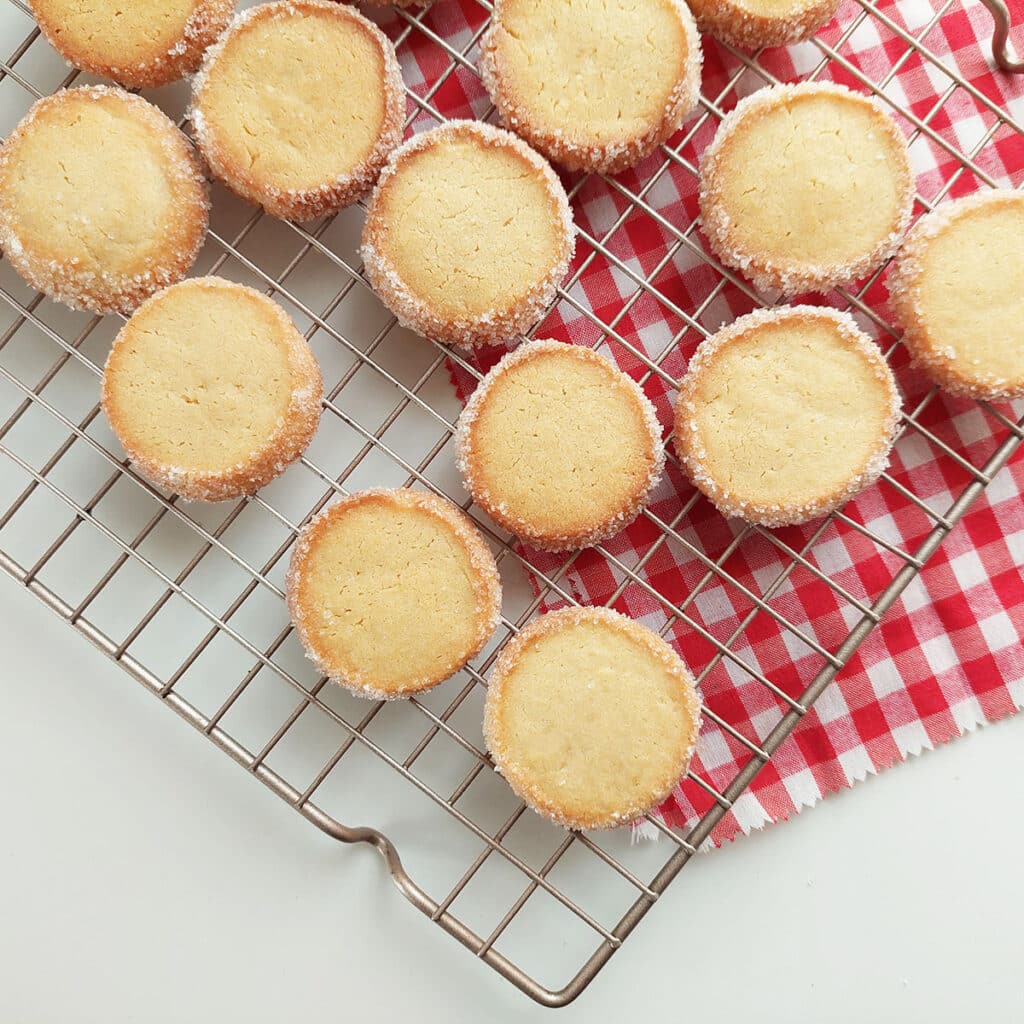
Bake for 15 to 18 minutes until golden.
Remove the tray from the oven but leave the cookies on the baking tray for 5 minutes. The baked cookies will be soft when you take it out of the oven but crisp as they cool.
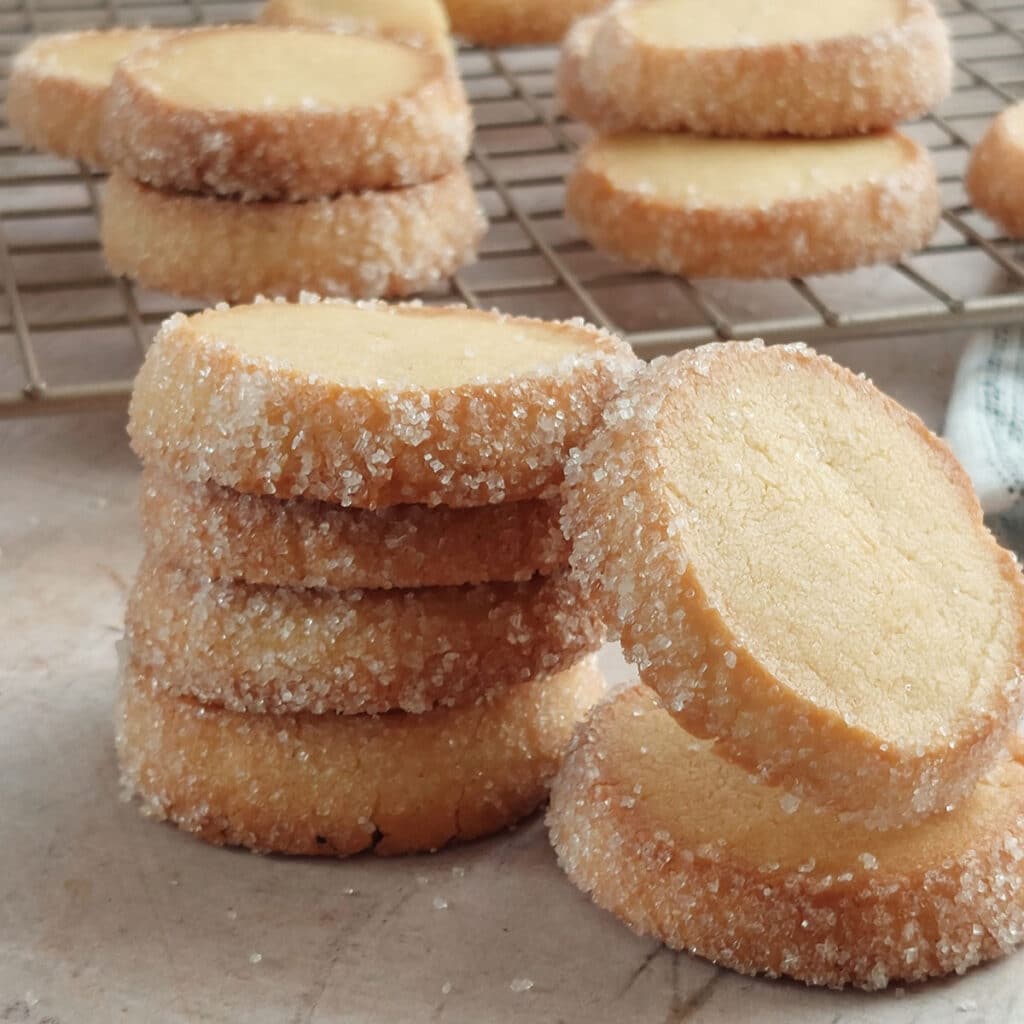
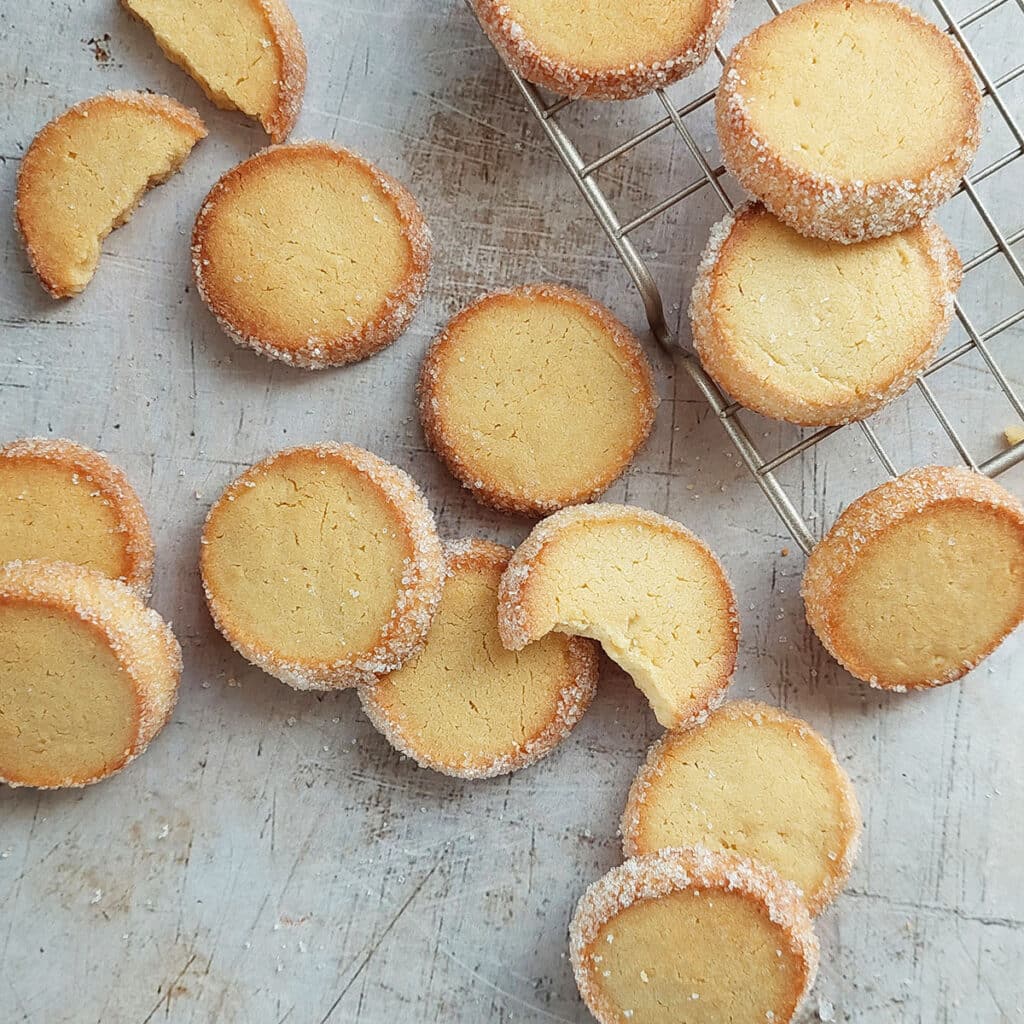
After 5 minutes on the baking tray, the cookies will be firm and crisp enough to transfer to a cooling rack.
Want perfectly round slices like these? See how to keep cookie dough logs perfectly round here: How to Keep Cookie Dough Logs Round (No Flat Sides)
Once completely cool store the cookies in an airtight jar.
Frequently asked questions
The cookie dough can be prepared up to 2 months in advance! Make the dough, refrigerate for 20 minutes then shape into a log (according to the recipe size suggestions).
Wrap tightly in plastic wrap and freeze for up to 2 months.
When ready to use, remove from the freezer and as soon as you are able to, slice the dough into disks while still cold.
Don't allow it to get too warm, as the dough will be soft making it difficult to handle and slice.
Yes, sure, simply roll the dough between 2 sheets of parchment paper. Then refrigerate for 45 minutes before cutting into shapes with a cookie cutter. Bake for 12 to 15 minutes if cut thinner than 1 inch (3cm) thickness.
Tips for the perfect French Butter Cookies
Ensure that your butter is softened to room temperature. Get it out of the fridge at least 1 hour before baking. All the ingredients are incorporated much easier and quicker in soft butter. This also prevents overworking the dough, which produces dense instead of crispy cookies.
Refrigerate the dough if it becomes difficult to handle: The dough has a high ratio of butter and can get difficult to work with if it gets too warm. If the dough gets too warm, simply put it back into the fridge or freezer for a few minutes. This helps to cool the butter, making the dough much easier to work with.
Do not skip the steps of chilling the dough. First after mixing (refrigerated for 20 minutes) and second after dividing and shaping into a log (freezing for 45 minutes) These are important steps. The first refrigeration firms the dough, making it easy to roll into a log. The second time (freezing) cools and firms the log shapes making it easy to slice into disks.
Adjust the baking time if cutting the cookies thinner or thicker than specified in the recipe
Do not overbake the cookies. They will be soft after baking straight out of the oven, but will crisp and get firm as it cools.
Enjoy 🙂
French Butter Cookies
Click above to switch between cups and grams
- ½ cup butter, softened to room temperature (see note 1)
- ½ cup powdered sugar (sift the powdered sugar before measuring)
- 1 egg yolk (at room temperature)
- ½ teaspoon vanilla extract
- 1 cup plus 2 Tablespoons all-purpose or cake flour (see note 2)
- ¼ cup granulated sugar (for coating the shaped dough, before baking)
Make the dough
- Cream the butter and powdered sugar: Use a spatula to mix the butter and sugar until it turns pale in color and light in texture.
- Add the egg yolk and vanilla extract: Mix in until combined.
- Sift in the flour: Add the sifted flour and mix to form a soft dough.
Refrigerate the dough
- Wrap the dough in plastic wrap and refrigerate for 20 minutes. see note 3
Divide and roll the dough
- Remove the dough from the refrigerator and divide it in 2 pieces
- Roll each piece into a log shape of approximately 4 inches (10cm) in length and 1 inch (3cm) in diameter. See note 4
Freeze the log-shaped dough
- Wrap the log shapes separately in plastic wrap and freeze for 45 minutes.
Roll in sugar, slice and bake.
- Preheat the oven to 356° F / 180° C (160° C fan)
- Line a baking sheet with parchment paper or a baking silicone mat
- Remove from the freezer and unwrap the shaped dough
- Sprinkle ¼ cup of granulated sugar onto a tray or large plate.
- Roll each of the log-shaped dough in the sugar, coating them evenly.
- Cut each log into slices that are ⅜ inch (1 cm) thick, and then arrange them on a baking sheet.
- Bake for 15 to 18 minutes until golden.
Cool and store
- Remove from the oven but leave the cookies on the baking sheet for 5 minutes. The baked cookies will be soft when you take it out of the oven but crisp as they cool.
- After 5 minutes on the baking tray, the cookies will be firm and crisp enough to transfer to a cooling rack.
- Once completely cool, store the cookies in an airtight jar for up to 5 days.
- Butter: Use what you have, either salted or unsalted. If you are using unsalted butter, then add a pinch of salt to your flour. Salted butter will not require adding salt to the recipe. Get the butter out of the fridge at least 1 hour before baking. All the ingredients are incorporated much easier and quicker in soft butter. This also prevents overworking the dough, which produces dense instead of crispy cookies.
- Flour: Use either cake flour, all purpose or plain flour. Do not use self-rising flour. Self-rising flour is not recommended as it changes the flavor and texture, making it dense instead of crisp and light.
- Do not skip the steps of chilling the dough. First after mixing (refrigerated for 20 minutes) and second after dividing and shaping into a cylinder (freezing for 45 minutes) These are important steps. The first refrigeration firms the dough, making it easy to roll into a cylinder. The second time (freezing) cools and firms the cylinder shapes making it easy to slice into disks.
- Refrigerate the dough if it becomes difficult to handle: The dough has a high ratio of butter and can get difficult to work with if it gets too warm. If the dough gets too warm, simply put it back into the fridge or freezer for a few minutes. This helps to cool the butter, making the dough much easier to work with.
- For perfectly round slices, see how to keep cookie dough logs perfectly round: keep cookie dough logs perfectly round
Want even more delicious recipes? Subscribe free to receive new post notifications emailed to you. Or follow along on Facebook, Pinterest, and Instagram. If you love sharing recipes please come and join my All about cooking and baking Facebook group or Subscribe to my YouTube channel

Diana Buck says
I do not see an oven temp for baking these cookies
The Gardening Foodie says
Hi Diana, the baking temperature (356° F / 180° C (160° C fan) and time ( 15 to 18 minutes ) is included in the recipe card at the end of the post.(scroll to the bottom of the post) The post itself contains information like ingredients and substitutes, frequently asked questions and a visual of the recipe steps.
I hope this helps 🙂 Feel free to ask me anything else you might be wondering about - I'm happy to help 🙂
Caroline Campbell says
180 degrees Celsius, or 356 degrees Fahrenheit. It is at the beginning of the recipe.
jj says
do I have to use a spatula or can I use a hand mixer which I find better
The Gardening Foodie says
Hi jj, Certainly, it is possible to use a hand mixer to combine the butter and sugar, egg yolk, and vanilla extract. However, to avoid ending up with dense cookies, I recommend using a spatula to mix in the flour instead of using the hand mixer.
I hope this helps 🙂
Happy baking
Diane says
Delicious cookies. One small discrepancy - the 2x version of the recipe still only calls for dividing the dough in half,(same as 1x recipe) and making 2 cylinder, even though there is double the dough, and we should make 4 cylinders. I didn’t read the 1x recipe through, and chose to do the 2x recipe, so I didn’t realize until I made 2 cylinders that were huge 😂. So I just cut them at 1 cm and made bigger cookies.
The Gardening Foodie says
Hi Diane, Thanks for trying out the recipe and sharing your experience. It sounds like you ended up with some gigantic cylinders instead of four smaller ones, but hey, look at it this way, bigger cookies = more deliciousness😁. But I am glad they turned out well for you 🙂
I apologize for any confusion caused by the double recipe issue.However the recipe card does not account for adjusting the method when doubling the ingredients. I'm really sorry if this caused any inconvenience or problems during your baking experience.
Kara P. says
These were so good! One thing I love about these is that there's little waste. Just rolled up and sliced. I made these for an open house I was hosting since I'm a realtor, the cookies were the perfect touch.
Kim Corbley says
Have you ever made these gluten-free? If so what flour would you recommend?
The Gardening Foodie says
Hi Kim
I'm sorry, but I haven't made these gluten-free. However, when I bake gluten-free cookies, I find that Bob's Red Mill 1-to-1 Gluten-Free Baking Flour works really well.
It's a great alternative to regular all-purpose or cake flour for cookies.
You can just swap it in, using the same amount as you would regular flour in this recipe.
I hope this helps
Happy baking 😊
Dawn says
These came out perfectly ♥️
thanks for sharing
The Gardening Foodie says
Hi Dawn, You're very welcome, I'm delighted to hear that they turned out perfectly 😊
cindy says
I made this recipe the first time and the cookies came out awesome. I made this recipe a second time but my cookies came out flat instead of 3/8 inches high. I also found the dough difficult to work with when I pulled it out of the refrigerator to divide. What did I do wrong?
The Gardening Foodie says
Hi Cindy,
It's great to hear that your first attempt was successful. If your cookies turned out flat the second time and the dough was difficult to work with, a few factors could be at play. Here are some common reasons for flat cookies:
Ingredient Measurement: Double-check your ingredient measurements to ensure accuracy. Small variations can have a significant impact on the texture of the dough and the final outcome of the cookies.
Butter Temperature: Make sure your butter is at the right temperature. If it's too soft or melted, it can cause the cookies to spread too much. The ideal temperature is usually softened but still cool to the touch.
Chilled Dough: Overly chilled dough can be hard to work with. Allow the dough to soften slightly at room temperature before trying to divide or shape it. If it's too cold, it might resist forming into the desired shape.
Flour Type: Ensure you are using the correct type of flour specified in the recipe. Using a different flour or not measuring it accurately can affect the texture of the cookies.
Mixing Time: Overmixing the dough can lead to flat cookies. Mix the ingredients just until they are combined to avoid incorporating too much air.
Baking Temperature and Time: Make sure your oven is preheated to the correct temperature. Also, check the baking time; overbaking can cause cookies to spread excessively.
Parchment Paper: If you used parchment paper, make sure it's not too greasy from previous batches. Grease can cause the cookies to spread more than desired.
I hope this helps
Happy baking 😊
Cindy says
Thank you for the reply and troubleshooting ideas. I made this recipe again but I sifted my confectionary sugar after I measured out the half cup instead of measuring out the half cup after sifting. The ratio was perfect and the cookies were delicious. The cookies were the discussion at the dessert table and I have forwarded the recipe to many with all of my helpful hints.
The Gardening Foodie says
Hello Cindy, that's wonderful news, and you're truly welcome! 😊
I'm thrilled that the tips were useful, and your cookies turned out great. It's so satisfying to know that everyone enjoyed them and hope that they all find the same joy in baking these cookies as you did 😊
Leona says
Once baked can they be frozen?
The Gardening Foodie says
Hi Leona, Yes, you can freeze the baked cookies for about 1 month. After this time, the cookies may start to develop freezer burn or lose some of their texture and flavor.
After baking and allowing the cookies to cool completely, you can store them in an airtight container, separating layers with parchment paper to prevent them from sticking together.
When you're ready to enjoy the cookies, simply take them out of the freezer and let them come to room temperature or warm them up in the oven for a few minutes.
Happy baking 😊
rosalie comizio says
the sugar in the photos looks more grainy than regular white sugar. do you use a different type? thank you. they look so pretty.
The Gardening Foodie says
Hi Rosalie, thank you 😊
I roll the edges of the cookies in white granulated sugar. Regular white granulated sugar works perfectly, and larger-crystal white sugar also works well.
Melisa Hansen-Giles says
Using raw sugar would be awesome! The light brown sugar is still fine.
Kate says
Hi! Have you tried adding things like nuts or chocolate chunks to these?
The Gardening Foodie says
Hi Kate, I have a version of this recipe (Date Almond Butter Cookies) without eggs, yet it retains the crisp texture and delicious flavor.
I've included chopped almonds and dates for an extra twist. Feel free to swap in different nuts like pecans, walnuts, pistachios, or even chocolate chunks instead of dates. Give it a try and let me know how you find it!
Happy Baking 😊
Kellie says
I made a test batch for Christmas giving, and I have two items to mention:
1. It would be awesome if your recipe had weights rather than measure. I did a test for measuring 1/2 cup powdered sugar out of the bag, 1/2 cup sifted measure, and 1/2 cup measure sifted. While your recipe clearly states to measure powdered sugar, it'd be helpful to add that weight. The weight/volume differences were notable.
2. My cookie tops cracked. Any ideas? My oven might not have been hot enough, so I'm thinking that was it.
Otherwise, a wonderful recipe.
The Gardening Foodie says
Hi Kellie,
I appreciate you trying out my recipe, and I'm happy to hear that you liked the taste of these cookies.
For measurements, there's a button located right above the list of ingredients. You can use it to switch between US customary measures and Metric weights, which should make it easier for you to get the accurate weights needed for the cookies.
Cracked tops: Try not to use too much flour when rolling out the dough into logs. using excessive flour can contribute to cracking. When you use too much flour, it can make the dough drier and lead to an imbalance in the recipe. The excess flour can absorb more moisture from the dough, causing it to crack during baking.
To prevent this issue, I recommend using a minimal amount of flour when rolling out the dough into a log. You can lightly dust your work surface with flour or use parchment paper (I use a silicone mat without flour) to roll out the dough without sticking. Additionally, if you find the dough is too sticky, you can refrigerate it for a short period to make it easier to work with, rather than adding more flour.
Over Mixing the Dough: Overmixing can lead to the development of too much gluten in the dough. This excess gluten can result in a tough or dry texture, leading to cracks in the cookies. Mix the ingredients until just combined to avoid overmixing.
Oven Timing: Baking the cookies for too long can cause them to dry out and crack. Keep a close eye on the baking time and remove the cookies from the oven as soon as they are set but still soft. Remove from the oven, but leave the cookies on the baking sheet for 10 minutes before cooling on a cooling rack.
I hope this information is helpful. Feel free to reach out if you have any more questions about the recipe. I'll be happy to help 😊
Happy baking 😊
Ida says
Made with my 8 year old niece. Very easy to make, only took a few minutes. The first batch, I cut too thin and they were over cooked. The 2nd batch was much better. They were thicker and I didn’t cook as long. They weren’t as moist as I was thinking they’d be, but everyone really liked them. My nephew said they “melt in the mouth”! We plan on making the recipe again this weekend. Thanks!
The Gardening Foodie says
Hello Ida,
It sounds like you and your niece had a fun and delicious baking adventure together!🙂
Adjusting the thickness and baking time for the second batch was a great idea, and I'm glad they turned out better and that everyone enjoyed them.
Plus your nephew's comment about them melting in the mouth is the best kind of review 🙂
Berni Stadler says
I’d like to add some food coloring - green and red for Christmas cookies which I think would look beautiful with the white sugar. When do you suggest that I add that in order for the dough not to become overworked?
The Gardening Foodie says
Hello Berni, that sounds fantastic! Adding food coloring to your cookie dough is a brilliant idea for a festive touch ☺️
I suggest incorporating the food coloring just after combining the egg yolk and vanilla extract. Begin with a few drops, mixing until you achieve the desired color.
Follow up with the addition of flour. If you find the color isn't vibrant enough after adding the flour, you can add a little more. Use a toothpick dipped in the coloring and then add it to your dough to ensure you don't add too much. Feel free to gently incorporate the coloring with your hands for approximately a minute to achieve a more uniform distribution.
Keep in mind that gel food coloring is often more concentrated, so start with a small amount (about a toothpick worth) and adjust as needed. If using liquid food coloring, a few drops should do the trick
Happy baking ☺️
Janna says
Will this dough work in a cookie press?
The Gardening Foodie says
Hi Janna, I haven't used this dough with a cookie press before, so I can't be certain about the results. Just so you know, the dough is stiff, so using a cookie press might be a bit tricky.
I hope this helps
Happy baking 🙂
Angie Boes says
Great recipe!! I just finished up my first batch - and they are delicious! I didn't have any powdered sugar on hand so I whipped up a batch of that with my coffee bean grinder and that worked just fine lol. They did bake up quicker than recommended time, I might let them go for a couple more minutes next time for more crunch. Believe me - I will be making more of these. Thank you so very much for such a great recipe, cheers to you, Angie 🙂
The Gardening Foodie says
Thank you so much for trying out the recipe, Angie! I'm so happy to hear that you enjoyed it. Your powdered sugar hack made me smile, sometimes you've got to get creative in the kitchen, right?
And here's to many more delicious batches of cookies! Happy Baking 😊🍪
Jane Ladwig says
Which do you prefer for flour - AP or the cake flour? I have both but don't know what the difference will be in the cookie texture with each. Also, would sanding sugar work for the outside of the cookie? Thanks for your help.
The Gardening Foodie says
Hi Jane, I use cake flour in this recipe because it creates a dough with a texture I prefer, resulting in cookies that turn out just right.
While sanding sugar would work for the coating, I use white granulated sugar for rolling the cookies. Some brands have slightly larger crystals, but both work the same. I hope this helps
Happy baking 😊
Jane Ladwig says
Turned out pretty much perfect. Thank you for your tips.
The Gardening Foodie says
That's great to hear!
You're welcome—I'm glad to help, and it's wonderful to know that the cookies turned out well 😊
Mary Ariail says
These cookies are absolutely wonderful - so flavorful and pretty. Mine did spread out more than the photo (about 1/4" after they were baked) even though I followed the steps in the recipe very closely with a couple of exceptions. I sprinkled some course sugar on top before baking for a little extra sweetness and crunch. I used cake flour instead of regular plain flour - could that have caused them to spread? I cooked them on a silicone mat. I checked them at 12 minutes (not 15-18) and they were done. At any rate, these cookies are elegant and delicious, and I plan to make them again and again.
The Gardening Foodie says
Hello Mary, I'm really happy you enjoyed the cookies. But I'm sorry they spread more than expected - as long as they taste good right?😋
Here are a few tips for next time:
1. Instead of cake flour, try using regular/plain flour next time, as it might help reduce spreading.
2. Consider cutting slightly thicker slices of dough. Thicker dough tends to spread less during baking.
3. Before baking, chill the cookie slices on the baking sheet in the fridge for 15-30 minutes. Then, pop them in the preheated oven. This helps the dough firm up and reduces spreading.
Hope these suggestions help!
Happy baking,😊 and here's to many more delicious batches of cookies.
Adell says
Hola desde Medellín, Colombia🇨🇴👋 cómo estás, ya preparé las galletas 🍪 y me quedaron deliciosas
Gracias
The Gardening Foodie says
¡Hola Adell, espero que estés bien! Yo estoy bien, ¡gracias por preguntar! 😊
Gracias por probar mi receta. Me alegra mucho escuchar que las galletas salieron bien y que también te gustaron 😊
Michelle Lawrence says
how do I 2 or 3x the recipe. thank you. Michelle
The Gardening Foodie says
Hi Michelle,
Here’s the recipe doubled and tripled in cups and grams:
Double:
Butter: 1 cup (226g)
Powdered Sugar: 1 cup (110g), sifted
Egg Yolks: 2
Vanilla: 1 tsp
Flour: 2 ¼ cups (280g), sifted
Granulated Sugar for Coating: ½ cup (100g)
Divide dough into 4 logs, each about 4 inches (10 cm) long and 1 inch (3 cm) in diameter.
Triple:
Butter: 1 ½ cups (339g)
Powdered Sugar: 1 ½ cups (165g), sifted
Egg Yolks: 3
Vanilla: 1 ½ tsp
Flour: 3 cups plus 3 Tablespoons (420g), sifted
Granulated Sugar for Coating: ¾ cup (150g)
Divide dough into 6 logs with the same dimensions.
Bake as directed.
You may need to bake in multiple batches to avoid overcrowding on the baking sheet.
Happy baking 😊
Michelle Lawrence says
Thank you so much.. I mad one batch and realized I needed to double or triple it!! WE love em.
The Gardening Foodie says
You're so welcome 😊 I’m so happy you loved the cookies so much that you're making more! Doubling (or tripling!) sounds like a perfect plan—enjoy every bite 😋
TraceyS says
Delicious! Any reason not to roll the "logs" in sugar BEFORE placing in the freezer? The sugar would not stick consistently once they'd been in the freezer an hour or so. Still super yummy but they were not as pretty as yours and a bit more sugar along the edges would not hurt a thing! 🙂
The Gardening Foodie says
Hi Tracey, Thank you so much for your wonderful comment 😊
You can definitely roll the logs in sugar before freezing, but the reason I suggest rolling them after is that the sugar might not stick as consistently once they’ve been in the freezer for an hour or so.
Freezing can cause condensation, which might make the sugar dissolve or not adhere as evenly.
That said, if you prefer more sugar along the edges (which sounds delicious 😋), rolling them before and after freezing is totally fine. Just keep in mind that the sugar may not stick as well before freezing.
So glad you enjoyed them 😊
Gloria says
Hi - thanks for sharing this recipe. If I want to add a sprinkle of sea salt on the surface of the cookie along with the granulated sugar, should I just mix salt and sugar together and roll the log on them?
The Gardening Foodie says
Hi Gloria,
Yes, That sounds like a great idea.
You can mix a small amount of flaky sea salt with the granulated sugar before rolling the dough logs in the mixture—this will help distribute the salt evenly.
If you prefer just a hint of salt, you can also sprinkle a little on top of the cookies after placing them on the baking sheet. Either way, it’ll add a lovely balance to the buttery sweetness.
Happy baking 😊
Jyyt says
ideally i want to make 1 serving but the 12-18 servings is alright too
if possible, how much should i tweak the ingredients if i only want to make 1 serving?
does this also affect the amount of time i need to keep it refrigerated + bake it?
The Gardening Foodie says
Hi, Scaling down to just one cookie can be tricky since some ingredient amounts would be very small. I haven’t tried this myself, but I wanted to mention that it might be challenging to get the proportions just right.
Jyyt says
Ty! Also may i ask if there is a specific amount or measurement of flour to use? Bc i don't see a labeled measurement for how much flour is needed.
The Gardening Foodie says
Hi, All the measurements are listed at the end of the post in the recipe card, but just in case you missed it — you'll need 1 cup plus 2 tablespoons of all-purpose or cake flour (135g).
Hope that helps — happy baking 🙂
The Gardening Foodie says
Hi Caril, Thanks so much 😊for the recipe I roll the cookies in regular white granulated sugar before baking. Larger-crystal white sugar works just as well, so you can use what you have on hand.
Happy baking 🙂
Stephanie says
I made these today. I added a little almond extract along with the vanilla. These cookies are scrumptious! Thank you for this terrific recipe.
The Gardening Foodie says
You're so welcome, Stephanie and I'm so happy you enjoyed them 😊
That almond extract with the vanilla must’ve made the cookies taste amazing.
Thank you so much for trying my recipe and for your lovely comment 😊
Connie Brock says
I cannot wait to make these beautiful cookies, but I have two questions for you: you mentioned using cake flour – will that make a more delicate crumb and do you recommend it? My other question has to do with the fact that the cookies look like they’ve been rolled in sanding sugar, not granulated sugar. What are your thoughts about that?
Thank you so much for this recipe.
Connie
The Gardening Foodie says
Hi Connie,
Thank you so much for your lovely message, I’m really glad you’re thinking of making these
About the flour: I mention both cake flour and all-purpose (plain) flour because readers often have one or the other at home, and both work well for this cookie. In France, sablé-style cookies are traditionally made with T55 flour, which sits between cake flour and all-purpose. That’s why either option works beautifully here.
For the texture:
All-purpose: closest to true French sablés, crisp all the way through.
Cake flour: still crisp, still snappy, the center feels slightly more tender with a gentle melt as you bite, not soft, not cakey.
Both give a lovely result, just slightly different personalities 😊
For the sugar coating: I use white granulated sugar for rolling the cookies. It gives a light, sparkly finish. A slightly coarser white granulated sugar can look more pronounced, but regular white granulated sugar works just as well.
Hope you enjoy baking them! I’d love to hear how they turn out.
Lisa says
6 ingredients, not 5. I can't get them rolled out correctly but they're so good I can't keep my husband from eating them all even though they're for Mother's Day. 😛
The Gardening Foodie says
Hi Lisa 😊 That’s great to hear! I’m so glad you and your husband enjoyed the cookies.
I hope you still have a few left for Mother’s Day. Enjoy!