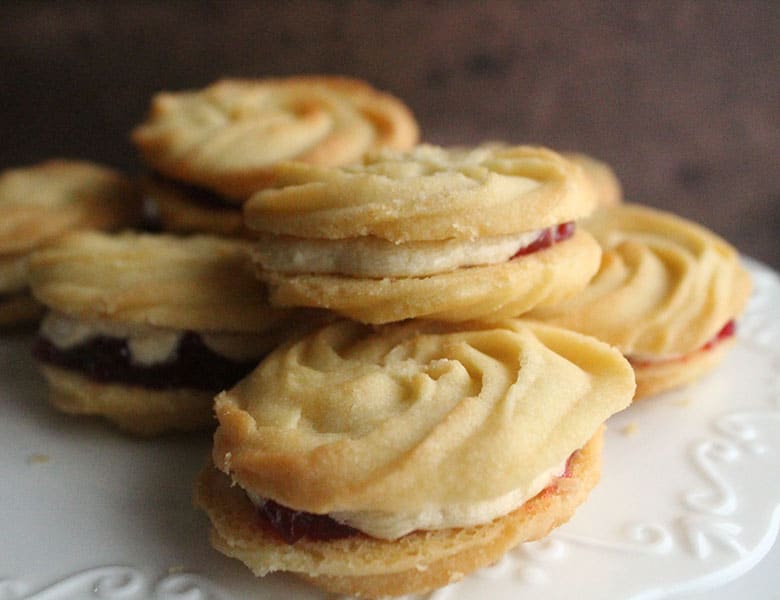
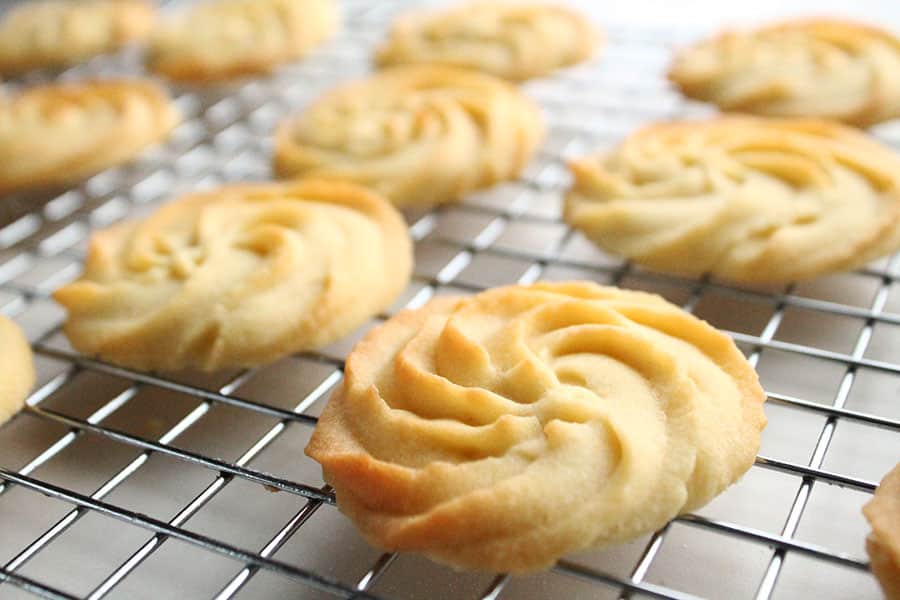
These Melting Moments Butter Cookies are delicately light, with a delicious buttery flavor and truly melt in your mouth deliciousness.
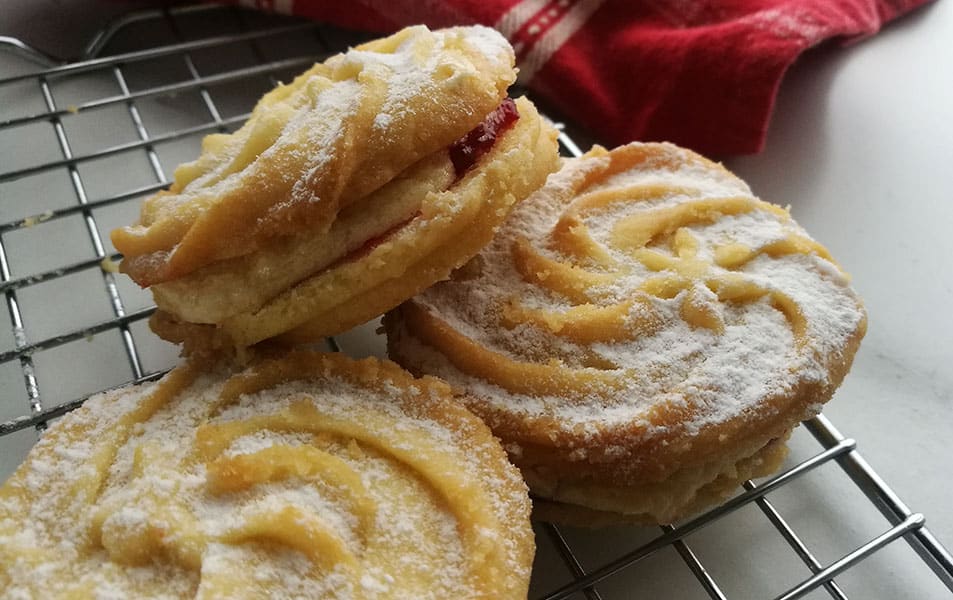
Filled with vanilla buttercream and strawberry jam, these beautiful cookies are an absolute treat.
Also known as Viennese Whirls or Sandwich butter cookies, this is a super easy bake made using basic ingredients.
These cookies can be piped or rolled into balls, flattened and baked. (Perfectly easy if you do not have or want to use a piping bag)
Instructions for piping or a rolled and pressed out dough in the recipe card below
What do you need to make Melting Moments Butter Cookies
While the full printable recipe is written below, this is the section to read if you’re wondering about ingredient substitutions or how these ingredients work in the recipe.
For the cookies:
- Butter at room temperature. Take the butter out of the refrigerator at least an hour before baking. It should be soft, but not melted.
- Powdered/Icing sugar. This type of sugar is used because it dissolves quickly when mixed with butter. It also gives these cookies that amazing light, crisp, melt-in-your-mouth texture.
- Cornstarch (US)/cornflour (UK): This ingredient is white in color and has a fine floury texture. It contributes to the light and tender texture of these cookies.
- Vanilla extract
- Cake Flour or all-purpose flour
For the filling and buttercream (optional)
- Butter: The butter should be at room temperature.
- Powdered sugar/icing sugar: Sift your powdered sugar to ensure a smooth buttercream
- Vanilla extract
- Strawberry or raspberry jam
Tips to produce the perfect Melting Moments Butter Cookies
Although this is a really easy recipe, the following helpful tips will ensure the perfect bake:
Cream the butter and sugar WELL.
This means that it should be beaten for at least 5 to 8 minutes.
An electric handheld or stand bowl mixer is helpful to aid in the creaming process.
The creamed butter and sugar should be light in color and fluffy in texture. This will create lighter cookies as opposed to a dense heavy batch of cookies.
Do not overfill the piping bag with the dough. Rather divide the dough in half, this will make the piping easier to manage.
Refrigerate the piped dough before baking. This is an important step so please do not leave it out.
Refrigerating the piped dough for about 30 minutes before baking.
This prevents the dough from spreading while baking ensuring that the cookies keep their beautiful piped shape.
The sugar in the dough becomes more pronounced as it chills creating a delicious flavored bake.
It also promotes light texture and golden brown color.
Avoid over baking the cookies. Bake until the edges turn a golden brown color.
How to make Melting Moments
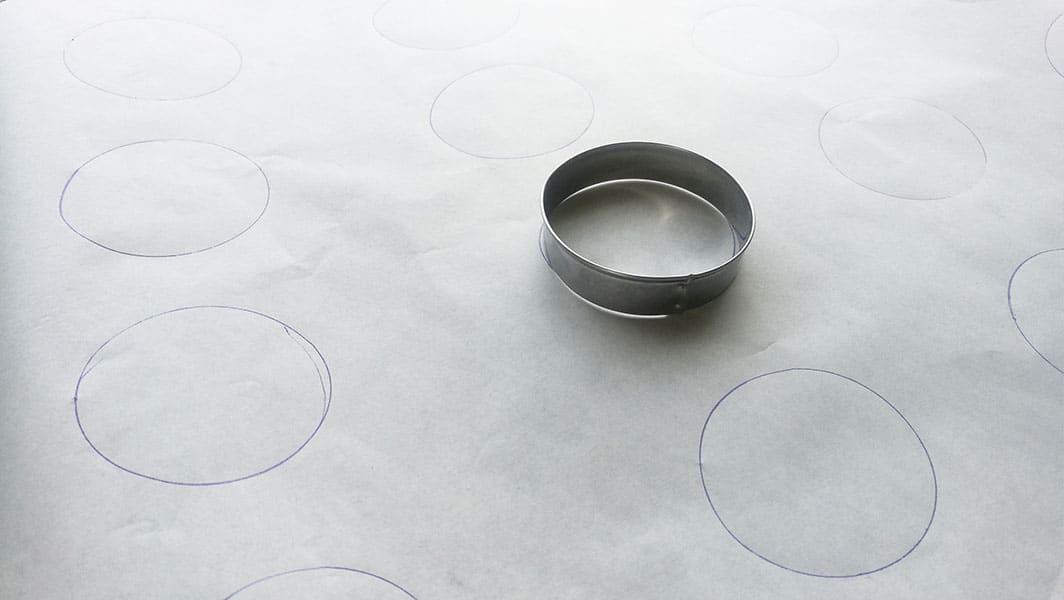
Use a 2inch/5cm round cookie cutter as a guide to draw circles on a sheet of parchment/ baking paper.
This will serve as a guide to pipe even sized cookies. Space the circles about 1 inch/3cm apart. Turn the parchment paper over so that the pencil marks are underneath.
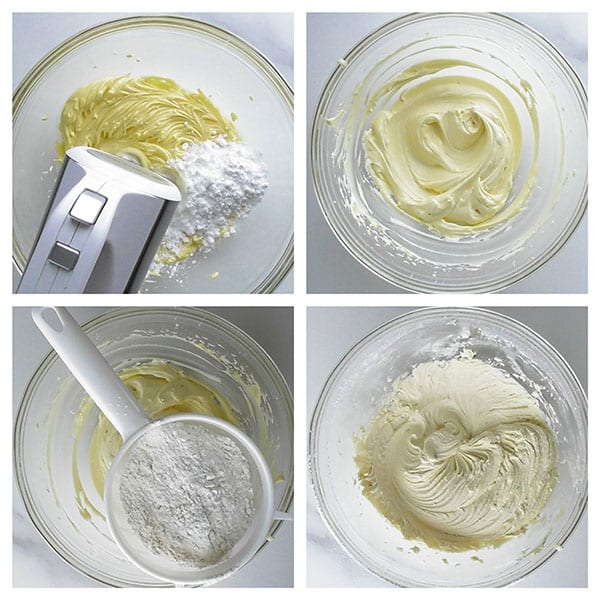
In a large bowl, beat the butter and powdered sugar for about 5 minutes until pale and fluffy.
Sift the flour and cornstarch/cornflour into the butter mixture and beat for 2 minutes on medium speed until thoroughly combined. Add vanilla extract and beat for 20 seconds more to combine.
Spoon the mixture into a piping bag fitted with an open star nozzle (1M).
Pipe 24 swirls using the circles as a guide.
If you feel that the dough is too stiff to pipe, then just add a tablespoon of warm milk to the dough. This will make the dough softer and easier for you to pipe
Place the baking sheet into the refrigerator for 30 to 40 minutes to firm up the piped cookies.
Bake for 10 to 12 minutes until golden brown. Remove from the oven and leave the cookies on the baking sheet to cool for 10 minutes.
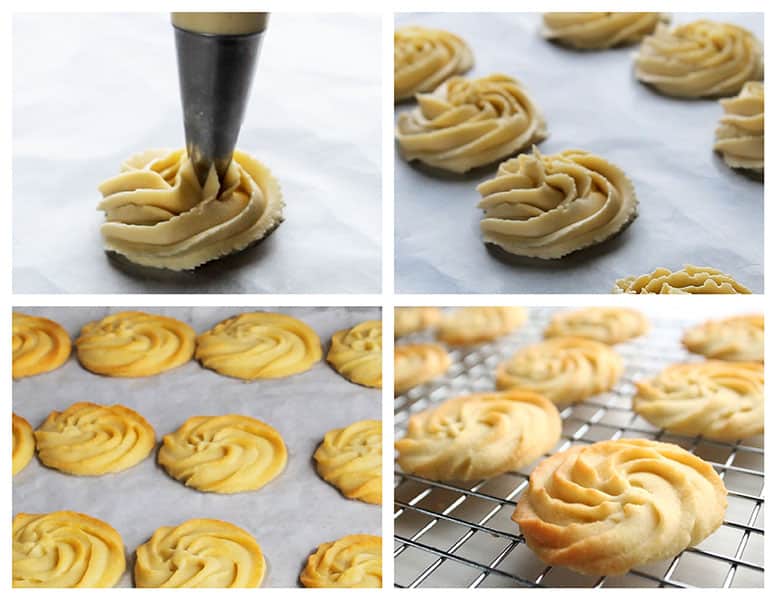
These cookies are very delicate so avoid using your hands to pick them off the baking tray. Rather use a spatula to transfer them to a cooling rack.
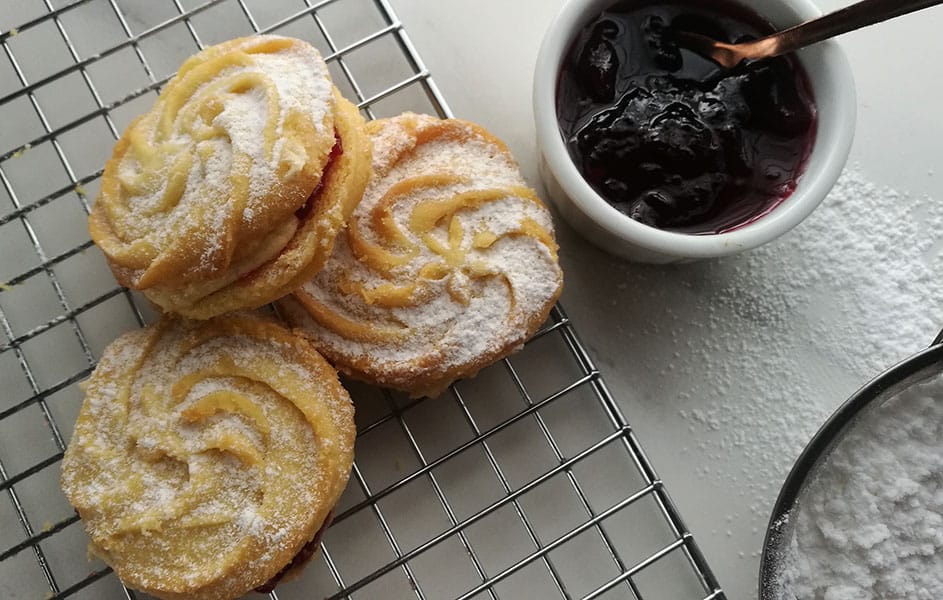
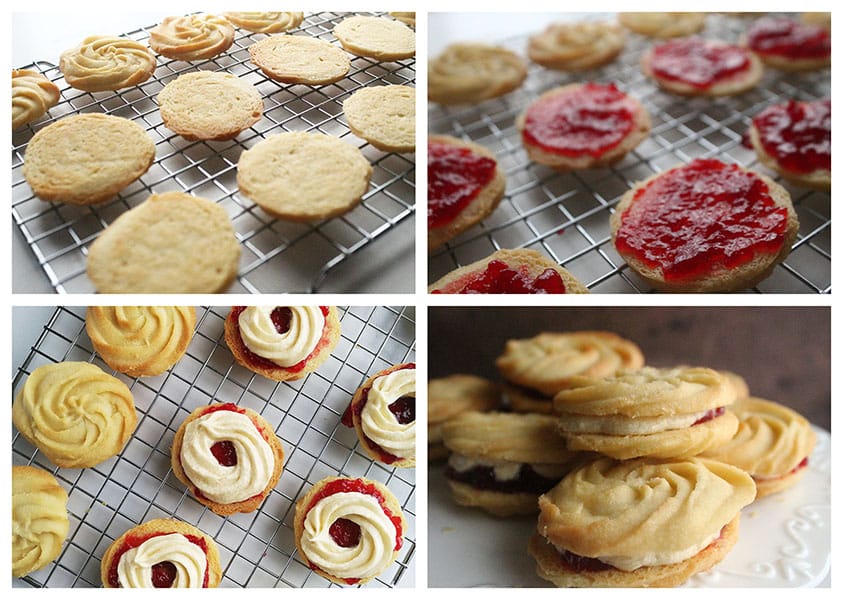
Once cooled serve as is or sandwich with buttercream and jam if you prefer. Keep in mind that these cookies are very delicate even after cooling so handle gently.
Can I press out the dough instead of piping? Melting moments without piping.
Absolutely. If you do not want to go through the process of piping out the dough, then simply refrigerate the dough for 1 hour. (Because it is very soft and you cannot handle and shape it until it is firm)
Once the dough has cooled, it will be firm enough to shape.
Flour your hands then roll the dough into 24 balls, flatten slightly (not too much as they will still spread add flatten during baking) and place on a lined baking sheet.
Refrigerate the shaped dough for 30 minutes more before baking.
Bake for 10 to 12 minutes until the edges turn golden brown.
Frequently asked questions
- Can unbaked Melting moments be frozen or prepared in advance?
The best part of these cookies is that it can you can prepare and pipe them in advance.
You can freeze the piped unbaked cookies overnight or up to 1 month before baking.
Bake the cookies from frozen, but frozen cookies might just require an extra 5 minutes of baking time.
- Can I freeze baked Melting Moments cookies?
Yes, Unfrosted or filled, they freeze well for up to 3 months. Thaw overnight in the fridge and allow them to reach room temperature before serving.
- How to store Melting Moments
These cookies will stay fresh in an airtight container at room temperature for up to 2 weeks.
- What can I use to fill Melting Moments?
These cookies taste great on their own but filling takes it to a whole new level of deliciousness. Here are a few filling ideas.
- Piped vanilla or chocolate buttercream
- Jam, any flavor, favorites include strawberry, blackberry, raspberry
- Whipped cream
- Lemon curd
- How to store Melting Moments
Enjoy ♥
If you like this recipe, be sure to check out my other amazing cookie and slice recipes
Follow on Facebook, Pinterest, and Instagram or Subscribe for the latest recipe updates.
Melting Moments
Watch how to make the recipe
For the cookies
- 2 ¼ sticks butter, very soft See note 1
- ½ cup powdered (icing sugar)
- 1 ¾ cup cake flour or all-purpose flour
- 2 ½ Tablespoons Cornstarch (cornflour) see note 2
- 1 teaspoon vanilla extract
- 2 Tablespoons milk optional, see note 3
For the buttercream (optional)
- ½ cup butter softened
- 2 cups powdered (icing sugar)
- 1 teaspoon vanilla extract
- ¼ cup jam
To make the cookies
- Prepare the baking sheet: Use a 5cm/2inch round cookie cutter as a guide to draw circles on a sheet of parchment/ baking paper. This will serve as a guide to pipe even sized cookies. Space the circles about 1 inch/3cm apart. Turn the parchment paper over so that the pencil marks are underneath.
- Beat the butter and sugar: In a large bowl, beat the butter and powdered sugar for about 5 minutes until pale and fluffy. See note 4
- Add dry ingredients and extract: Sift the flour and corn flour into the butter mixture and beat for 2 minutes on medium speed until thoroughly combined. Add vanilla extract and beat for 20 seconds more to combine.
- Pipe: Spoon the mixture into a piping bag fitted with an open star nozzle (1M).Pipe 24 swirls using the circles as a guide. (See video for below to watch how these cookies are piped.)
- If you feel that the dough is too stiff or hard to pipe, then just add a tablespoon of warm milk to the dough. This will make the dough softer and easier for you to pipe
- Refrigerate piped shapes: Place the baking sheet into the refrigerator for 30 to 40 minutes to firm up the piped cookies. See note 5
- Bake: Preheat the oven to 350°F/180°C (160°C fan) Bake for 10 to 12 minutes until golden brown. Remove from the oven and leave the cookies on the baking sheet to cool for 10 minutes.
- Cool: These cookies are very delicate so avoid using your hands to pick them off the baking tray. Rather use a spatula to transfer them to a cooling rack.
- Once cooled serve as is or sandwich with buttercream and jam if you prefer. Keep in mind that these cookies are very delicate even after cooling so handle gently.
Can I press out the dough instead of piping? Melting moments without piping.
- Absolutely. If you do not want to go through the process of piping out the dough, then simply refrigerate the dough for 1 hour. (Because it is very soft and you cannot handle and shape it until it is firm)
- Once the dough is cooled, it will be firm enough to shape. Flour your hands then roll the dough into 24 balls, flatten slightly (not too much as they will still spread add flatten during baking) and place on a lined baking sheet.
- Refrigerate the shaped dough for 30 minutes more before baking.
- Bake for 10 to 12 minutes until the edges turn golden brown.
To make the buttercream
- Beat the butter, sifted powdered sugar and vanilla extract in a bowl until smooth.
Sandwich the cookies
- Spread or pipe a little jam onto the flat side of 12 of the cookies.
- Spoon or pipe a little the buttercream over the jam and sandwich with the remaining cookies.
- Dust with powdered (icing sugar) to finish.
Tips and frequently asked questions
Can Melting moments be frozen or prepared in advance?
- The best part of these cookies is that it can you can prepare and pipe them in advance.
- You can freeze the piped unbaked cookies overnight or up to 1 month before baking.
- Bake the cookies from frozen, but frozen cookies might just require an extra 5 minutes of baking time.
Can I freeze baked Melting Moments cookies?
- Yes, Unfrosted or filled, they freeze well for up to 3 months. Thaw overnight in the fridge and allow them to reach room temperature before serving.
What can I use to fill Melting Moments?
- These cookies taste great on their own but filling takes it to a whole new level of deliciousness
- Piped vanilla or chocolate buttercream
- Jam, any flavor, favorites include strawberry, blackberry, raspberry
- Whipped cream
- Lemon curd
How to store Melting Moments
- These cookies will stay fresh in an airtight container at room temperature for up to 2 weeks.
- The butter needs to be really soft when beating it with the sugar. If it is not soft enough, it will be far too stiff to pipe.
- Cornstarch’ in the US is the same thing as ‘cornflour’ in the UK. It’s the pure starch extracted from corn kernels, and it has the form of a very fine white powder.
- If you feel that the dough is too stiff or hard to pipe, then just add a tablespoon or 2 of warm milk to the dough. This will make the dough softer and easier for you to pipe. This is optional and only to be added when piping.
- Beat the butter and sugar WELL. This means that it should be beaten for at least 5 to 8 minutes. An electric handheld or stand bowl mixer is helpful to aid in the creaming process. The creamed butter and sugar should be light in color and fluffy in texture. This will create lighter cookies as opposed to a dense heavy batch of cookies.
- Refrigerate the piped dough for 30 minutes before baking. This is an important step so please do not leave it out. This prevents the dough from spreading while baking ensuring that the cookies keep their beautiful piped shape. The sugar in the dough becomes more pronounced as it chills creating a better-flavored bake. It also promotes light texture and golden-brown color.


Tracy Taylor says
Made these for a welcome back home occasion. My baby girl (42 years old) moved back to Washington! Great recipe for our tea party. Raspberry and lemon fillings were delicious. Thanks for a terrific cookie.
Pam says
Your saying 2 2/5 tbls corn starch, I've never seen a 1/5 measurements? Would that be a heaping 1/4th?!
And comparing this recipe to French butter cookie,
. I'm guessing this is a "soft" cookie and the French one is crispy? Thank you for posting some delicious recipes.
The Gardening Foodie says
Hello Pam, I'm sorry for any confusion with the measurements. I usually ensure accuracy by weighing my ingredients on a scale, and I cross-verify using US customary measurements. I've edited the recipe, rounding off to the nearest standard measurement, which is 2 1/2 tablespoons.
Regarding the cookie texture, you're right; these cookies are softer compared to the crispy French butter cookies.
I hope this clarification is helpful
Wishing you happy baking 😊
Janis says
If these cookies are filled with buttercream and jam, how long can they stay at room temperature or do they have to be refrigerated?
The Gardening Foodie says
Hi Janis,
The cookies filled with buttercream and jam can stay fresh at room temperature for about 2-3 days if stored in an airtight container.
To extend their shelf life, refrigerate the cookies for up to a week. This helps maintain the freshness by preventing the buttercream from becoming too soft and the jam from spoiling.
Happy Baking 😊
Iris Washington says
I made these for me and my family and they were very good, not to sweet and so light weight. I used a different buttercream recipe with pumpkin spice in it and they were wonderful. My grandson loves them. Thanks for the tips, really useful.
The Gardening Foodie says
I'm so happy to hear you and your family loved them! Adding pumpkin spice to the buttercream sounds amazing—I bet that was a perfect touch! And how sweet that your grandson enjoyed them too! 😊 Thanks for the kind words, and I’m glad the tips came in handy!