Layered Flatbread which is also known as paratha is a type of flatbread which originated in North India. This buttery, flaky, crisp multi-layered flatbread is absolutely delicious served with your favourite curry or Indian dish.

Layered Flatbread
The first time that I ever tasted a layered paratha was on the beautiful island of Mauritius where we were on holiday a few years ago.
The gorgeous layers and soft buttery flavour was so good and I had to add this to my recipe box.
I think that every meal I ate on that holiday had to be accompanied by a layered flatbread. As our holiday came to an end, so did my daily dose of this delicious flatbread.
A few weeks after we got home, I gave this recipe a try and was pleasantly surprised at how easy it is to make and how amazingly delicious it turned out.
So if you ever tasted these flatbreads and always got shop-bought because you thought it too difficult to make on your own, then I got you covered with my easy step by step instructions and pictures for this recipe.

Layered flatbread is made with basic and simple ingredients, you will have in your kitchen cupboard or pantry. Just follow these easy steps and tips to have a stack of your own homemade layered paratha in under an hour.
Just a note on a few ingredients and substitutes if needed
To make these flatbreads you will need 5 of the most basic ingredients,
Flour: You can use either all-purpose, plain or cake flour for this recipe.
Butter: Room temperature butter is best to use, making it easier to incorporate into the flour.
Oil: Use canola or sunflower oil
Hot water: Hot water is used to help create a soft dough.
Salt
How to make Layered Flatbread
In a bowl, mix the combine the flour, salt, oil and butter and mix using your fingertips to create a breadcrumb-like texture. This ensures that all the flour is coated with the butter and oil.
The hot water is then incorporated into this mixture and mixed together to form a soft dough. It is best to leave this dough covered for 20 minutes.
This allows the flour to absorb the water and the gluten to develop creating a more elastic and stretchy dough. As a result, it will make the dough easier to roll out.

After the dough has rested for 20 minutes, divide it into 4 equal parts, roll it into a ball and flatten each into a disk

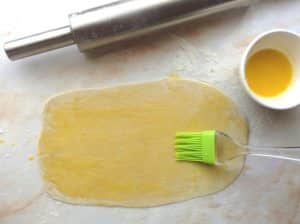
Dust your board or work surface with flour and roll each into a circular or rectangular shape. It really does not have to be a perfect rectangle or circle so do not worry about that.

Roll it as thin as possible and brush the surface with about half a teaspoon of melted butter. Dust with a bit of flour
Start folding or pleating as shown in this picture, it is like folding a paper fan. If you can, try to make the pleats or folds narrow and small. This will give the flatbread more layers.
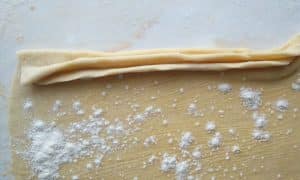
After pleating the dough, just hold the two ends and stretch the dough ever so slightly to neaten. Do not pull on it too much. You do not want to break the dough and ruin the folds that you have made. Press the ends together.
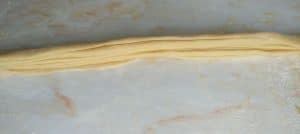
Shape into a spiral form and press on the end to adhere to the dough.

Do the same for the other 3 pieces of dough and then start rolling out.

Dust the surface with flour and roll to a medium thickness. If it is rolled out too thick, then it takes a bit longer to cook and if it is too thin, you will not be able to see the layers once cooked and it will lose that layered flaky texture that you want.

Heat a heavy-based pan on medium heat and place the rolled out flatbread onto it. As it starts cooking, you will notice little bubbles appear on the surface.
Cook for about 10 seconds, brush ¼ teaspoon butter on the top and then flip it over with a spatula.
Cook for about 15 more seconds until the bottom has light brown spots. You can flip it over again if you feel that it has not cooked through enough. It should not appear doughy or uncooked. It takes more or less 15 to 20 seconds on each side, on medium heat.

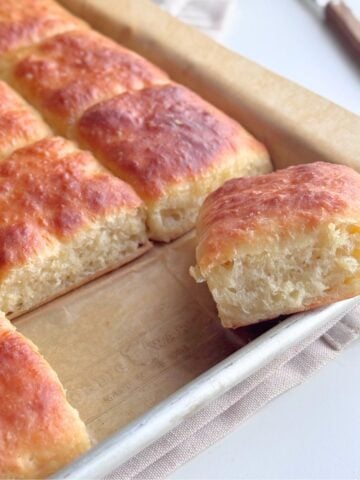
Cook the remaining flatbreads in this way and keep it covered as you cook the rest. Serve warm with your favourite curry or however you prefer. I love eating these flatbreads plain straight of the pan or warmed for breakfast.

It is really amazing how these basic and simple ingredients can create such a delicious flavour. So go ahead and give these beautiful flatbreads a try, they are really easy to make and so full of delicious flavour.

Enjoy ♥

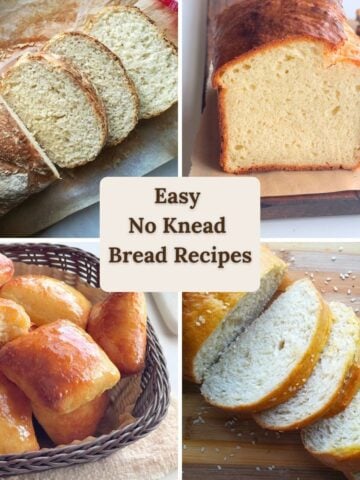
If you like this recipe, be sure to check out my other fantastic bread recipes
Still hungry for more?
Follow on Facebook, Pinterest, and Instagram or Subscribe for the latest recipe updates.
Layered Flatbread
- 1 cup / 120g all purpose or cake flour
- ¼ teaspoon salt
- 1 Tablespoon / 14 g / ½ oz butter
- 1 Tablespoon / 15 ml oil
- ⅓ cup / 80 ml hot water
- In a bowl, mix the combine the flour, salt, oil and butter and mix using your fingertips to create a breadcrumb like texture. This ensures that all the flour is coated with the butter and oil.
- Add the hot water and mix and knead for a few seconds to form a soft dough.
- Cover the dough and allow to rest for 20 minutes. SEE NOTE 1.
- Divide the dough into 4 equal parts, roll it into a ball and flatten each into a disk
- Dust your board or work surface with flour and roll each into a circular or rectangular shape. It really does not have to be a perfect rectangle or circle so do not worry about that.
- Roll it as thin as possible and brush the surface with about half a teaspoon of melted butter. Dust with a bit of flour
- Start folding or pleating as shown in the picture in the post above. It is like folding a paper fan. If you can, try to make the pleats or folds narrow and small. This will give the flatbread more layers. After pleating the dough, just hold the two ends and stretch the dough ever so slightly to neaten. Do not pull on it too much because you do not want to break the dough and ruin the folds that you have made. Press the ends together.
- Shape into a spiral form and press on the end to adhere to the dough.
- Do the same for the other 3 pieces of dough and then start rolling out.
- Dust the surface with flour and roll to a medium thickness. SEE NOTE 2
- Heat a heavy based pan on medium heat and place the rolled paratha onto it. As it starts cooking,you will notice little bubbles appear on the surface. Cook for about 10 seconds, brush ¼ teaspoon butter on the top and then flip it over with a spatula.
- Cook for about 15 more seconds until the bottom has light brown spots. You can flip it over again if you feel that it has not cooked through enough. It should not appear doughy or uncooked. It takes more or less 15 to 20 seconds on each side, on medium heat.
- Cook the remaining flatbreads in this way and keep it covered as you cook the rest. Serve warm with your favourite curry or however you prefer.
- Allowing the dough to rest for 20 minutes helps the flour to absorb the water and the gluten to develop creating a more elastic and stretchy dough. As a result, it will make the dough easier to roll out.
- If the dough is rolled out too thick, then it takes a bit longer to cook and if it is too thin, you will not be able to see the layers once cooked and it will lose that layered flaky texture that you want.
More flatbread recipes for you to try


Kelly Lynns Sweets and Treats says
This looks so buttery and delicious! And such simple ingredients!! I definitely need to try this 🙂 XOXO
The Gardening Foodie says
Thank you Kelly. Oh yes definitely simple ingredients that create big and amazing flavours:)
neil@neilshealthymeals.com says
You won't believe this Ashika but I was actually born in Mauritius. I only lived there for 6 weeks though because my parents had to leave for work purposes and return to the UK. I've never been back, but I would love to do so one day! Anyway, enough about me! I love your easy layered paratha. I make my own naan and chapati to go with my curries but have never tried paratha before. Thanks for the recipe!
The Gardening Foodie says
Oh wow that is amazing...Mauritius is such a beautiful island. I hope that you get an oppertunity to take a vacation there soon.
That is great that you make your own naan and chapati...now you have got to try this recipe, it goes so well with curries too 🙂
Kelsie | the itsy-bitsy kitchen says
I've never even heard of paratha but now I'm craving it. Buttery bread is always a must! This looks fantastic, Ashika! Have a great weekend 🙂
The Gardening Foodie says
Thank you Kelsie...haha, then you definitely need to try these out too:)
Leanne | Crumb Top Baking says
From your up-close photos, the paratha really looks buttery and flaky! I've never heard of it before but it looks delicious. And your step by step photos are super helpful!
The Gardening Foodie says
Thank you Leanne, it has amazing taste...I hope that you get to try out this recipe too 🙂
stacey @ The Sugar Coated Cottage says
This looks heavenly with all those spiraled layers. What a beautiful process, reminds of croissants but much simpler. Take care.
The Gardening Foodie says
Thank you Stacey 🙂
Thao @ In Good Flavor says
Paratha is one of the bread on my "to try and to make" list. I haven't gotten around to it yet. This is reminding me that I need to make some. It looks so good!! I would be happy eating straight from the pan!
The Gardening Foodie says
Thank you Thao, I hope that you try out this recipe soon 🙂