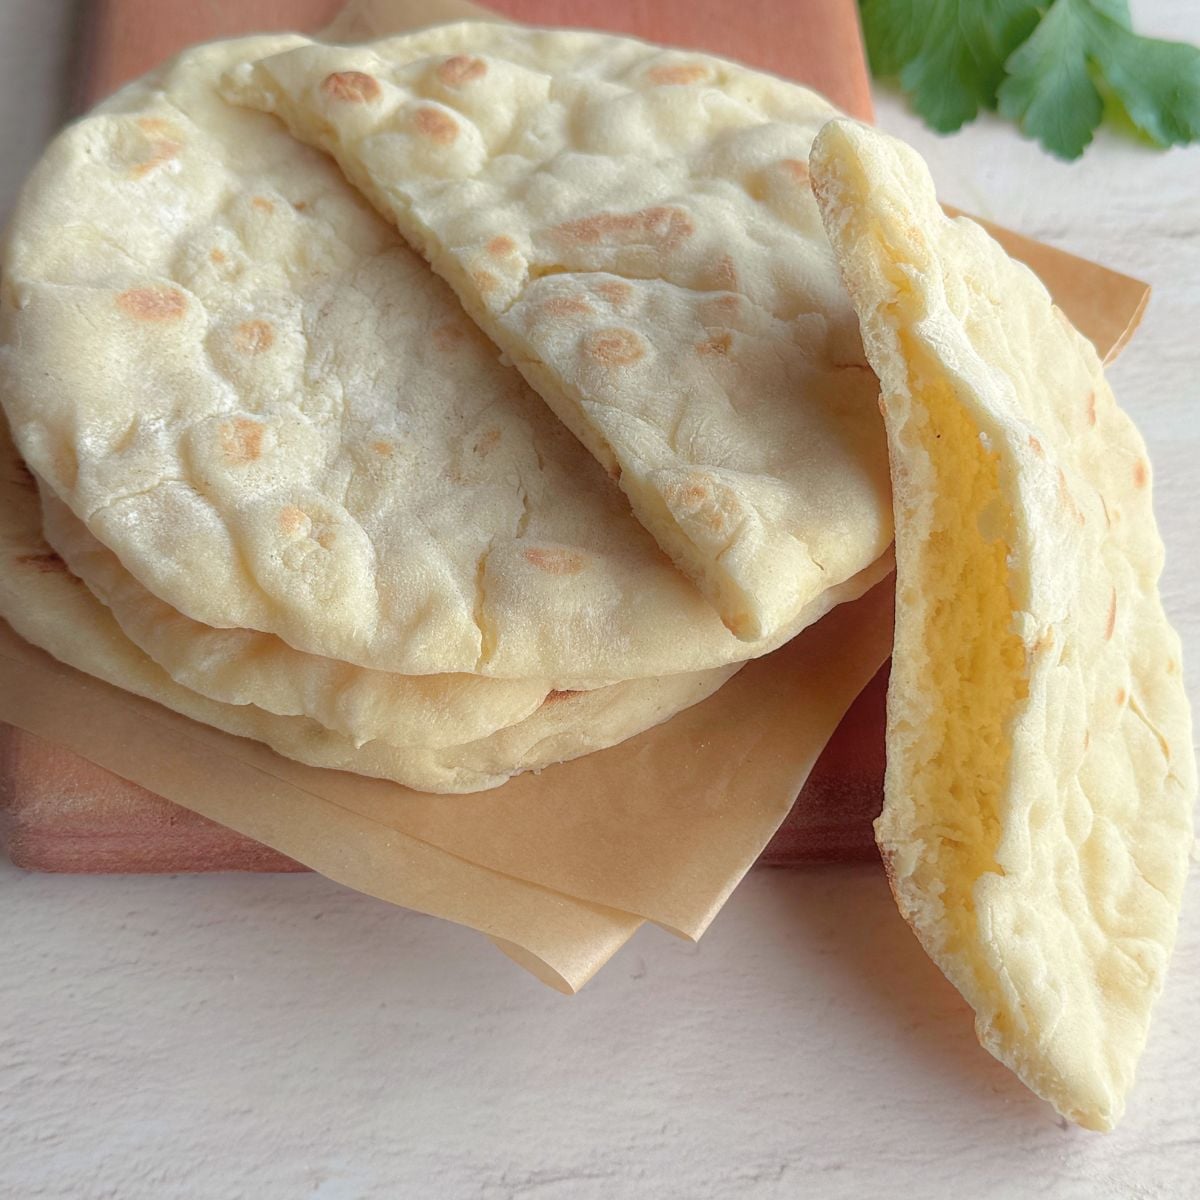
Made with just 4 simple ingredients and ready in under an hour, these soft pitas cook in a skillet and are great folded around your favorite fillings or served with dips, soups, and salads.

Step by step photos
These visual instructions help you see the process. You can also find the full printable recipe with ingredient amounts and instructions at the end of the post.
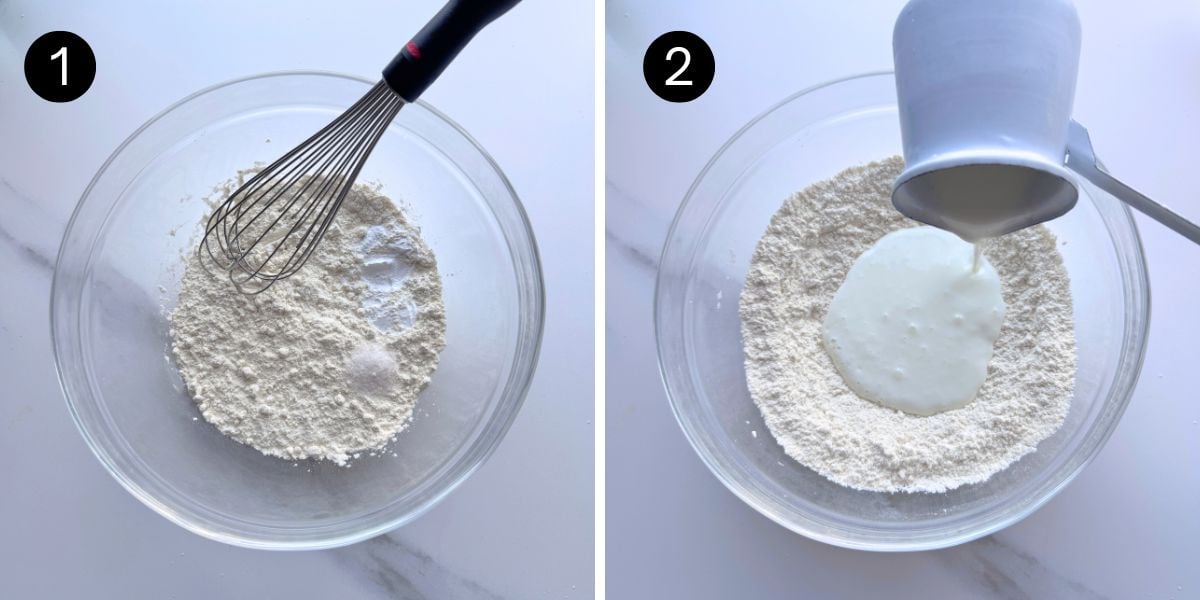
- In a large bowl, whisk together the all purpose flour, baking powder, and salt.
- Add the buttermilk. It can be used straight from the fridge.
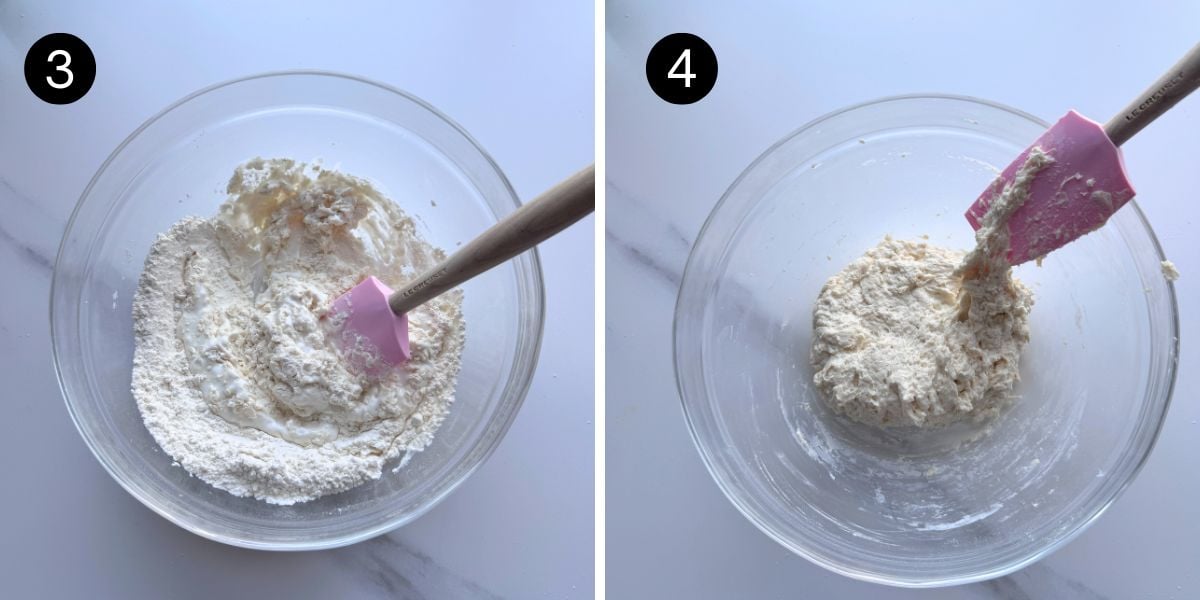
- Mix with a spatula or dough whisk until a shaggy, sticky dough forms.
- Cover and let the dough rest for 10 minutes.
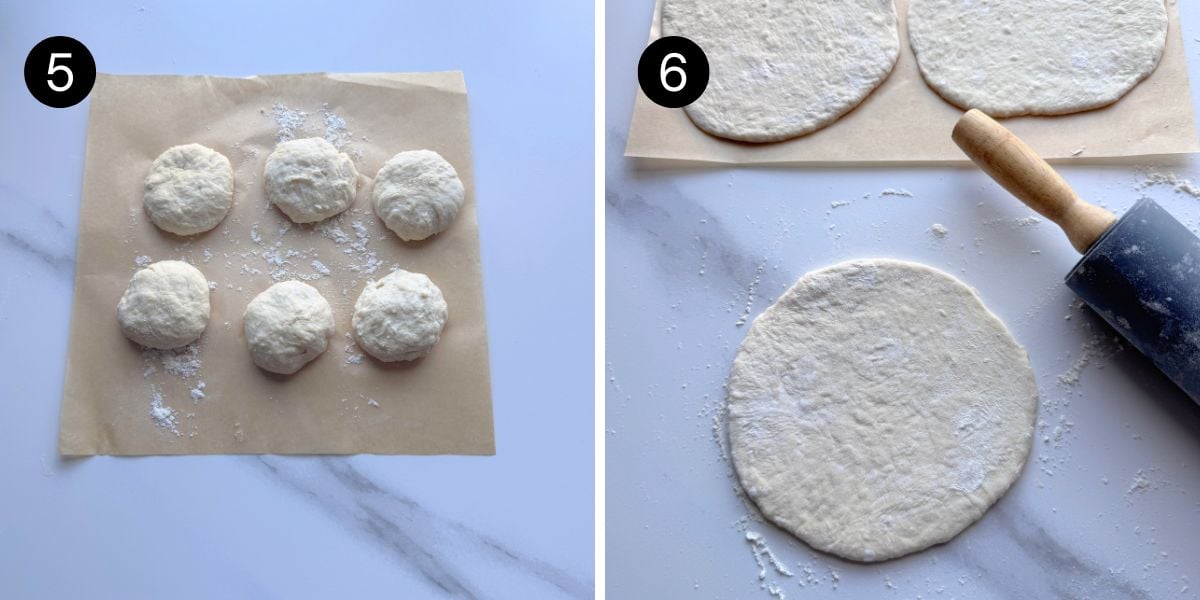
- Lightly flour your hands and work surface as needed. The dough is sticky, and you can use an extra ¼ to ½ cup flour while shaping and rolling. Divide the dough into 6 equal pieces and shape into balls.
- Roll each ball into a 6-inch (15 cm) circle.
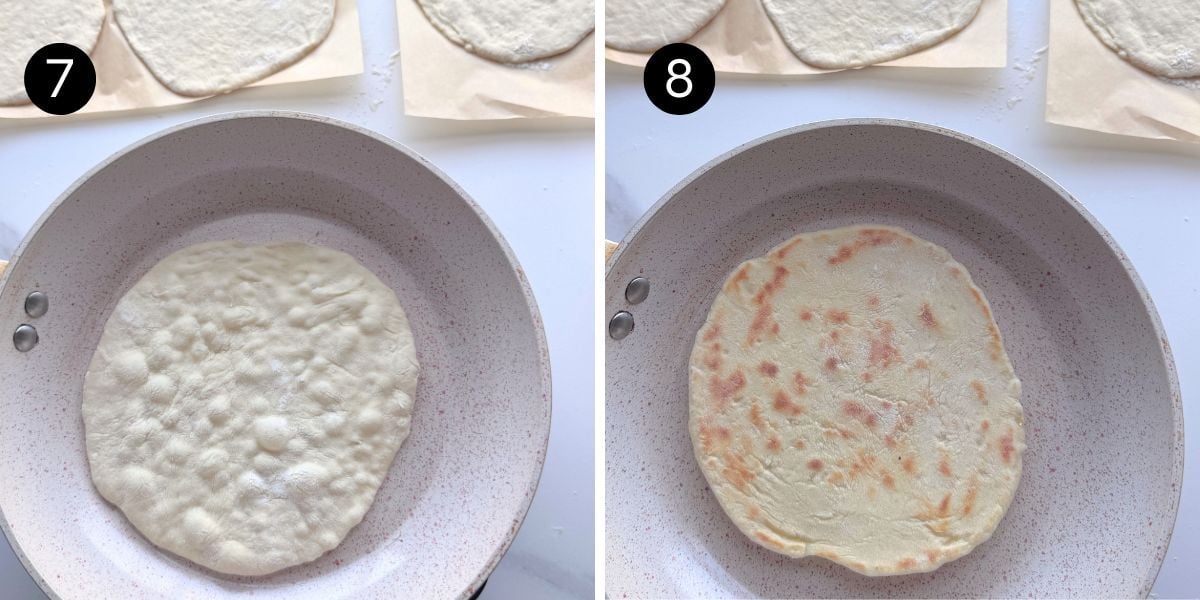
- Heat a large dry skillet or cast-iron pan over medium heat. Cook one pita at a time for 1½ to 2 minutes, until bubbles begin to form.
- Flip and cook for another 1 to 2 minutes, until the underside is lightly browned. If needed, flip once more and cook for a few more seconds. Transfer to a plate and cover with a clean kitchen towel while cooking the remaining pitas to keep them soft.
Storage
These pitas are best served the day they are made. Store leftovers in an airtight container at room temperature for up to 2 days.
Recipe tips
- Buttermilk substitute: Use plain Greek yogurt thinned with a little milk until similar in consistency to buttermilk.
- The dough is sticky. Lightly flour your hands and work surface as needed. Up to ¼ to ½ cup extra flour can be used while shaping and rolling.
- Cook over medium heat. If the pan is too hot, the outside will brown before the inside is cooked.
- Keep the cooked pitas covered with a clean kitchen towel while you cook the remaining pitas to help keep them soft.
- Will these puff into pockets? These no yeast pitas don't usually puff as much as traditional yeast pita bread, so they may not form a large pocket. I most often use them as soft wraps. If you'd like to fill them like pita pockets, warm a pita first, then carefully slit it open with a sharp knife.
Recipe
No Yeast Stovetop Pita Bread
servings6 pita breads
Soft, skillet-cooked pita bread made with just 4 simple ingredients. Ready in under an hour, they're perfect for wraps, dips, soups, and salads.
Watch how to make the recipe
Ingredients
- 2 cups (240 g) all purpose flour (plain flour)
- 2 level teaspoons baking powder
- ½ teaspoon salt
- 1 cup (240 ml) buttermilk
Instructions
- In a large bowl, whisk together the flour, baking powder, and salt.
- Add the buttermilk and mix with a spatula or dough whisk until a shaggy, sticky dough forms.
- Cover and let the dough rest for 10 minutes.
- Lightly flour your hands and work surface as needed. The dough is sticky, and you can use an extra ¼ to ½ cup flour while shaping and rolling. Divide the dough into 6 equal pieces and shape into balls.
- Roll each ball into a 6-inch (15 cm) circle.
- Heat a large dry skillet or cast-iron pan over medium heat until hot. Cook one pita at a time for 1½ to 2 minutes, until bubbles begin to form.
- Flip and cook for another 1 to 2 minutes, until the underside is lightly browned. If needed, flip once more and cook for a few more seconds.
- Transfer to a plate and cover with a clean kitchen towel while cooking the remaining pitas to help keep them soft.
Storage
- These pitas are best served the day they are made. Store leftovers in an airtight container at room temperature for up to 2 days.
Recipe Notes
Buttermilk substitute: Use plain Greek yogurt thinned with a little milk until similar in consistency to buttermilk.
Sticky dough: Lightly flour your hands and work surface as needed. Up to ¼ to ½ cup extra flour can be used while shaping and rolling.
Cook over medium heat: If the pan is too hot, the outside may brown before the inside is cooked.
Keep covered: Cover the cooked pitas with a clean kitchen towel while you cook the remaining pitas to help keep them soft.
Nutrition
Serving: 1pita | Calories: 177kcal | Carbohydrates: 34g | Protein: 6g | Fat: 2g | Saturated Fat: 1g | Polyunsaturated Fat: 0.3g | Monounsaturated Fat: 0.4g | Cholesterol: 4mg | Sodium: 272mg | Potassium: 99mg | Fiber: 1g | Sugar: 2g | Calcium: 72mg | Iron: 2mg
Hungry for more?
Sign up for my free newsletter to get emails about new recipes .And don't forget to follow me on YouTube, Facebook, Pinterest, and Instagram for all the latest deliciousness.


Kelly Lynns Sweets and Treats says
I love that these don’t require yeast AND you can make them in the stove top!! There definitely wouldn’t be leftovers here hehehe
Neha says
These pita bread looks so puffy! I am loving those huge pockets inside of it. Great recipe!
Helen says
I made these this evening. They were gorgeous and so easy to make. Thank you for the recipe and the tip of adding lemon juice to the milk - worked brilliantly. We ate them with homemade roasted beetroot hummus. I will be making them very often, I think!
The Gardening Foodie says
Hi, it is either all-purpose OR cake flour 🙂
Elena says
It sounds great! I'm going to make it soon! Thanks!
The Gardening Foodie says
Hi Elena, :)that's great, I would love to know how it turns out too 🙂
Kristen says
Amazing Recipe! Simple household ingredients as well!
The Gardening Foodie says
Hi Kristen 🙂 Thank you, I am glad that you enjoyed this recipe too 🙂
The Gardening Foodie says
Hi Shruti, the sour milk needs to be warm which makes it easier to combine with the dry ingredients.
I hope that this helps answer your question 😃
Shruti Rastogi says
Okay. Thanks. Also, please let me know that in order to make sour milk , should we use raw milk or milk that has been boiled once and cooled? Please let me know
The Gardening Foodie says
Hi Shruti 🙂 you can use shop-bought milk or milk which has been boiled and cooled.
Claire says
Easy. Perfect this ecq/lockdown time.
Sunakshi agrawal says
Can we make pita bread with whole wheat flour without yeast?
The Gardening Foodie says
Hi Sunakshi, yes you can use whole-wheat flour in this recipe as well. The texture might however be different compared to that of cake or all purpose flour. If you want a soft texture then ensure that you cover the pita with a clean cloth as soon as you remove it from the stove. This will help to trap the steam and keep the pita soft
I hope that this helps answer your question
Jan Marshall says
They are the same. All purpose is the American term. Self raising is British.
Jan Marshall says
Sorry, cake flour is the European name.
Kaz Mo says
Sorry to be pedantic but all purpose flour equates to plain flour in thexUK. It is flour without raising agents.
Helen says
All purpose is Plain flour in the UK.
Elizabeth Busuttil says
Hello I'm Elizabeth from Malta can I use Soya milk with this recipe thank you
The Gardening Foodie says
Hi Elizabeth,yes you can use soya milk with this recipe.
Sabrina says
I’ve made these 3 or 4 times and they come out perfect every time. Thanks for the recipe.
The Gardening Foodie says
Hi Sabrina 🙂 Thank you and you are welcome. I am glad that you are enjoying this recipe too 🙂
Sara says
First time making pita and it was so fun and easy! I didnt have sour milk, so made it from 1% milk and lemon juice, and it still worked great!
The Gardening Foodie says
Hi Sara 🙂 Thank you for giving this recipe a try. I am so glad that you enjoyed it too 🙂
The Gardening Foodie says
Hi, yes it should be warm... not cold from the fridge. Just lukewarm about 1 minute in the microwave should be fine
The Gardening Foodie says
Hi Nikki... I am sorry that you are having a problem with this recipe
To try and help answer your question: You mention that you used milk. Milk might be the reason that your dough is weak and runny. As mentioned in my recipe, you need buttermilk or a substitute( mentioned in the notes of the recipe card) This has a is thicker consistency compared to milk and will make a firm dough.
If you want to give this a try to your dough right now: Just add more flour to your dough now to try to help thicken it. If you are going to add another full cup ( 120g) then I suggest that you mix in a teaspoon of baking powder into it first.
I hope that this helps answer your question and please let me know how it turns out 🙂
Virda says
I made these last night. Doubled the recipe. Added only 2 tsp baking powder, and also added 2tbsp sugar to the dough. I used more liquid to form the dough, it was a very soft and slightly sticky dough. All the pitas puffed up pretty good! Tasted awesome.
The Gardening Foodie says
Hi Virda...Thank you 🙂 Doubling the recipe is a great idea as these are eaten up very quickly 🙂 I am glad that the recipe turned out well for you.
Sophie says
Oh my goodness! Thank you so much for this recipe. I will admit I was a tiny bit sceptical as to whether they'd work & actually taste like pita but they came out really well 🙂 I will definitely be making these on a regular basis now. No more packet pita for me! 🙂
The Gardening Foodie says
Hi Sophie, Thank you for giving this recipe a try, I am so glad that you enjoyed this recipe too
I am also glad that my recipe has convinced you to quit store-bought pita
JDauray says
Made these tonight when I was looking for a way to make these quick and at the last minute. I used AP flour and buttermilk, just as specified. I did add Nigella seeds for flavor. However, the one thing that was different was that they did sit for another 20 minutes after I rolled them out. And when I cooked them they did puff up like yeasted ones. They made perfect pocket pitas. I will definitely use your recipe again. So easy and such a life saver in a pinch.
The Gardening Foodie says
Hi JDauray, Thank you for giving this recipe a try. I am really glad that it turned out well for you too 🙂
I make these so often now as well, really the perfect busy day recipe 🙂
Barbara L Renze says
This recipe is fantastic!! So easy to make and very delicious! I highly recommend doubling it though, your family will thank you. In addition to using them for gyros or dipping, I also used some for individual pizzas and that was so good too.!! Thanks!
Aysha says
I really loved the idea of using butter milk in place of yeast ..I tried this recipe once it really turned out good ... but again am goin to combine wheat flour with all purpose to make it nutritious....
The Gardening Foodie says
Hi there! I'm so glad that you're interested in trying out my recipe.
To answer your question, I'd recommend using clabbered milk in place of dairy whey. Clabbered milk is similar to buttermilk, so it should be a great alternative to sour milk.
I hope this is of assistance. If you have any other questions, please don't hesitate to reach out and I will be more than happy to help
Danielle says
Can't believe this recipe works but it really does! It was even soft and fluffy without the towel trick. Thanks for sharing!
The Gardening Foodie says
Hi Danielle, Thank you and you are very welcome 🙂
I am so happy to hear that the recipe worked well for you 🙂
Aziel’s House says
This just replaced my favorite pita recipe that requires yeast. Second time making them and they are perfection.
The Gardening Foodie says
That's fantastic! I'm so happy to hear that this recipe has become your new favorite, especially without yeast
Shireen says
This recipe sounds great. Will definitely try it. I usually substitute buttermilk for Yogurt in cakes....can I use Yogurt instead for this recipe? And if so, would it need to be warmed still?
The Gardening Foodie says
Hi Shireen, Yes, you can definitely substitute yogurt for buttermilk in this recipe. Yogurt works as a great alternative and won't affect the overall texture.
I'd suggest bringing the yogurt to room temperature instead of warming it. This will help it mix more smoothly with the other ingredients.
Enjoy 😊
Rosemary says
Oh, but they DO puff up, just like a pita! Just like a balloon! I didn't need to slice it open. I think the trick is to keep turning it frequently. By the 3rd or 4th flip, it puffs! Thanks, great recipe. I use my home cultured buttermilk.
The Gardening Foodie says
Hi Rosemary, That’s wonderful to hear 😊
Turning the dough frequently is definitely one of the things that helps it puff up. And using your own cultured buttermilk must add a delicious touch too.
Thank you for trying out my recipe, I’m so glad it worked well for you 😊