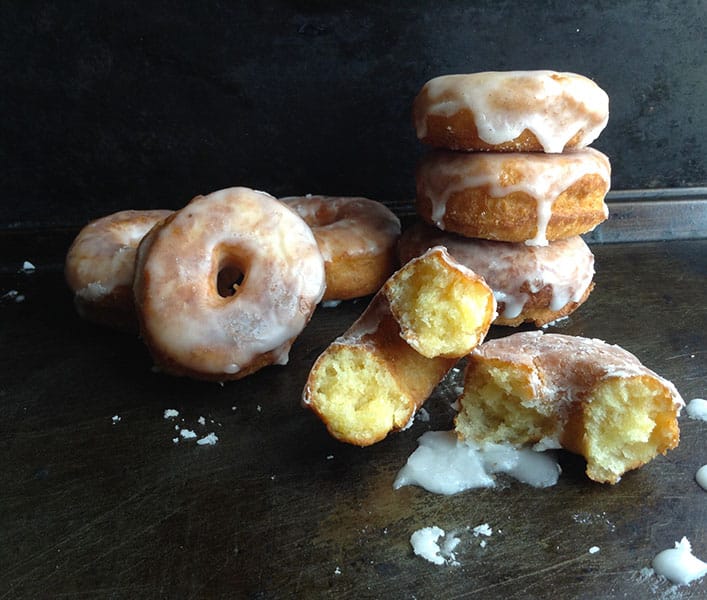
My delicious homemade No Yeast Soft Donut Recipe is so quick and easy to make. Just mix, shape, fry and glaze. Oh, and don't forget to eat them too 😉
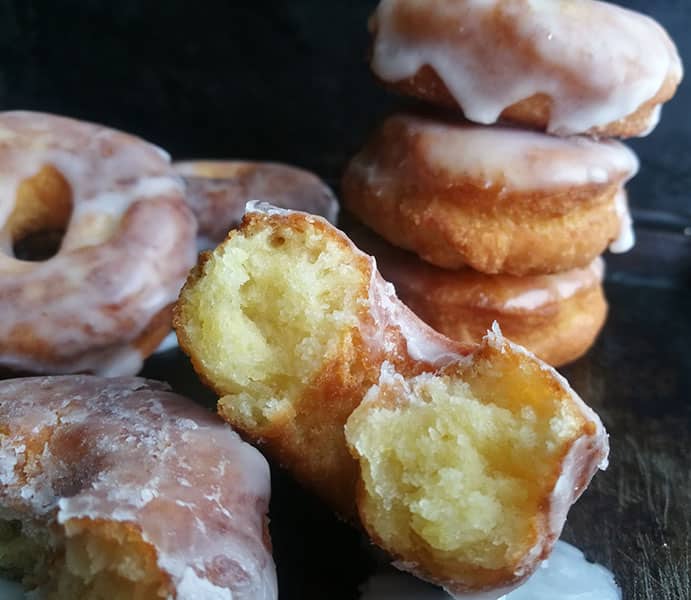
I love working with yeast-based recipes, but sometimes you just want a quick, delicious treat, no kneading, no waiting for dough to rise. That’s where this No-Yeast soft donut recipe comes in.
But if you’re in the mood for classic yeast donuts, I have a fantastic recipe for that too. You can check out it out here
Difference between no yeast and yeast donuts
Since this is a yeast-free recipe, the texture of these donuts will be different compared to the yeast based donuts.
Yeast donuts
- Yeast based donuts require proofing (rise time) which could be between one to two hours.
- They have a light airy, chewy texture
No yeast donuts
- No proofing (rise) time so quicker to make. This recipe uses baking powder which helps it rise or puff up while frying
- These donuts resemble cake donuts with a more dense, firm texture.
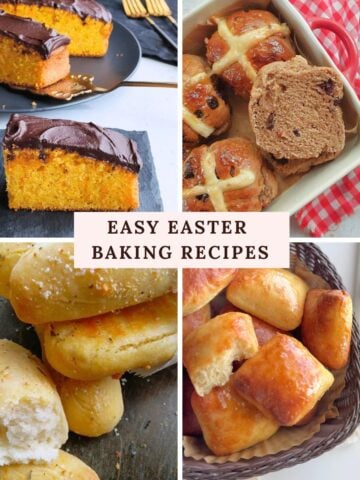
Visual Instructions
These visual instructions help you see the process. You can also find the full printable recipe with instructions and ingredients at the end of the post.
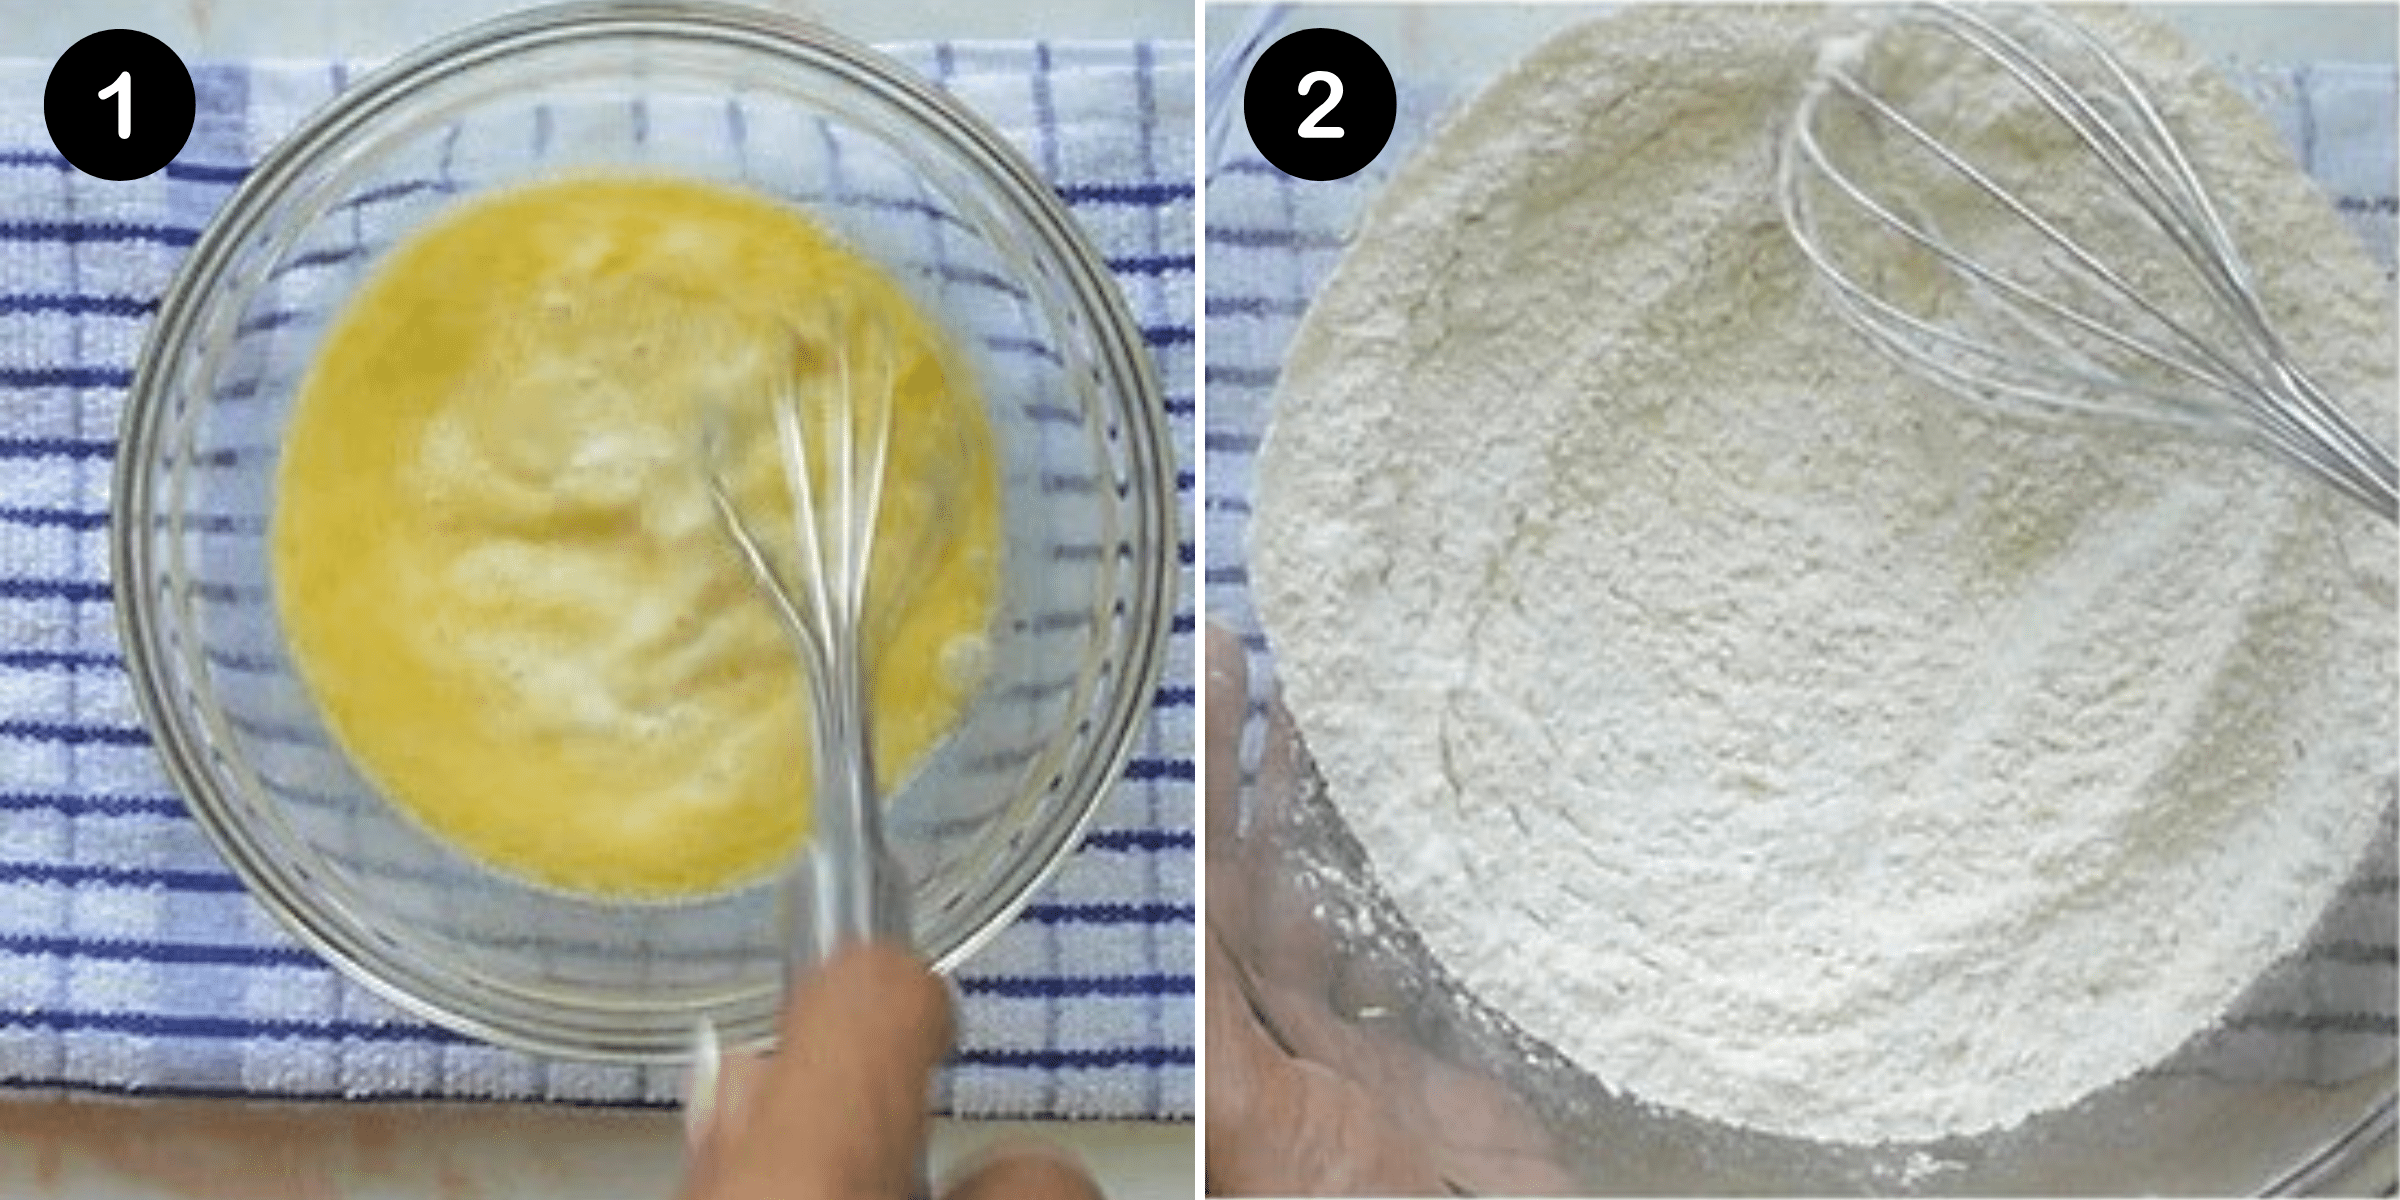
- Wet ingredients: Whisk together melted butter, oil and milk in a large bowl and set aside.
- Dry ingredients: In a separate bowl, whisk together the flour, baking powder, sugar and salt.
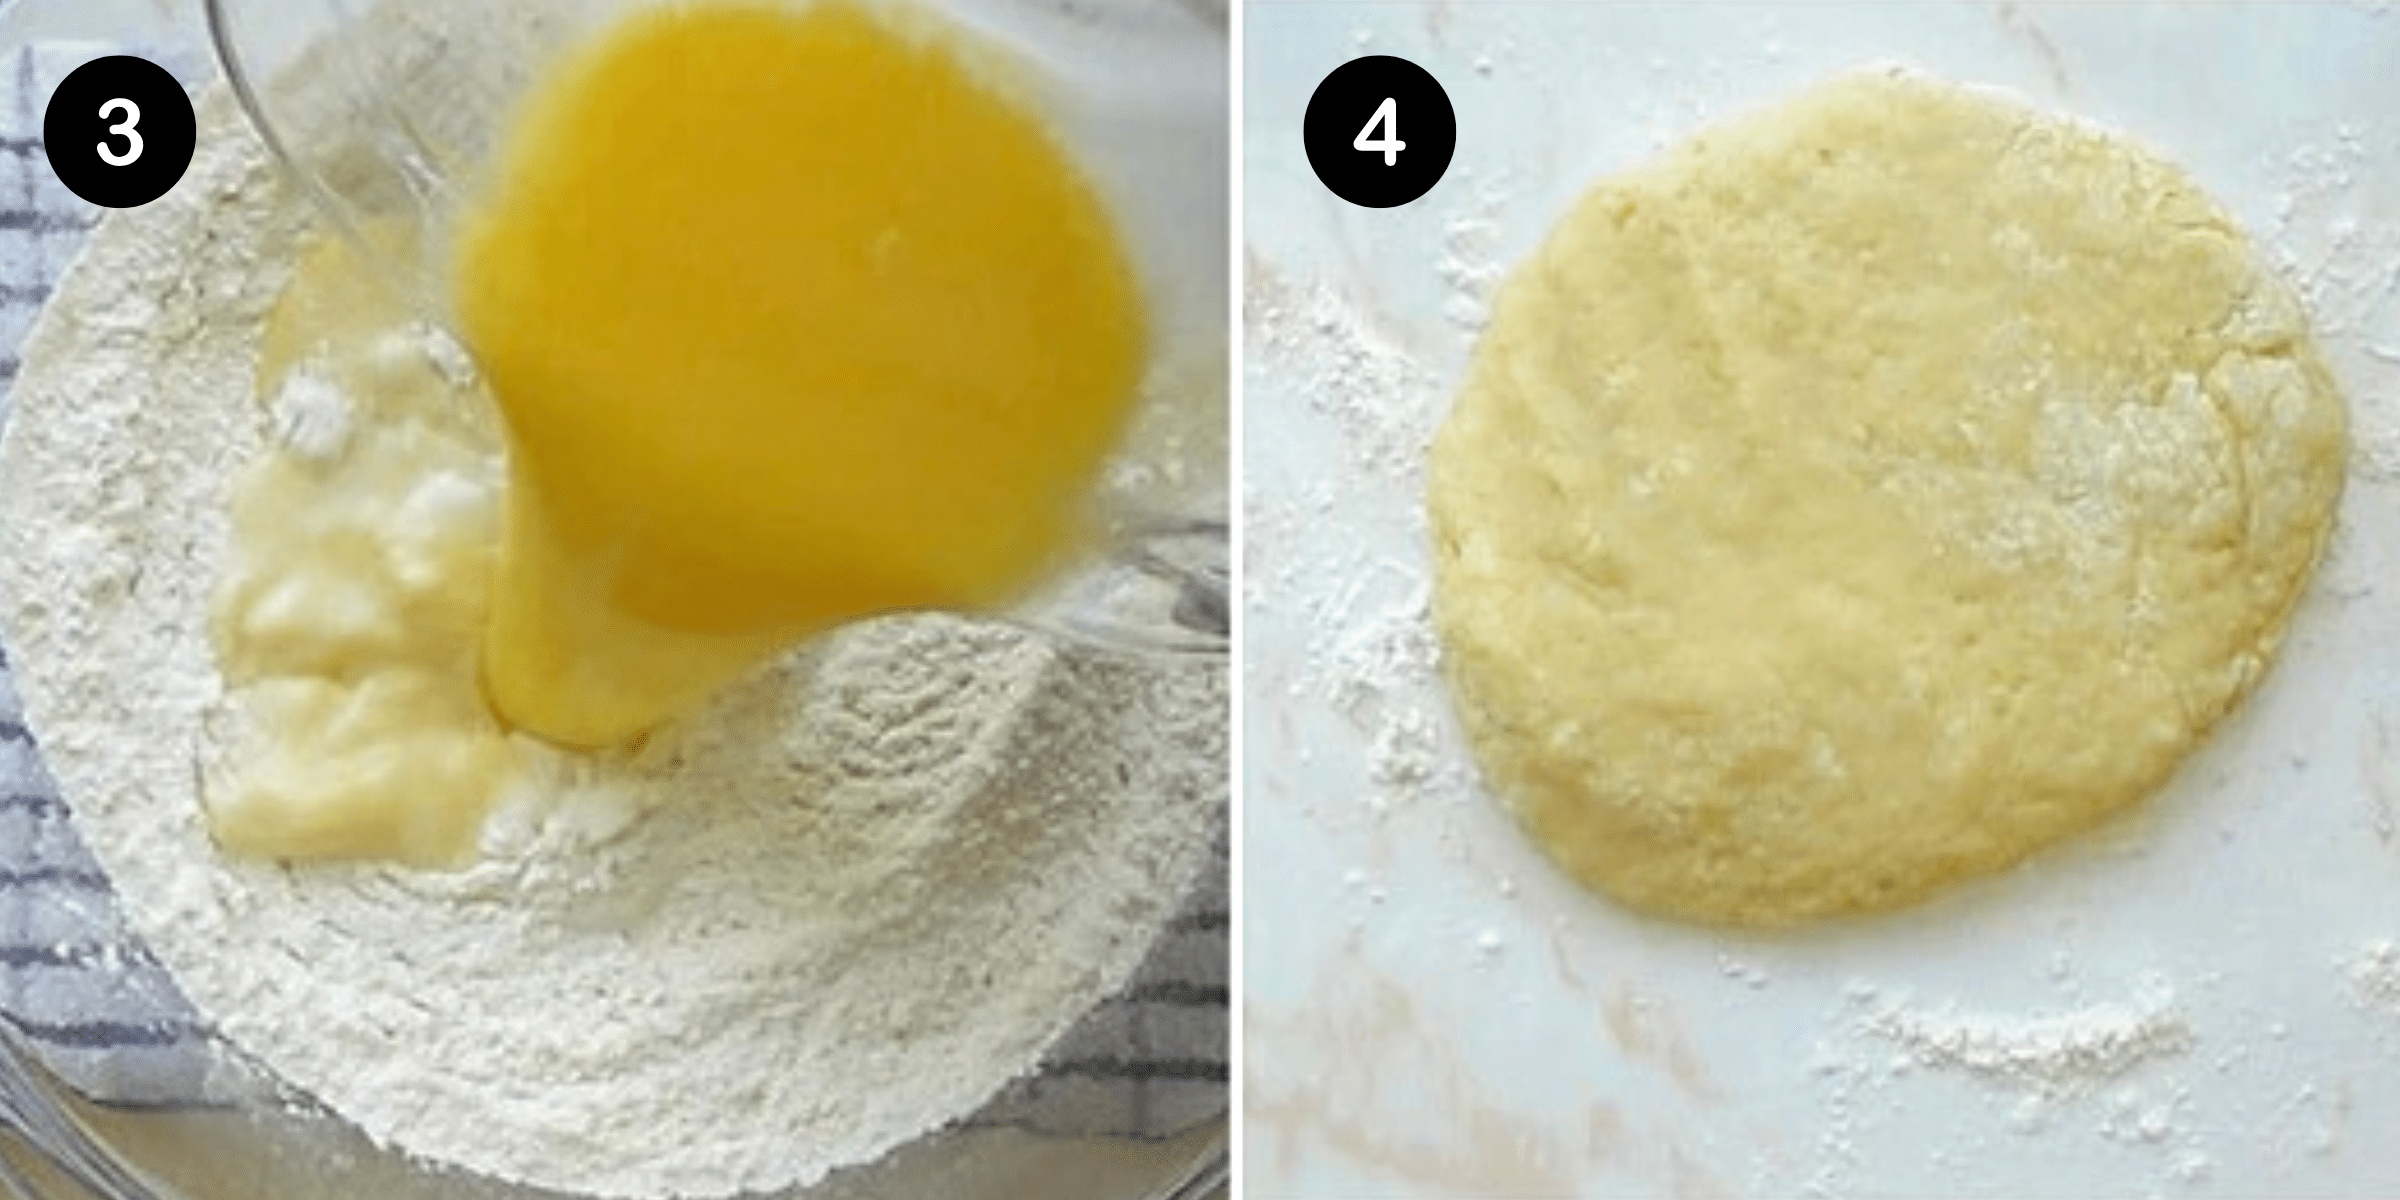
- Combine wet and dry ingredients: Pour the wet ingredients into the bowl with the dry ingredients. Using a spatula or spoon, mix until combined. You can add a tablespoon of flour to the dough if you feel that it is too sticky.
- Gather the mixture to form a soft dough but do not knead the dough. Press out the dough to about ½ inch / 12mm thickness
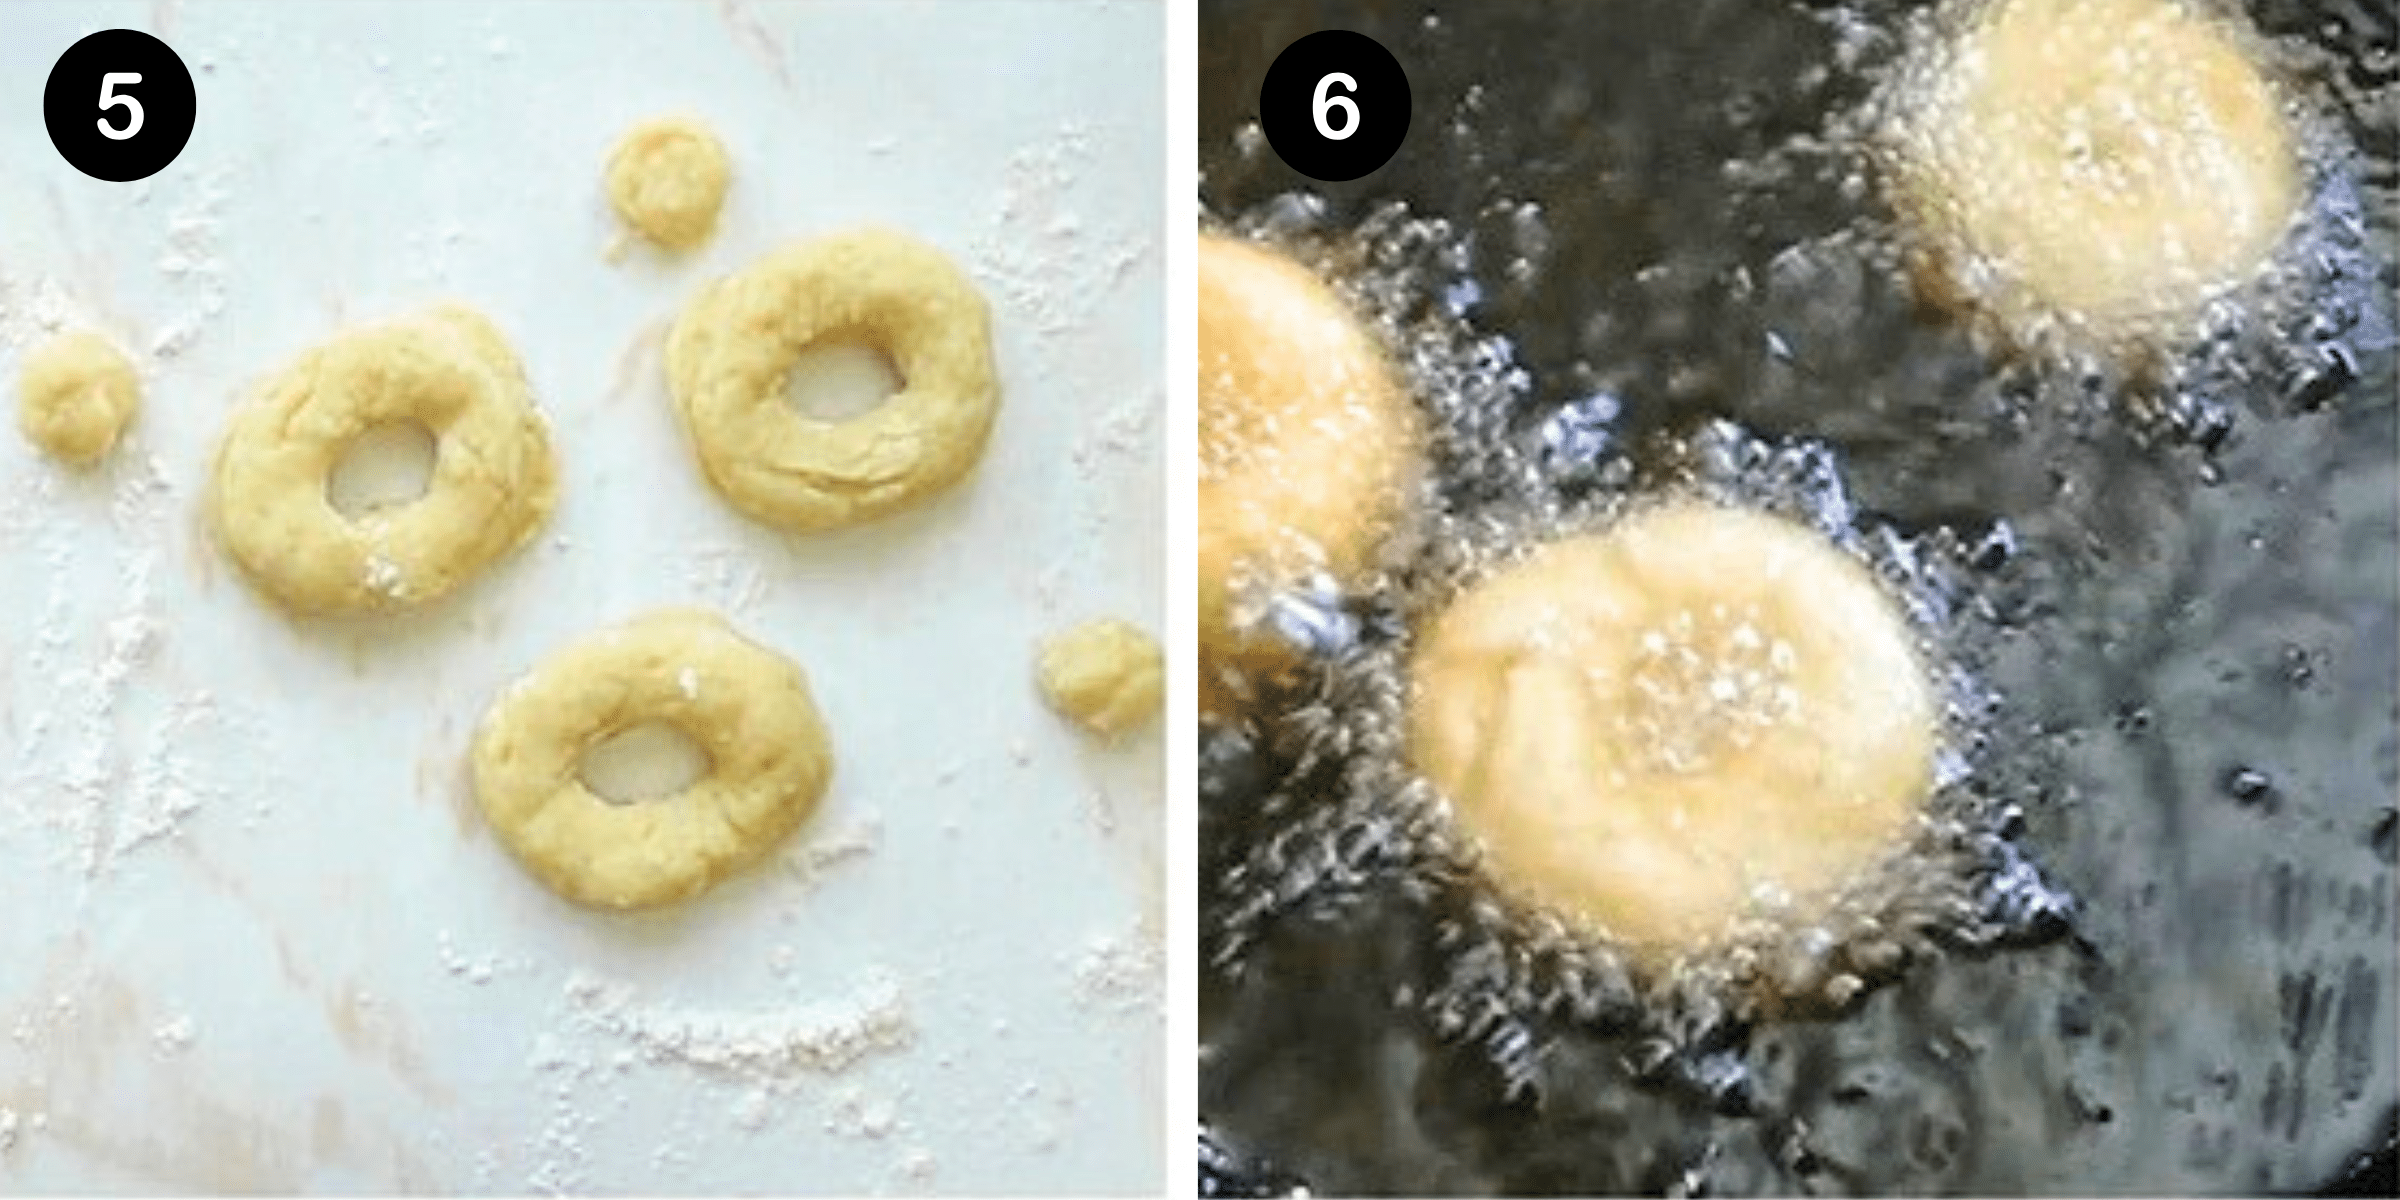
- Cut out using a donut or cookie cutter.
- Heat oil in a deep pan. Test readiness by frying a small dough piece. If golden and floating, it's ready. Fry donuts for 3 minutes per side until golden brown. Drain on paper towels. If you prefer a softer outer crust then glaze the donuts while still hot

Tips
Dough consistency
- The dough should feel soft, smooth, and slightly firm, not too sticky or too dry.
- It should hold its shape when pressed without crumbling or sticking to your hands. This will also prevent it from falling apart while frying.
Frying
- Heat the oil to 175-180°C (350-360°F) If the oil is too cold, donuts absorb oil and become soggy, making them more likely to break.
- If it's too hot, the outside browns too fast while the inside stays raw, making them fragile.
- Fry in small batches, flip gently, and avoid flipping too soon to help them hold their shape.
Test if the oil is ready
- With a Thermometer: Check that the oil is 175-180°C (350-360°F).
- Without a Thermometer: Drop a small piece of dough into the oil. If it bubbles immediately and floats to the top turning golden in about 60 seconds, the oil is ready.
- Wooden Spoon Method: Dip the end of a wooden spoon or chopstick into the oil. If steady bubbles form around it, the oil is at the right temperature. If it bubbles too fast, it's too hot, if there are no bubbles, it's too cold.
Glaze
- If you prefer a softer outer crust then glaze the donuts while still hot. As it soaks in it will create a softer crust.
- Recipe for glaze included in recipe card below
Topping ideas
- Roll the warm donuts in a mixture of cinnamon and sugar
- Dip in warm melted white, dark or milk chocolate
- Add a bit of fun with colour sprinkles over the chocolate
- Drizzle glaze over the donuts as I have done with this recipe
Storing
These donuts are best enjoyed the same day they're made. Store them at room temperature in an airtight container for up to one day to keep them fresh.
Enjoy ♥
Recipe
No Yeast Soft Donut Recipe
Watch how to make the recipe
Wet ingredients
- ¼ cup butter
- ½ cup milk
- 2 tablespoons oil plus extra for deep frying
Dry ingredients
- 2 cups all purpose (plain flour)
- ½ cup white granulated sugar
- 1 level teaspoon baking powder
- ½ teaspoon salt
Glaze (optional)
- 1 ½ cups powdered / icing sugar
- 2-3 Tablespoons hot water
Wet ingredients
- Melt the butter in the microwave or on the stovetop. Once melted,add in the oil and milk. Mix until combined and set aside.
Dry ingredients
- In another bowl, sift the flour and baking powder and stir in the sugar and salt.
Combine wet and dry ingredients
- Make a well in the center of the dry ingredients and pour in the melted butter mixture.
Make the dough, shape and fry
- Using a spoon, mix until combined. Add a tablespoon (9g) of flour to the dough if you feel that it is too sticky. Do not knead the dough (SEE NOTE 1)
- Turn out the dough onto a floured surface. Press out the dough to about ½ inch / 12mm thickness and cut out using a donut or cookie cutter.
- Heat the oil to 350-360°F (175-180°C) Test readiness by frying a small dough piece. If golden and floating, it's ready. Fry donuts for 3 minutes per side until golden brown. Fry in small batches, flip gently, and avoid flipping too soon to help them hold their shape. (see notes 2 and 3)
- Transfer the cooked donuts onto a plate lined with paper towels.
- Glaze the donuts while still warm.
Glaze (optional)
- Mix powdered / icing sugar with 2-3 tablespoons of hot water.
- Whisk well until silky and smooth and dip one side of the donuts into the glaze. Place the glazed donuts onto a wire rack to allow excess glaze to drip off the donuts.
- These donuts are best eaten immediately or preferably on the same day that it has been prepared.
- Dough Consistency: Work lightly and gently with the dough. Overhandling and kneading can cause it to crumble and break during frying.
- The dough should feel soft, smooth, and slightly firm, not too sticky or too dry.
- It should hold its shape when pressed without crumbling or sticking to your hands. This will also prevent it from falling apart while frying.
- Heat the Oil to 350-360°F (175-180°C):
- If the oil is too cold, donuts absorb oil and become soggy, making them more likely to break.
- If it's too hot, the outside browns too fast while the inside stays raw, making them fragile.
- Test if the Oil is Ready:
- With a Thermometer: Check that the oil is 175-180°C (350-360°F).
- Without a Thermometer: Drop a small piece of dough into the oil. If it bubbles immediately and floats to the top, turning golden in about 60 seconds, the oil is ready.
- Wooden Spoon Method: Dip the end of a wooden spoon or chopstick into the oil. If steady bubbles form around it, the oil is at the right temperature. If it bubbles too fast, it's too hot. If there are no bubbles, it's too cold.
Hungry for more?
Sign up for my free newsletter to get emails about new recipes .And don't forget to follow me on YouTube, Facebook, Pinterest, and Instagram for all the latest deliciousness


neil@neilshealthymeals.com says
Wow. It's been ages since I made donuts and this is just the easiest and best recipe for them I've seen in a while. Not to mention totally delicious looking! Yum! 😀
Kelly @ Kelly Lynn’s Sweets and Treats says
These look so yummy and just a few ingredients!! I wonder if I could make them in my air fryer?!
Kam says
I personally use baking soda and vinegar to make soft baked goods but nonetheless these still look really good! Wish I could try them but I have gluten sensitivities.
SZ. says
I also have gluten sensitivities and I was able to make these with gluten free flour! I didn't attempt to make them into traditional donut shapes though, I just made them into donut holes. I added a little more milk, maybe a teaspoon more since gluten free flour is a little dryer most of the time. I used the King Arthur brand of flour, and besides the extra milk, I followed the recipe exactly. I think that they turned out well and would make again.
Shezara says
Thanks for ur post. I also eat gluten free but I'm wondering if the bob red mills 1:1 baking flour will work since that is what I happen to have on hand at the moment
The Gardening Foodie says
Hi Shezara, you are welcome 🙂
Regarding your question: I am really sorry, but I have not tested this recipe with Bob red mills 1:1 baking flour or any gluten free flour, so not sure how it will turn out.
I have just used either all purpose or cake flour for this recipe.
Komal says
Nice will definitely try
Sushma says
Will try sounds interesting yummy n eady
CheshireCat says
Hi, your recipe looks great & I really want to try it! One question though: can I bake the donuts instead of frying them? Also how long do they stay soft?
The Gardening Foodie says
Hi, CheshireCat, thank you.
I have always fried these donuts and never baked them, so I am not sure of how they will turn out when baked. If you are looking for a baked recipe, I have this great recipe for baked donuts which you can give a try.
Like most donut recipes, they stay soft and are best eaten on the same day as it is fried.
I hope that this helps answer your questions
Céline Dignard says
I made them today. Added a tablespoon of sour cream into the milk mix...my hubby enjoyed the crunchiness on the outside and soft as cake on the inside...first time i made doughnuts without eggs...quickie recipe that might just satisfy your craving!
Crystal says
Did you use all purpose flour or cake flour?
The Gardening Foodie says
Hi Crystal, I used cake flour
Rayla says
This was a delicious and easy treat. To anyone reading this comment definitely try. I wish i could give 10 stars. Thank you for putting this recipe out onto the internet. 🤤 ⭐️⭐️⭐️⭐️⭐️⭐️⭐️⭐️⭐️⭐️
Reena luchmee says
Thanks for sharing your recipe...i just finish mine, and they come up really nice...crunchy and of course soft.. My kids loved it..
The Gardening Foodie says
Hi Reena, You are welcome and thank you for your kind words 🙂 I am really glad that you and your kids loved these doughnuts 🙂
Karen says
What temperature do you bring the oil to?
The Gardening Foodie says
Hi Karen, it should be between 360°F and 370°F ( 180°C and 190°C)
Jennifer says
How many donuts will this recipe yield?
The Gardening Foodie says
Hi Jennifer, the recipe yields about 15 to 20 donuts, but it also depends on the size of the cutter which you are using 🙂
Jennifer says
My friend and I tried this recipe this morning, we burnt the crusts of the first four doughnuts (the oil was too hot!). HAHA. But the inside was still edible and soft, delicious! Good thing, the next ones were great. We made 13 doughnuts in all using a round cookie cutter. Thanks for this recipe!
The Gardening Foodie says
Hi Jennifer, You are welcome LOL 🙂 I am glad that you gave this recipe a try and that you loved it too. Thank you for letting me know how it turned out 🙂
Rachel Brooks says
Sounds very delicious 🍩🍩🍩
Zerubbabel Lindsey says
Can I bake these donuts?
The Gardening Foodie says
Hi Zerubbabel, I have only fried these donuts and have not baked them, so I am not sure how they would turn out. There are however a few donut recipes on my blog like this Chocolate Cake Doughnuts if you would like to give it a try. These are also yeast free and taste amazing.
Amos says
I love doghnuts but here in Fiji evrything stuff are expensive...I hope this will answer my hope of making doghnuts.Cheap and easy ...and be yummy.
Emily says
Hi! Could I add coco powder to these to make chocolate donuts?
The Gardening Foodie says
Hi Emily 🙂 yes you can add cocoa powder to the flour. Ensure that you sift the cocoa powder with the flour to avoid any lumps in the mixture.
Robs says
Just made these doughnuts! They came out perfect! Thank you
The Gardening Foodie says
Hi Robs, thank you and you are welcome...I am glad that you loved this recipe too 😃
Deb says
Can you keep the oil and use again? I've never deep fried anything so not sure. Thanks!
The Gardening Foodie says
Hi Deb, I avoid reusing oil as much as possible. Especially with a recipe like this. You are going to get little pieces of dough sometimes breaking off the doughnut as it fries. These tiny pieces might burn in the oil. It can be strained once completely cooled, but it is going to affect the taste of the next food that you fry in the same oil.
I hope that this helps to answer your question 🙂
Rachel says
We fry food often and reuse the oil, just make sure you strain the oil before storing! It will get dirty after awhile and you'll need to get fresh but it can be used for a few frys. It will affect the taste some, so maybe don't fry doughnuts after fish or something like that. But french fries and doughnuts don't seem to affect it too much.
Reina says
Hi..can i just use melt the butter from the microwave? Is it necessAry that the butter should be heated?i want to try this recipe.thanks
The Gardening Foodie says
Hi Reina, yes you can melt the butter in the microwave. It should be slightly warm, just so that it combines easily with the dry ingredients. 🙂
Ashley says
Made this but used all purpose flour. It was delicious and easy to make!
The Gardening Foodie says
Hi Ashley, thank you..I am glad that you enjoyed this recipe too 😃
Kathy sheets says
Hi, I have a donut dropper, any idea how to make this thin enough to use the dropper vs rolling out and cutting?
The Gardening Foodie says
Hi Kathy, I have only ever rolled out this dough. Adding more liquid to thin it out is going to change the taste and texture of the donuts.
I hope this helps 🙂
Eleanor Edwards says
What am I doing wrong, mine are just falling apart in the oil
The Gardening Foodie says
Hi Eleanor. I am sorry that your doughnuts are falling apart in the oil.
The reasons this would happen could be overhandling of the dough which causes the dough to break when frying. The dough needs to just be gathered into a ball, pressed out lightly and shaped with a cutter. This dough needs to be handled very lightly, no kneading, and no rolling out with a rolling pin.
Allow it to fry on one side before turning it very gently as well. I hope that this helps answer your question 🙂
I will be doing a video on this recipe next week so that you can see how it is done if you would like to give it a try again
Azmeera Husman says
Hi please advise did you 2 cups of flour or one cup because 250g is one cup.
The Gardening Foodie says
Hi, Azmeera I used 2 measuring cups of flour. A cup of flour on a scale weights between 120-125g. So 2 cups will weigh between 240-250g.
Jackie C says
OMG!!!! These were amazing and so easy! Thank you for the awesome recipe. We ate them warm/hot covered in sugar. Next time I will do the glaze and do half the batch as chocolate.
The Gardening Foodie says
Hi Jackie, Thank you and you are welcome 🙂 I am glad that you enjoyed this recipe too 🙂
Charlotte says
What am I doing wrong, my dough turned into more of a batter than dough ☹️
The Gardening Foodie says
Hi Charlotte, sorry that you are having a problem with the dough. It is possible that the flour you added was insufficient. Try adding more flour, depending on how weak your dough is. Judging from what you say, I would suggest that you add 1 extra cup of flour to your dough. Work it in so that it forms a soft dough which you are able to cut into.
I will be uploading a video on this recipe later today, so you can see the consistency of the dough.
I hope that this helps answer your question and please let me know how it turns out 😃
Hi says
This was good
The Gardening Foodie says
Hi, Thank you 🙂
Kat Tillis says
By far THE BEST homemade donuts I have ever made and they were so easy! Nice and soft inside and slightly crispy on the outside. Definitely saved this in my favorites.
The Gardening Foodie says
Hi Kat, Thank you 🙂 I am glad that you love this recipe too 🙂
Georgia Ferguson says
can you freeze the dough?
The Gardening Foodie says
Hi Georgia 🙂 I am sorry, but I have never had to freeze the dough, usually because it is a quick dough to put together. I am not sure how this dough will work after it has been defrosted.
Beth says
This recipe is amazing! Thank you for sharing.
The Gardening Foodie says
Hi Beth 🙂 Thank you and you are welcome 🙂
Jessica says
The kids helped me make these. We had fun and the donuts are yummy! We doubled the recipe and made 16 large donuts. Thank you!
The Gardening Foodie says
Hi Jessica 🙂 Thank you for giving my recipe a try. I am so glad that you and your family had fun and enjoyed making these donuts.
LOL...doubling this recipe is ALWAYS a good thing, I do the same whenever I make these too 🙂
Erin says
Has anyone tried these in an air fryer?
Deanna says
Would love to know as well!!
The Gardening Foodie says
Hi, Deanna I have not tried this recipe in an air fryer and not sure how they will turn out but I do have this air fryer doughnut recipe if you would like to give it a try:
Air Fryer Doughnuts (yeast based, egg free)
I hope this helps answer your question 🙂
Keira Yeager Johnson says
So good and easy to make!!!
The Gardening Foodie says
Hi Keira ☺️ Thank you. I am glad that you enjoyed the recipe.
Mercy Chisveto says
These doughnuts were by far the best I've ever made. Great and easy recipe😋😋🤤🤤
The Gardening Foodie says
Hi Mercy, Thank you, I am glad that these doughnuts turned out great for you too 🙂
uthra says
Hi Ashika! How many donuts can you make with 2 cups of flour? Thanks’
The Gardening Foodie says
Hi Uthra, I get about 15 donuts with this recipe using 2 cups of flour. The number of donuts you get will also depend on the size of the cutter you are using.
I hope that this helps answer your question 🙂
UTHRA GOPALAKRISHNAN says
Yes, thank you! Trying it out this week for my son's birthday and will post back!
The Gardening Foodie says
Hi Uthra, you are welcome, thats great, I would love to know how they turned out 🙂
Etta says
Hi I tried these but they went brown very quick but not cooked inside x
The Gardening Foodie says
Hi Etta, I am sorry that these did not turn out well for you. I can offer a suggestion though if you would like to give this recipe a try again.: The oil should be at a medium-low setting to ensure that the donuts get a chance to cook inside before they brown too quickly on the outside. If the oil is too hot, they do tend to brown or burn on the outside before it has been cooked on the inside.
I hope that this helps 🙂
Matilda says
How many donuts does this make?
The Gardening Foodie says
Hi Matilda, this recipe makes approximately 20 donuts, but it will also depend on the size of the cutter you are using.
I hope that this helps answer your question 🙂
Linda says
Have you ever made this dough an hour or two in advance? I’m wondering if sitting for a while will make them dense, or if they still turn out well if you fry them a little while after making the dough.
The Gardening Foodie says
Hi Linda, Sorry, but no, I make this dough and use it immediately. I am not sure how it will turn out or how the dough will be affected if made in advance.
NGO says
Hey Ashika,
This is such a yum and quick donut recipe. Thanks Ashika.
I planned to make donuts for breakfast on Mother's day , but got to make it only for Lunch.. thanks to sweet suprises by my husband and children. ❤️❤️The donuts were so yum. They were not dense at all. In fact the kids suggested that I allow dough to rest a while the next time I make these goodies.
Elaine says
These reminded me of the doughnuts I had as a teen in my high school. IMO it's better than the other type of doughnut. I love the crunchy outside and soft inside!
Zoe says
Hi
Can I just use oil instead of butter?
The Gardening Foodie says
Hi Zoe, butter contributes to the flavor and texture of these donuts. You can replace the butter, but keep in mind, the texture and flavor will not be the same.
I hope this helps answer your question 🙂
Alyssa Zarbok says
Hi,I am 12 years old I did the recipe this morning it turned out really well. My cousin and brother loved them.
The Gardening Foodie says
Hi Alyssa, thank you that is absolutely great 🙂
Your comment really made my day 🙂 I am so happy that you tried out my recipe, that it turned out well and that your family enjoyed it too 🙂
Susan Read says
Hi, Can this recipe be shallow fried? Also after cooled can they be frozen?
The Gardening Foodie says
Hi Susan, Yes these donuts can be shallow fried for about 3 minutes on each side. Heat the oil to a medium setting to ensure that it cooks on the inside and does not burn on the outside. I would also suggest that you fry just one first as a test for how long it takes to cook. Follow the same time and procedure for the remaining donuts.
Regarding freezing. Yes these can be frozen for up to 1 month after frying and cooling completely. I'd say its best frozen without the glaze. Store in an airtight container when freezing. Defrost at room temperature.
I hope this helps answer your question 🙂
Treva says
would love to make these but was wondering if it really makes a difference using all purpose flour or cake flour
The Gardening Foodie says
Hi Treva, I love using cake flour in most of my recipes. including this donut recipe. It creates more of a softer textured bake. It has less gluten than all-purpose flour, which produces a donut that's chewy without being tough or dense.
However cake flour is sometimes not available in some countries. For that reason I give the plain flour or all purpose flour alternative.
I hope this helps answer your question 🙂
Deborah Ulm says
Thank you for sharing this recipe. My mom used to make homemade doughnuts now I'm making delicious memories with my son.
Definitely making again😋
Blimey says
Good morning, I just came across this Delicious recipe. 😋 & I must try it! G-d willing After Passover.
I'm allergic to yeast & I don't really care for baked Doughnuts.... when I'm frying my family the Yeast 1s.... (now I can make mine 1st.. then theirs.
Thanku !
Maggie says
Hi! How many donuts does this specific recipe make? Thank you!
The Gardening Foodie says
Hi Maggie, I used a 3 inch (7cm) round donut cutter which made about 12-15 donuts.
I hope this helps 🙂
Tara Connor says
Can you bake these doughnuts instead of frying?
The Gardening Foodie says
Hello Tara, Sorry, I haven't tried baking these doughnuts, so I'm not sure how they'll turn out.
Bella says
Could I substitute milk for condensed milk?
Bella says
Could I substitute baking powder with baking soda?
The Gardening Foodie says
Hi Bella, I’m sorry but unfortunately, baking powder can't be substituted with baking soda, and condensed milk can't replace milk.
These ingredients function quite differently and will change the taste and texture of the recipe.
Lia says
Hi, can I shallow pan fry these doughnuts or just deep fry?
The Gardening Foodie says
Hi Lia, these are best deep fried.
Lia says
Thank you
Jessica T says
I’ve tried this the way it was written and with cup4cup GF flour. Amazing. So easy to throw together, too.
The Gardening Foodie says
That makes me so happy to hear, Jessica. Especially that it worked well with Cup4Cup too, that’s really helpful.
Thank you so much for sharing how it turned out 😊