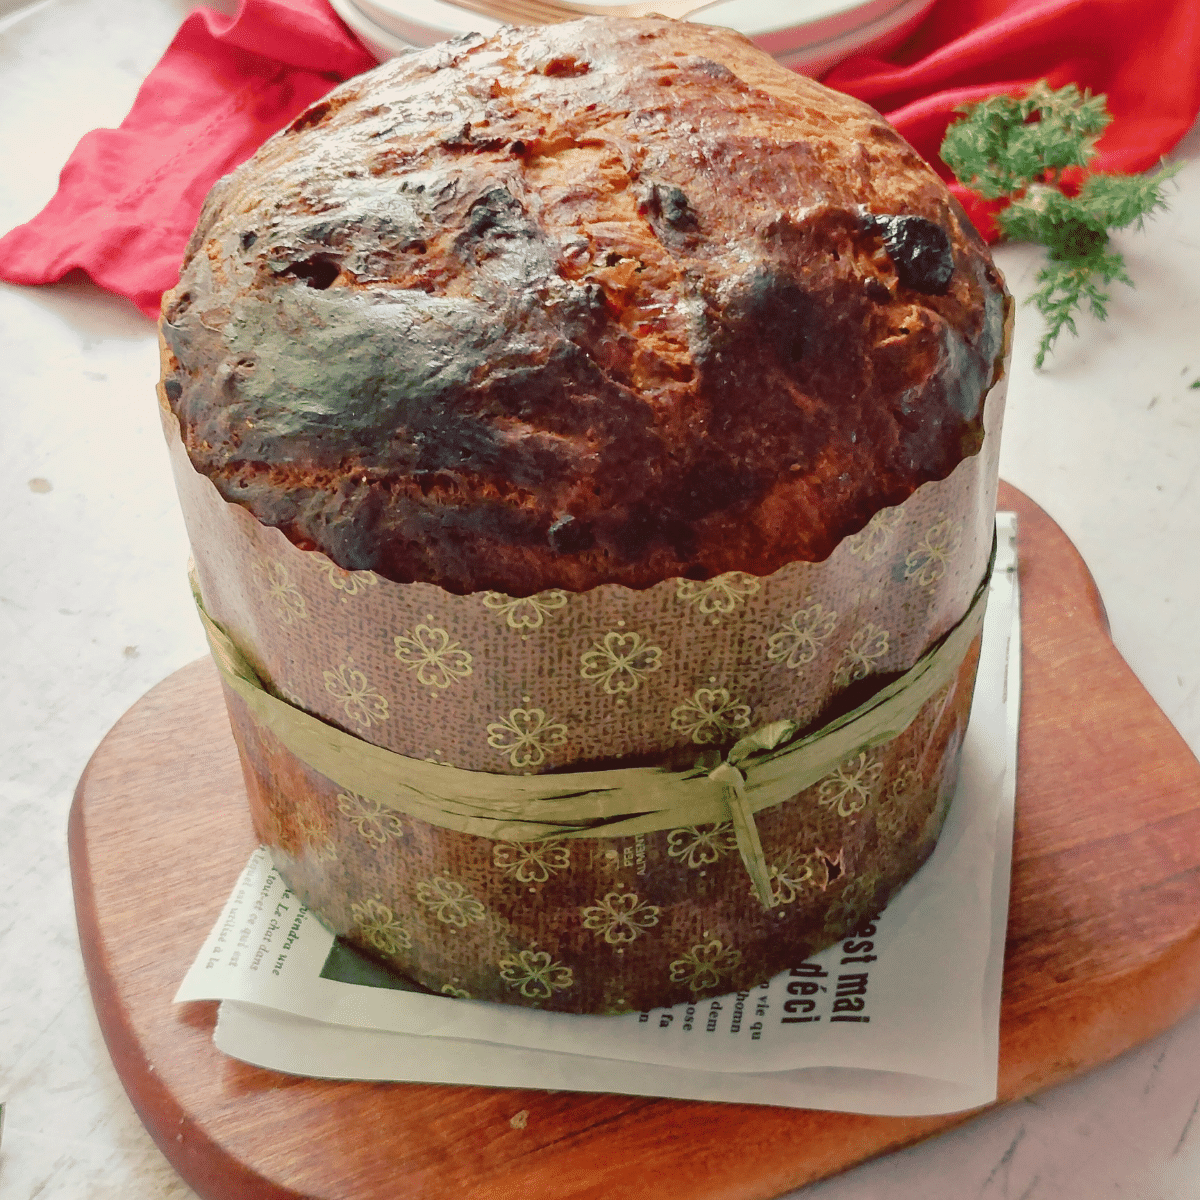
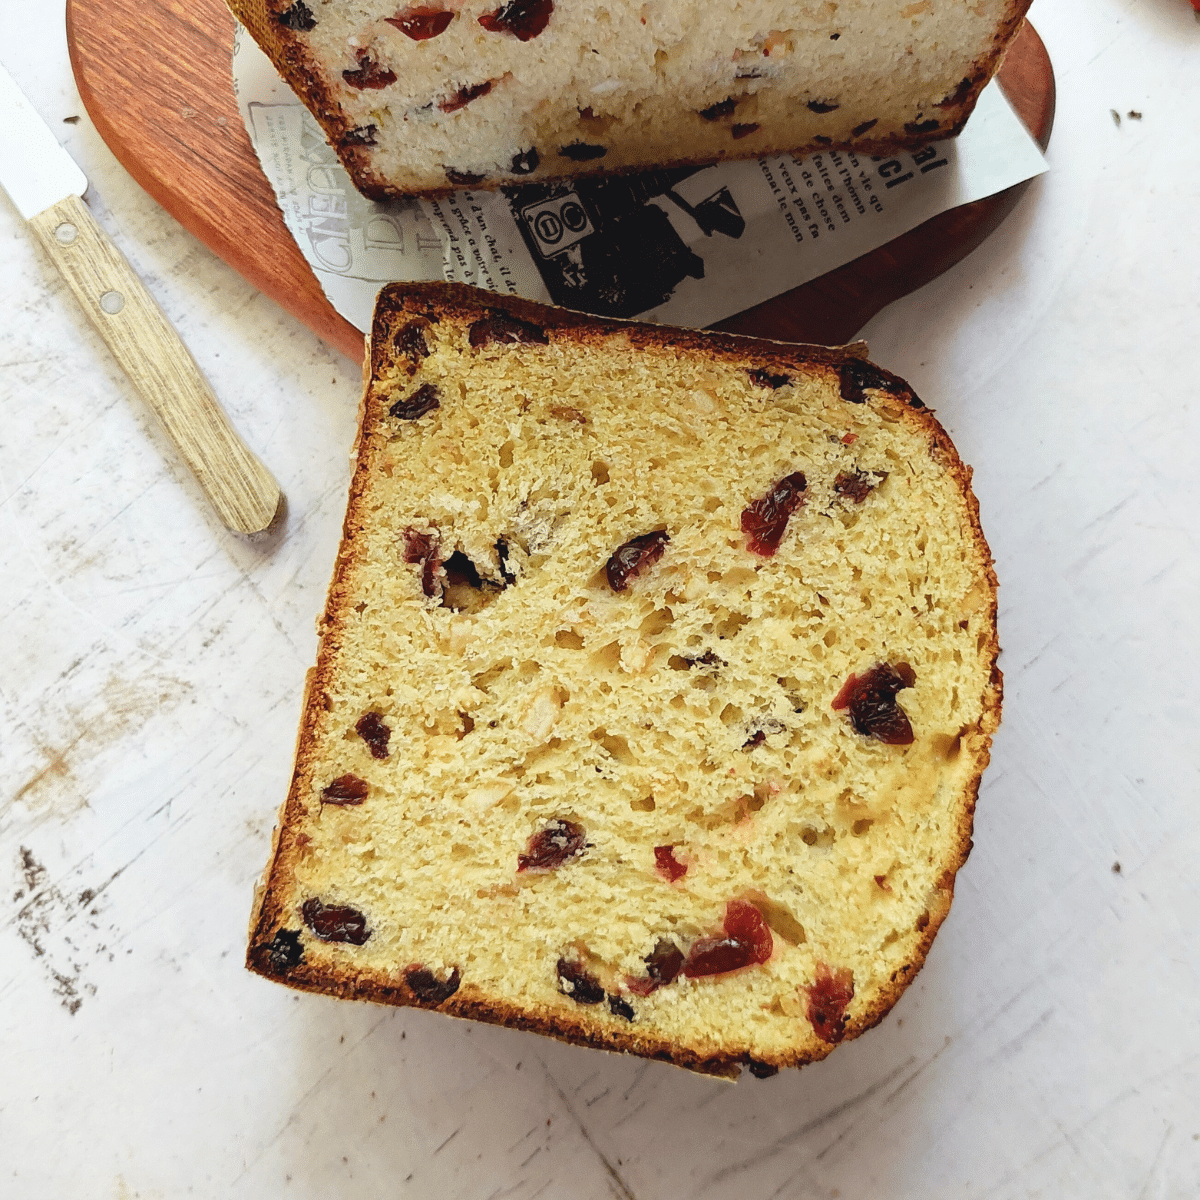
Indulge in the festive joy as you savor the buttery and delicious taste of this classic No Knead Italian Sweet Bread known as Panettone.
With this recipe, anyone can easily make Panettone without using a stand mixer or going through the kneading process.
Unlike the traditional Panettone, which requires several days of preparation, this version only takes a few hours, but the taste is still absolutely amazing!
What is No Knead Italian Sweet Bread (Panettone)
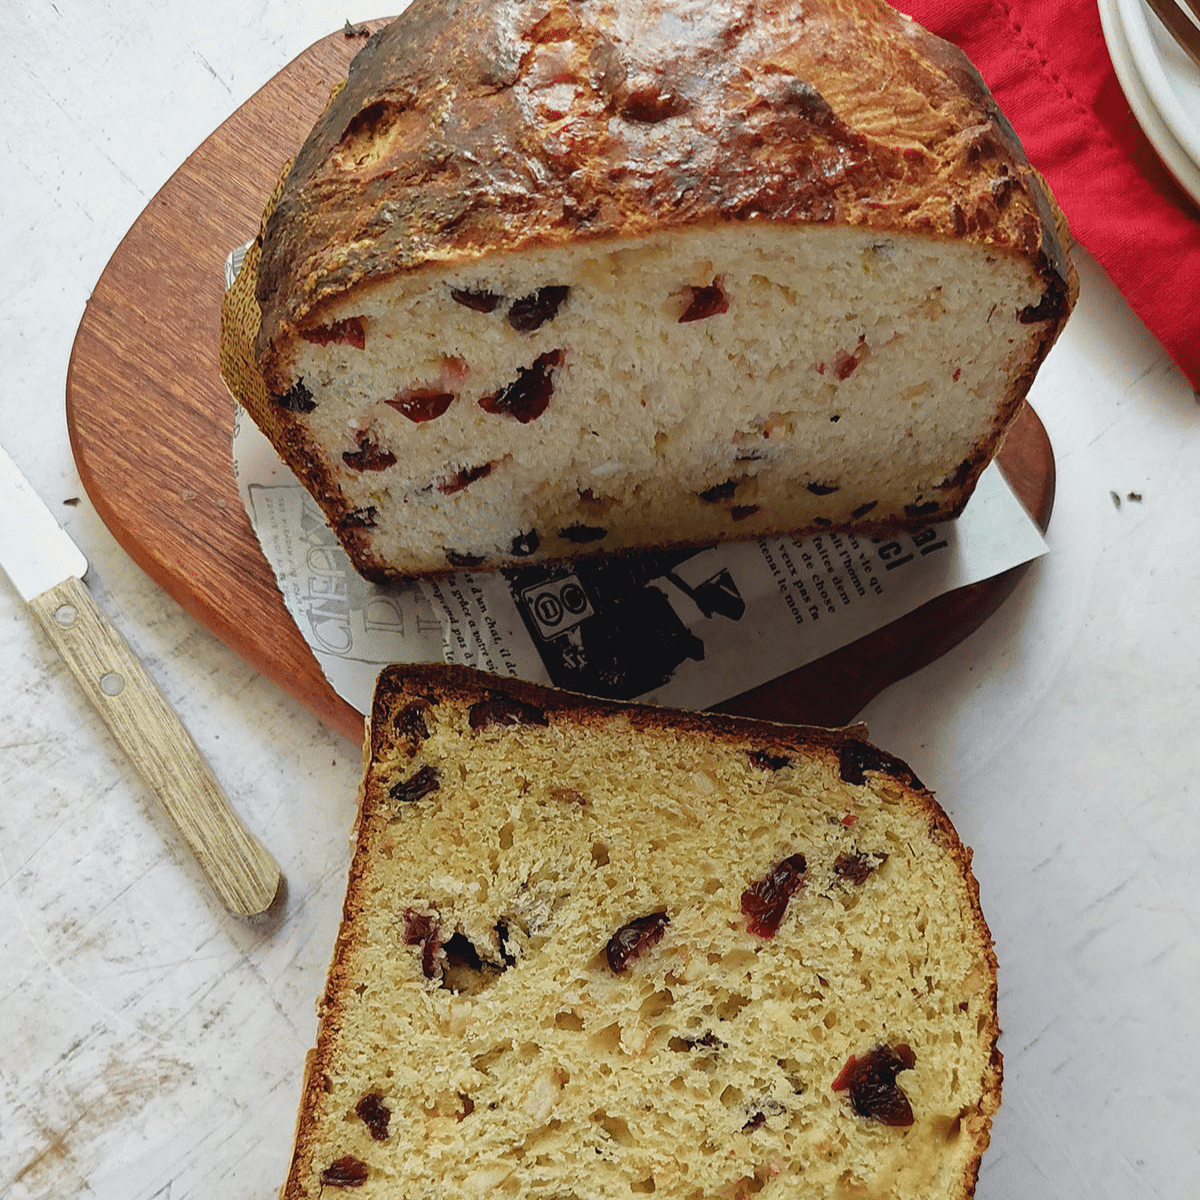
Traditional Panettone is tall domed shaped bread that's light and airy in texture.
The dough is rich and sweet, containing ingredients such as butter, eggs, and sugar. It often includes candied fruits, citrus zest, and raisins, which add flavor and texture to the bread.
I use a combination of dried cranberries, raisins, apricot and candied citrus peel. But feel free to use your favorite candied fruits.
Choice of Mold or Baking Pan for This Bread
Panettone is usually baked in special paper panettone molds, but if you don't have them, a regular cake pan works just fine.
- If you don't have a panettone paper mold, you can place the dough in a greased and lined cake pan with a 6-inch (15 cm) diameter and about 3 inches (7 cm) in height.
- If your pan is shallower, you can make a taller-sided pan by using a double layer of parchment paper when lining the sides. Make sure that the parchment extends about 2 inches (5 cm) above the rim.
Visual Instructions
Here are step by step pictures so you can see what the dough at each stage should look like.
The full printable recipe with amounts and instructions are at the end of this post.
Soak the dried fruit
- In a medium size bowl, soak the dried fruit in lukewarm water for about 15 minutes. Then you can drain and dry it before using it.
- I use a combination of dried cranberries, raisins, apricot and candied citrus peel which when combined weighed 1 ½ cups (225g) But feel free to use your favorite candied fruits.
- Alternatively, if you don’t like dried fruit use chocolate chips in the same quantity - just be sure to eliminate the soaking stage 😁
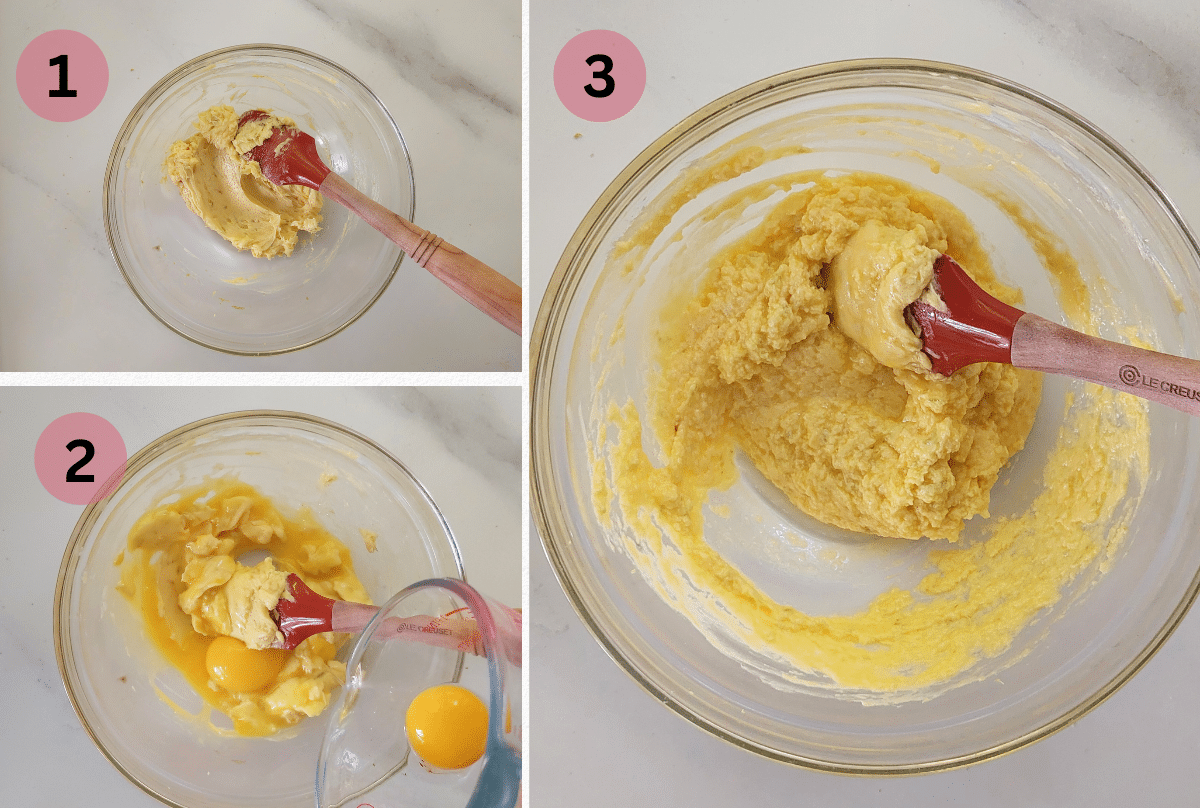
Butter-yolk mixture
- In a medium-sized bowl, use a spatula to blend ½ cup (113g) of salted butter, 1 teaspoon of vanilla extract, and 2 teaspoons of lemon or orange zest until the mixture is light and creamy.
- Incorporate 4 egg yolks, stirring after each addition.
- Blend with a spatula until the mixture is thoroughly combined, then set it aside.
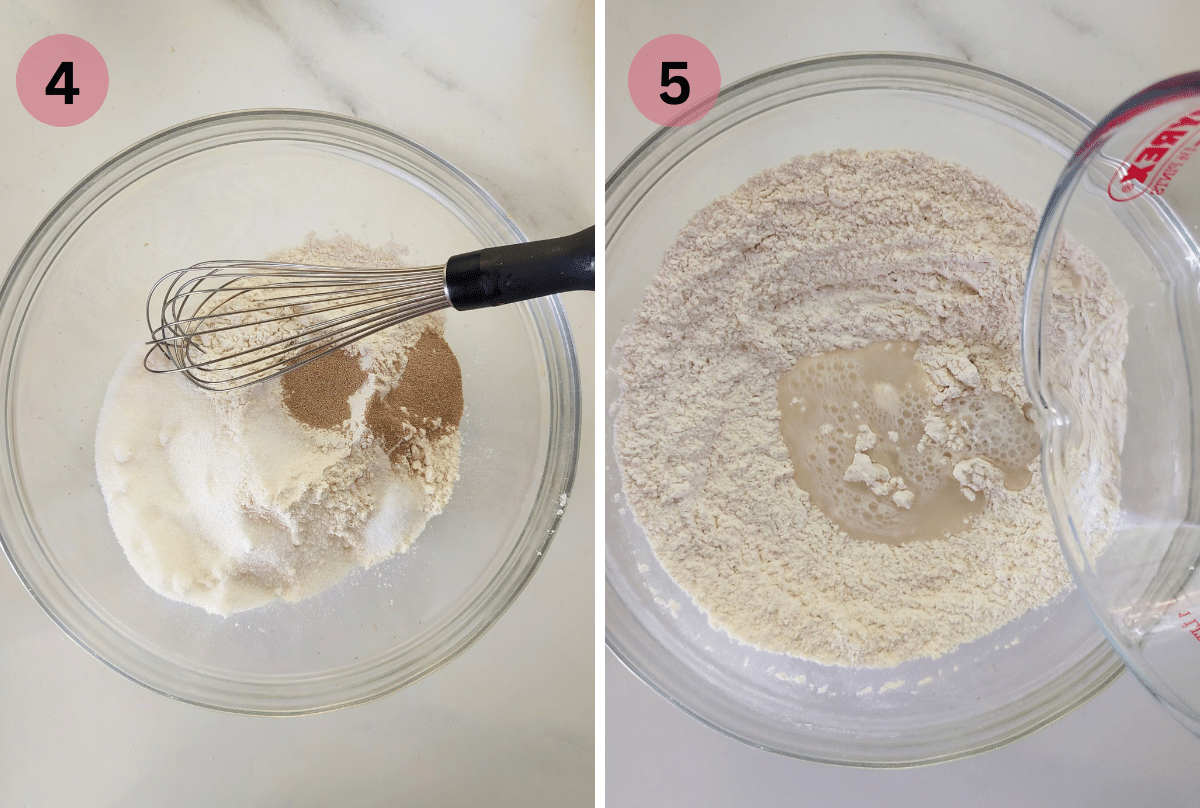
Flour mixture
- In a separate large bowl whisk together 2 ⅔ cup (340g) bread flour (recommended) or all purpose flour, ½ cup (100g) white granulated sugar, 1 ½ teaspoons instant dry yeast and ¾ teaspoon salt (add 1 teaspoon salt if using unsalted butter)
-
If you're using active dry yeast, use 2 teaspoons instead. Ensure that when using active dry yeast, you activate it with a little warm water - between 105–115 °F(40-46°C ) or according to the package instructions before adding the mixture to the flour.
- Add ⅔ cup (160ml) of warm water (approximately 105–115 °F or 40-46°C) and mix it in.
- While the liquid may seem minimal compared to the flour, resist the urge to add more water. Doing so could lead to the dough becoming overly sticky once you incorporate the butter-yolk mixture in the next step.
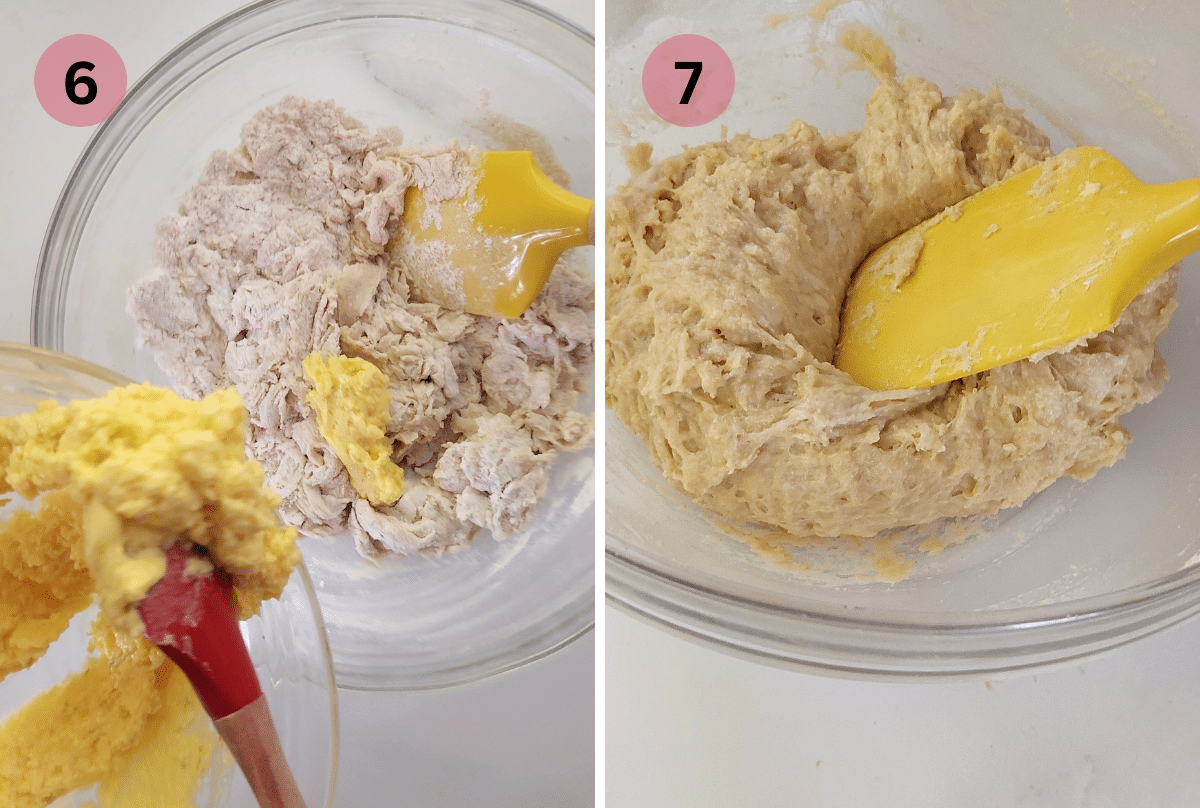
- Add the butter-yolk mixture
- Mix well with a spatula until the butter-yolk mixture is well incorporated. The dough will be very soft and sticky.
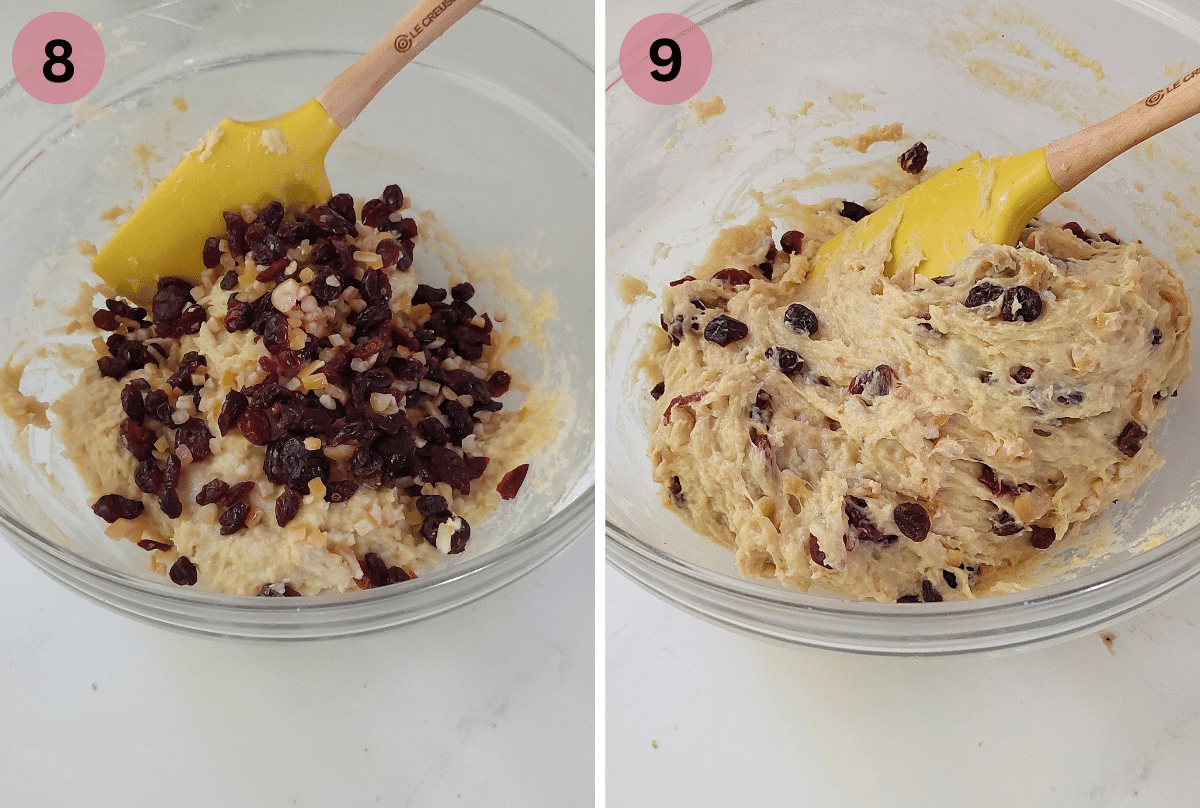
- Drain out excess water from the soaked dried fruit and add it to the dough
- Use a spatula to combine the dried fruit into the dough.
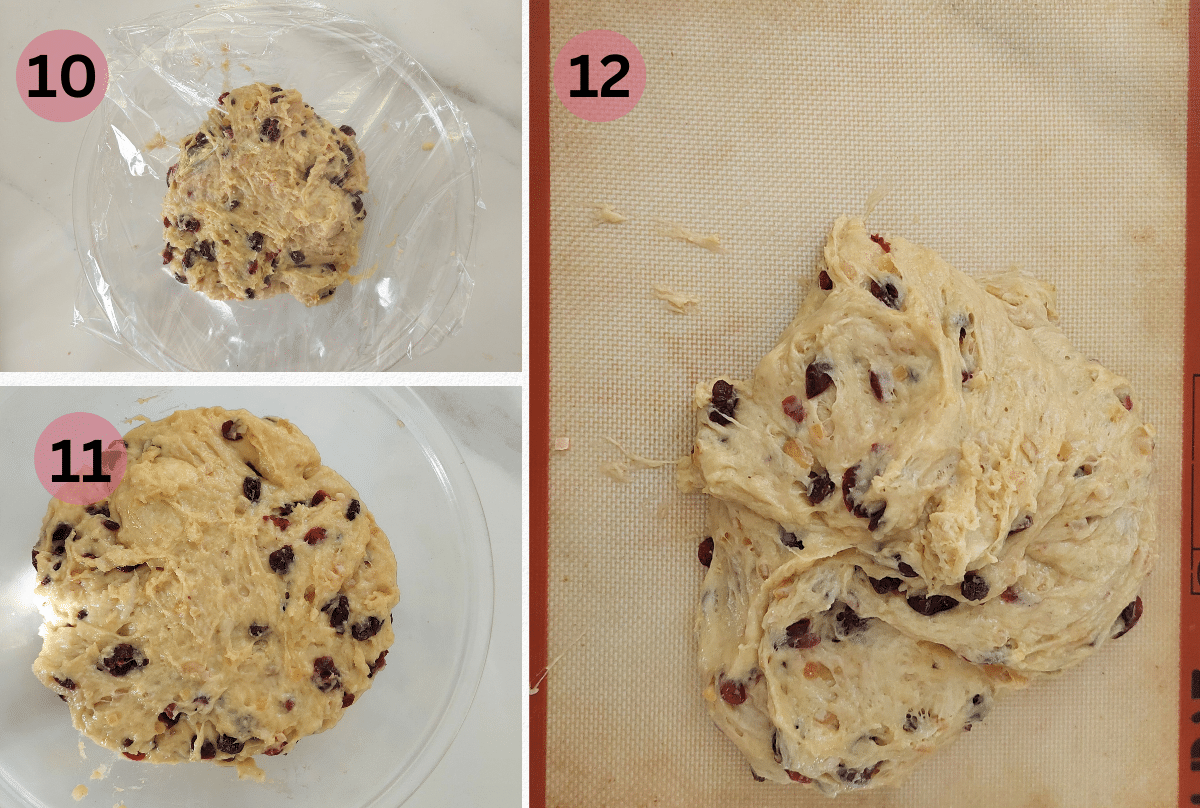
- Transfer your dough into a large bowl greased with butter, cover with plastic wrap.
- Allow the dough to rise in a warm location until it doubles in size, typically taking about 1 to 1 ½ hours. For further clarification on what this means, refer to the details below ⬇.
-
When your dough is in a bowl, it has the space to expand in all directions, not just upward.
-
So, it doesn't necessarily need to rise significantly to double in volume. For additional certainty, consider using a clear plastic container, like a dough bucket or an ice cream bucket.
-
Gently press the dough down until it's level, mark it with tape, and after 30 minutes, if it has reached twice the original height, it has doubled in volume and is ready to go!
- Once the dough has doubled in size turn it out onto a lightly floured surface.
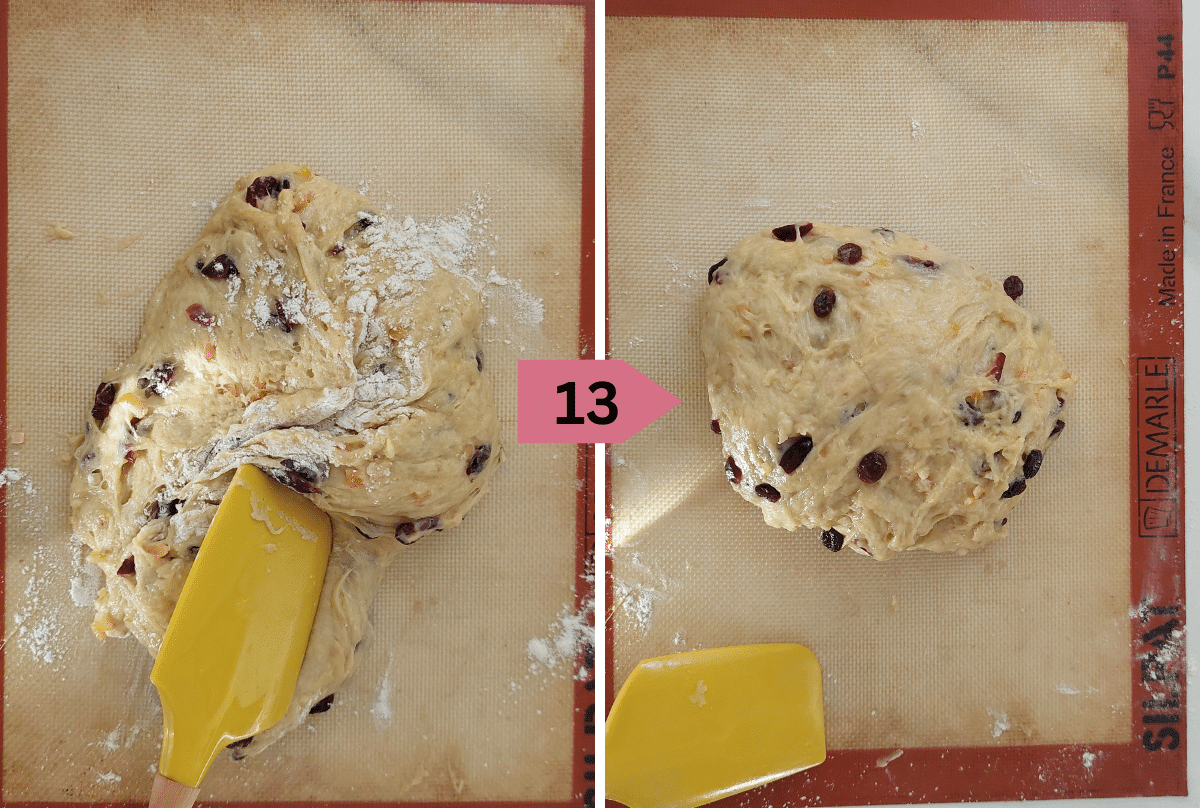
- Use your spatula to mix the dough, folding it in an inward motion for a few minutes until it forms a ball and becomes slightly less sticky.
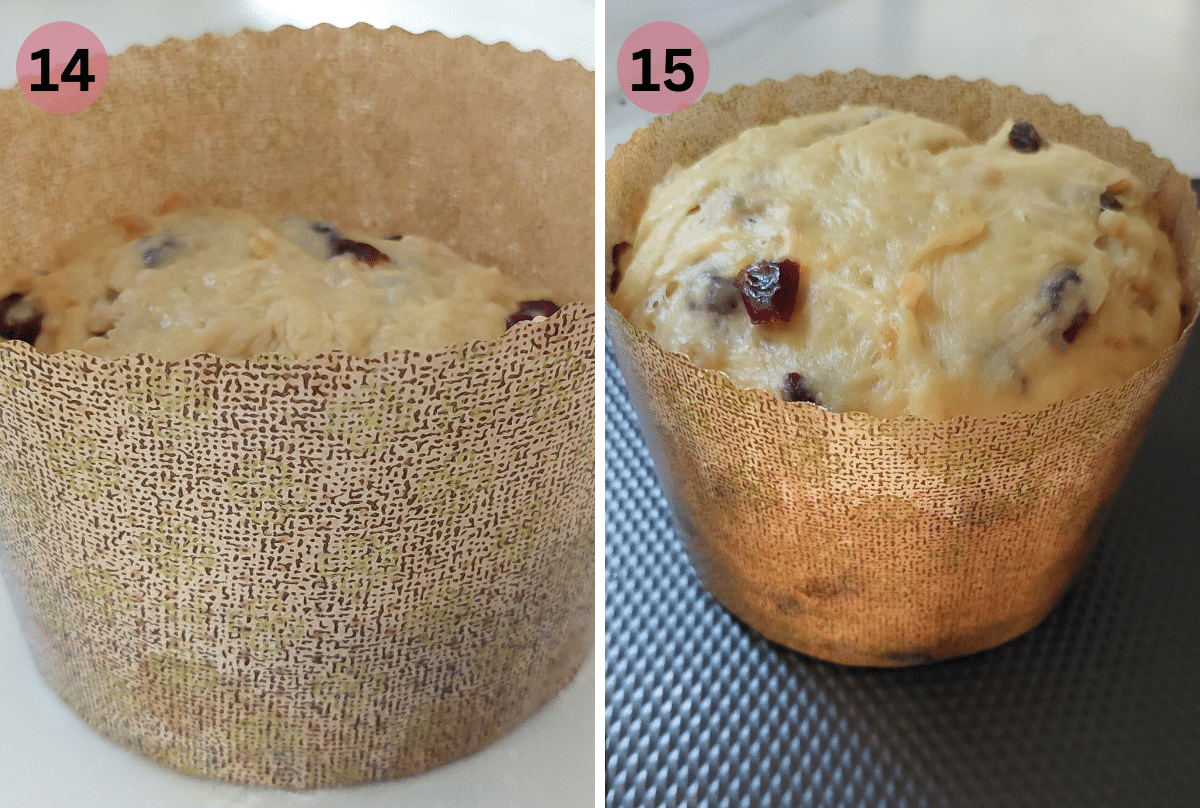
- Place the dough into a panettone paper mold. I used a mold that is 6 inches (15 cm) in diameter and 4 inches (10 cm) in height. See section on choice of mold for alternative baking pan)
- Cover loosely with plastic wrap and let rise in a warm location until the dough just about reaches the rim of the mold, about 1 to 1 ½ hours.
When the bread is almost done rising, position the oven rack in the middle of the oven and preheat to 356° F / 180° C (160° C fan).
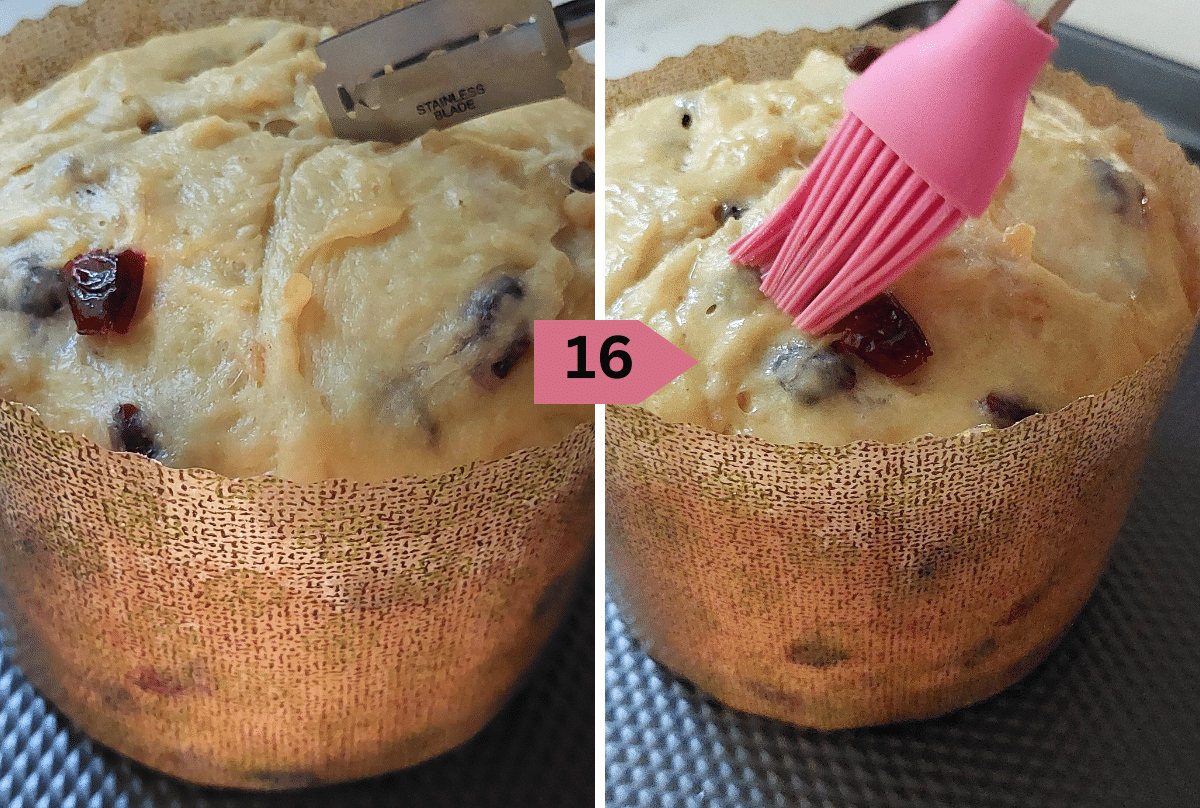
- Using a sharp knife, make a shallow cross on top. Then lightly brush the top with beaten egg or a little milk.
Bake in the oven for 40 to 45 minutes or until a skewer inserted comes out clean. Keep an eye on it, as oven times may vary. In my case, it was ready within 38 minutes. If you notice the top browning too quickly, simply cover the panettone bread loosely with aluminum foil.
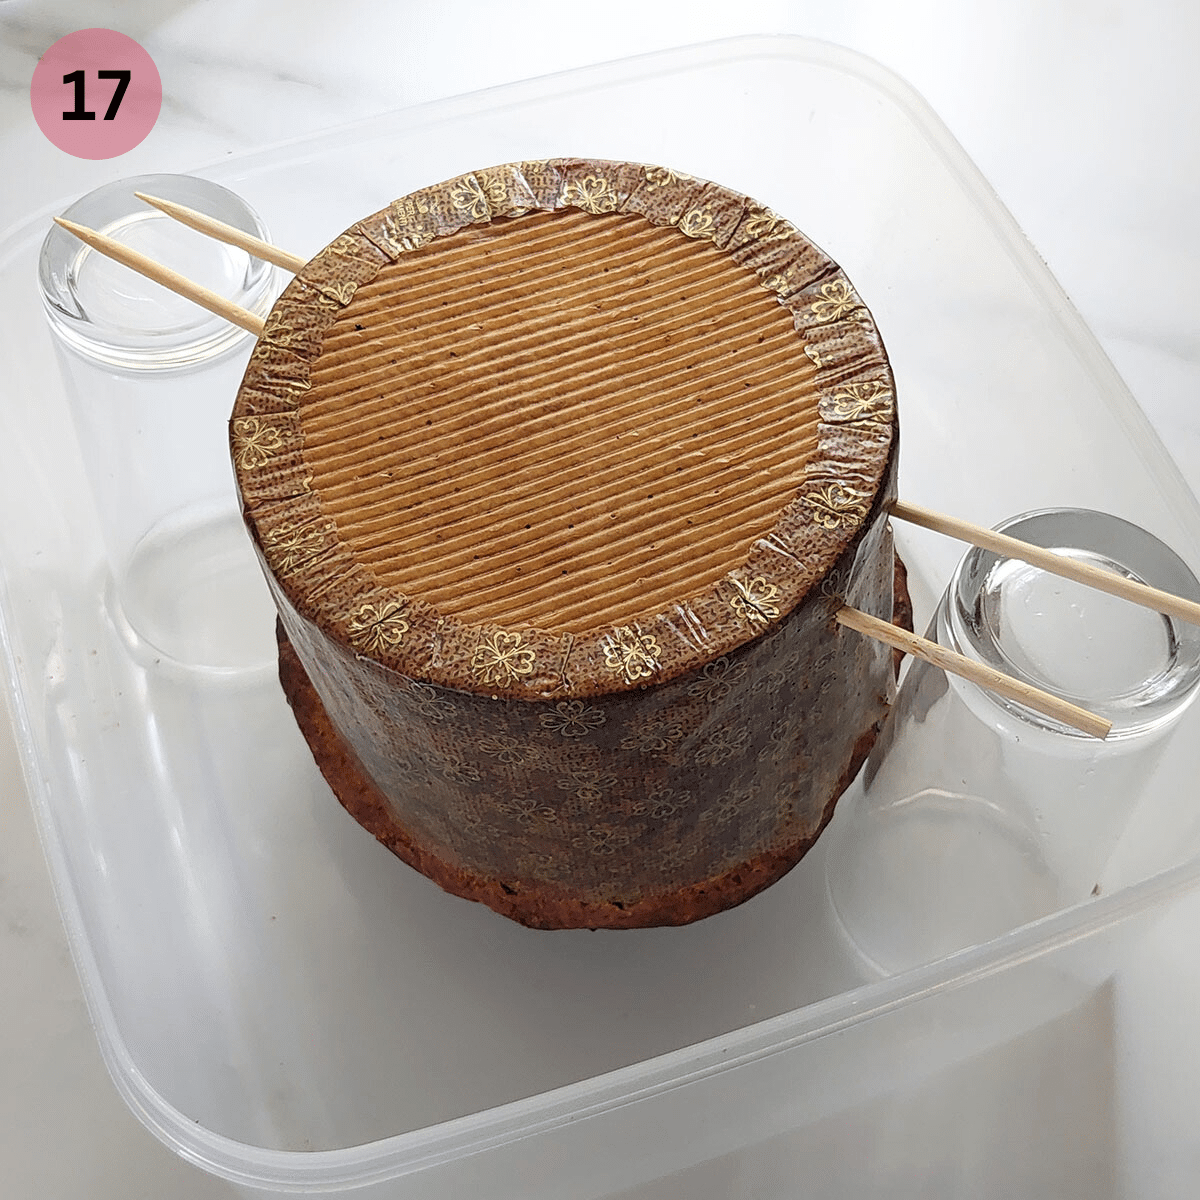
- Take it out of the oven, insert two long wooden or metal skewers about 1 inch (2 ½ cm) from the bottom, and flip the panettone upside down.
The Purpose of Hanging Panettone Upside Down After Baking
Hanging the panettone upside down helps prevent collapsing and ensures a lighter texture, avoiding a dense loaf. This method maximizes the air pockets, contributing to a softer overall texture for the bread.
I balanced the skewers using two tall glass cups.But you can also use a tall narrow pot or bowl, ensuring that the skewers rest securely on the rim.
When letting panettone cool and hang, it's better to leave a gap instead of allowing it to touch the bottom of any container or surface.
If you've chosen cake pans over a Panettone paper mold, avoid skewering or flipping.
Instead, let it cool in the pan for approximately 30 minutes, then carefully remove and invert it onto a wire rack to cool completely.
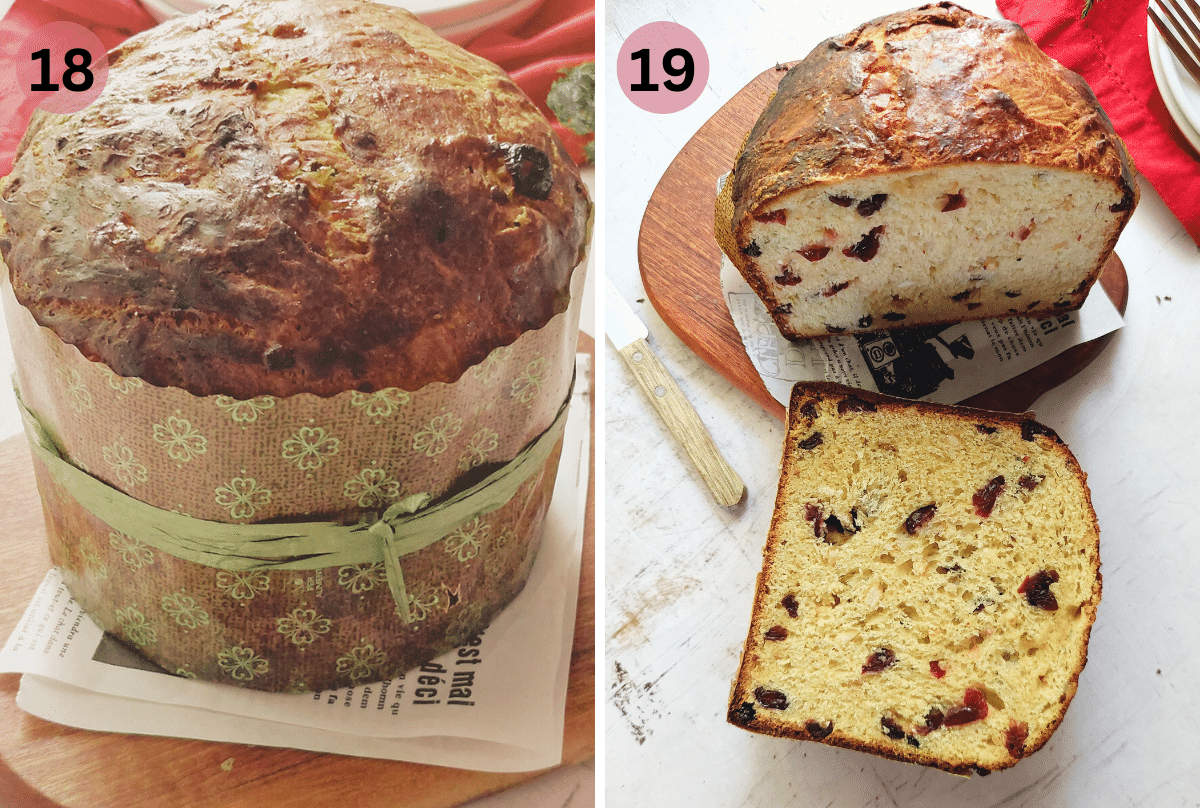
18 and 19: Slice and enjoy after it has completely cooled.
Recipe
No Knead Italian Sweet Bread known as Panettone
For the soaked fruit
- 1 ½ cups dried fruit (see note 1)
- Add just enough hot water to cover the fruit
Butter-yolk mixture
- ½ cup salted butter (softened at room temperature)
- 1 teaspoon vanilla extract
- 2 Tablespoons lemon or orange zest
- 4 egg yolks (from large eggs)
Flour mixture
- 2 ⅔ cups of white bread flour (Alternatively, you can use all-purpose flour if bread flour is unavailable)
- ½ cup white granulated sugar
- ¾ teaspoon salt (add 1 teaspoon salt if using unsalted butter)
- 1 ½ teaspoons instant dry yeast / rapid rise yeast (see note 2 if using active dry yeast)
- ⅔ cup warm water (approximately 105–115 °F or 40-46°C)
Soak the fruit
- In a medium size bowl, soak the dried fruit in lukewarm water for about 15 minutes. Then you can drain and dry it before using it.1 ½ cups dried fruit
- I use a combination of dried cranberries, raisins, apricot and candied citrus peel which when combined weighed 1 ½ cups (225g) But feel free to use your favorite candied fruits.
- Alternatively, if you don’t like dried fruit use chocolate chips in the same quantity - just be sure to eliminate the soaking stage 😁
Butter yolk mixture
- In a medium-sized bowl, use a spatula to blend butter, vanilla extract, and lemon or orange zest until the mixture is light and creamy.½ cup salted butter, 1 teaspoon vanilla extract, 2 Tablespoons lemon or orange zest
- Incorporate egg yolks, stirring after each addition.4 egg yolks
- Blend with a spatula until the mixture is thoroughly combined, then set it aside.
Flour mixture
- In a separate large bowl whisk together the flour, white granulated sugar, instant dry yeast and ¾ teaspoon salt (add 1 teaspoon salt if using unsalted butter)2 ⅔ cups of white bread flour , ½ cup white granulated sugar, 1 ½ teaspoons instant dry yeast / rapid rise yeast, ¾ teaspoon salt
- Add warm water (approximately 105–115 °F or 40-46°C) and mix it in. While the liquid may seem minimal compared to the flour, resist the urge to add more water. Doing so could lead to the dough becoming overly sticky once you incorporate the butter-yolk mixture in the next step.⅔ cup warm water
Combine yolk mixture with flour mixture
- Add the butter-yolk mixture to the flour mixture.
- Mix well with a spatula until the butter-yolk mixture is well incorporated into the flour mixture. The dough will be very soft and sticky.
Add drained soaked fruit
- Drain out excess water from the soaked dried fruit and add it to the dough
- Use a spatula to combine the dried fruit into the dough.
First rise
- Transfer your dough into a large bowl greased with butter, cover with plastic wrap.
- Allow the dough to rise in a warm location until it doubles in size, typically taking about 1 to 1 ½ hours. (See note 3)
Second rise
- Once the dough has doubled in size, turn it out onto a lightly floured surface.
- Use your spatula to mix the dough, folding it in an inward motion for a few minutes until it forms a ball and becomes slightly less sticky.
- Place the dough into a panettone paper mold. I used a mold that is 6 inches (15 cm) in diameter and 4 inches (10 cm) in height. (See note 4 on choice of mold for alternative baking pan)
- Cover loosely with plastic wrap and let rise in a warm location until the dough just about reaches the rim of the mold, about 1 to 1 ½ hours.
Bake
- When the bread is almost done rising, position the oven rack in the middle of the oven and preheat to 356° F / 180° C (160° C fan).
- Using a sharp knife, make a shallow cross on top. Then lightly brush the top with beaten egg or a little milk.
- Bake in the oven for 40 to 45 minutes or until a skewer inserted comes out clean. Keep an eye on it, as oven times may vary. In my case, it was ready within 38 minutes. If you notice the top browning too quickly, simply cover the panettone bread loosely with aluminum foil.
Cooling
- Once removed from the oven, insert two long wooden or metal skewers about 1 inch (2 ½ cm) from the bottom of the panettone and gently flip it upside down.
- Hanging the panettone upside down helps prevent collapsing and ensures a lighter texture, avoiding a dense loaf. This method maximizes the air pockets, contributing to a softer overall texture for the bread.
- I balanced the skewers using two tall glass cups, but you can also use a tall narrow pot or bowl, ensuring that the skewers rest securely on the rim.
- Remember that when letting panettone cool and hang, it's better to leave a gap instead of allowing it to touch the bottom of any container or surface.
- If you've used cake pans instead of Panettone paper mold, you can't skewer it or flip it upside down.Rather just cool it down for about 30 minutes in the pan. Then you can remove from the pan and invert onto a wire rack to cool down completely.
- Slice once completely cooled.
Storage
- Room temperature: Tightly wrap with plastic wrap and place it in a resealable bag or cover it with foil. Stays fresh at room temperature for up to 3 days if stored correctly.
- Freeze: For freezing, you can freeze the panettone either sliced or as a whole loaf. Wrap the leftovers with plastic wrap and then store them in a sealed, freezer-safe bag.
- To defrost: The panettone can be frozen for up to 3 months. Thaw overnight in the refrigerator, then place it on the kitchen counter to reach room temperature.
- Alternatively, if you don’t like dried fruit use chocolate chips in the same quantity - just be sure to eliminate the soaking stage 😁
So, it doesn't necessarily need to rise significantly to double in volume. For additional certainty, consider using a clear plastic container, like a dough bucket or an ice cream bucket.
Gently press the dough down until it's level, mark it with tape, and after 30 minutes, if it has reached twice the original height, it has doubled in volume and is ready to go! 4. Alternative to Panettone mold: Panettone is usually baked in special paper panettone molds, but if you don't have them, a regular cake pan works just fine.
- If you don't have a panettone paper mold, you can place the dough in a greased and lined cake pan with a 6-inch (15 cm) diameter and about 3 inches (7 cm) in height.
- If your pan is shallower, you can make a taller-sided pan by using a double layer of parchment paper when lining the sides. Make sure that the parchment extends about 2 inches (5 cm) above the rim.
This post may contain affiliate links. Please read my disclosure policy.
Want even more delicious recipes? Subscribe free to receive new post notifications emailed to you. Or follow along on Facebook, Pinterest, and Instagram. If you love sharing recipes please come and join my All about cooking and baking Facebook group or Subscribe to my YouTube channel


Linda says
This looks like something I would love. Thank you for the recipe. I just wondered if I use sprouted spelt flour would I have to make any changes.
The Gardening Foodie says
Hello Linda,
You're welcome! I'm glad you're interested in trying the recipe. If you're using sprouted spelt flour instead of white bread flour, you might need to make a few adjustments. Sprouted spelt flour tends to absorb liquid differently than regular flour, and it can result in a slightly denser or moister texture.
I recommend starting with the same quantity of sprouted spelt flour and monitoring the dough consistency as you mix. You may need to add a bit more or less water to achieve the right texture. Sprouted flours can sometimes require less liquid than their non-sprouted counterparts.
Additionally, keep in mind that sprouted spelt flour can have a slightly nutty flavor, which could complement the dried fruits and citrus zest in your recipe. It sounds like a delicious variation! Enjoy baking, and feel free to share how it turns out with sprouted spelt flour.
Linda says
Thanks so much for your reply so fast. My plans are to make this soon. I will let you know how I make out when I do. Its so kind of you to teach us new recipes like this. I sure appreciate it, Linda
The Gardening Foodie says
You're very welcome, Linda 😊
I'm so glad to hear you're planning to try out this recipe soon and really looking forward to hearing about how it goes.
If you have any questions along the way, feel free to ask. I'll be happy to help
Have fun Baking 😊