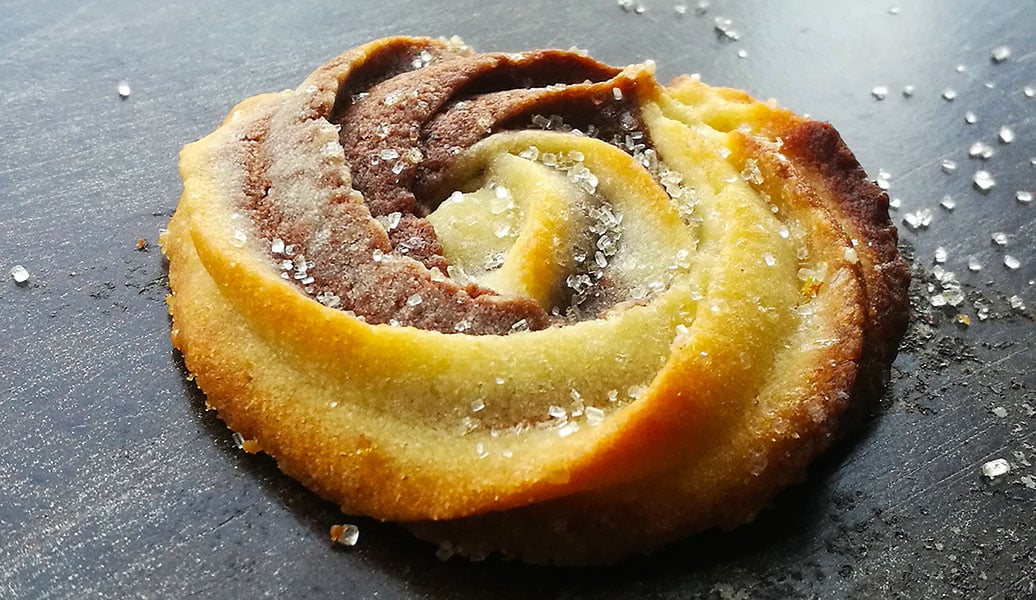
Enjoy these Chocolate Vanilla Danish Butter Cookies with their rich buttery flavor and light crisp texture. Made using just six basic ingredients to create bakery-style cookies that are melt in your mouth deliciousness.
These cookies are the perfect anytime treat or make an impressive baked gift.
Easy to make, with amazing flavor, these are about to become one of your new favorite bakes too
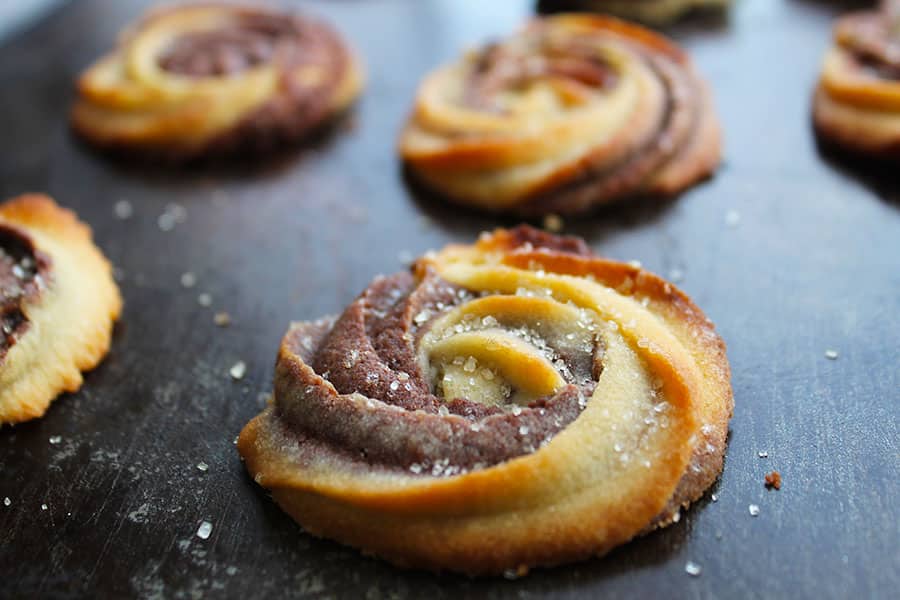
Inspired by my Danish Butter Cookies, I decided to add a bit of both delicious worlds to this recipe. A combined heavenly swirl of Chocolate and vanilla!
Not only do these cookies look pretty, but they also taste amazing. Sprinkled with sugar, and enjoyed with your favorite beverage, this is one indulgent treat.
Your shopping list
While the full printable recipe is written below, this is the section to read if you’re wondering about ingredient substitutions or how these ingredients work in the recipe.
Butter: Butter is one of the most important ingredients in this recipe. It is responsible for the rich flavor and the quality of piping.
Keep in mind that although the butter has to be very soft, it should not be melted.
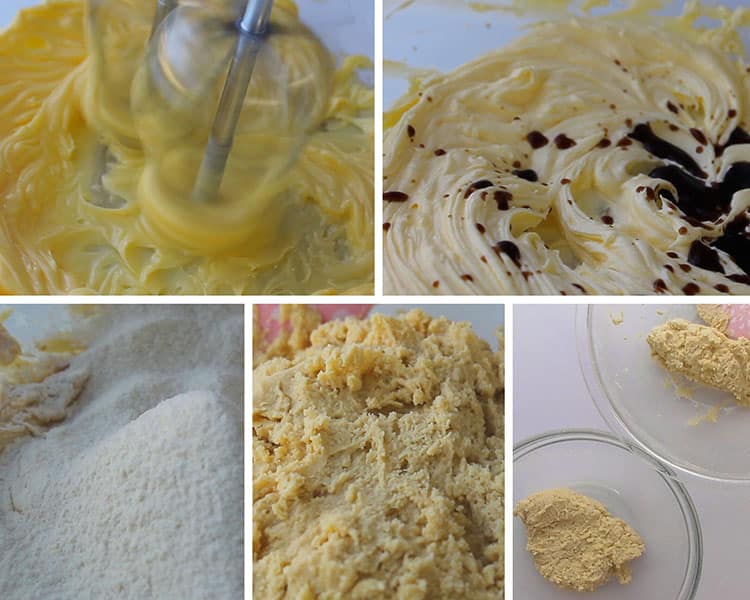
Powdered sugar: This type of sugar is used because it dissolves quickly when mixed with butter. Powdered sugar contains cornstarch responsible for giving these cookies that amazing light, crisp, melt in your mouth texture.
Vanilla extract
Cake Flour or all-purpose flour
Milk: Added to soften the dough for easier piping.
salt
Cocoa powder: Use unsweetened, sifted cocoa powder.
Vanilla extract
Cake Flour or all-purpose flour
Milk: Preferably full-fat milk, added to soften the dough for easier piping.
salt
Cocoa powder: Use unsweetened, sifted cocoa powder.
Before you start baking your Chocolate Vanilla Danish Butter Cookies
For a successful bake every time make sure to check the following before you start baking:
- The butter should be very soft which will make piping much easier.
Soft butter also creates light crisp cookies. I usually leave the butter out of the refrigerator overnight to achieve the best consistency.
Use this method to soften the butter if you do forget to get out of the refrigerator early:
Soften butter by pouring a cup of hot water (not boiling) into a saucepan with a metal bowl set on top.
The bottom of the bowl should not touch the water. Put the butter into the bowl. Allow to soften for about 2 minutes or just until the butter is soft but not melted. Keep an eye on it so the butter doesn’t start to melt.
- Make sure that you are using unsweetened cocoa powder and not instant hot chocolate powder.
Usually, Instant hot chocolate powder contains additional sugar amongst other ingredients, affecting the outcome of these cookies.
- I recommend using powdered sugar for this recipe. The powdered sugar is the ingredient responsible for the light, melt-in-your-mouth texture of these cookies.
How to make Chocolate Vanilla Danish Butter Cookies
While the video and the full printable recipe are written below, this is the process with step-by-step pictures to guide you.
Line a cookie sheet with baking paper.
Cream the butter REALLY WELL for about 5 to 8 minutes. Add the powdered sugar and beat for another 2 minutes. The creamed butter and sugar should be light in color and fluffy in texture.
Add the vanilla extract and milk and beat until just combined.
Sift the flour into the creamed butter mixture. Fold it in gently with a spatula to form a very soft dough
Divide the dough in two and place half of it into a separate bowl.
To one-half of the dough add sifted cocoa powder,
Add milk to soften the dough
Mix in until well combined and smooth.

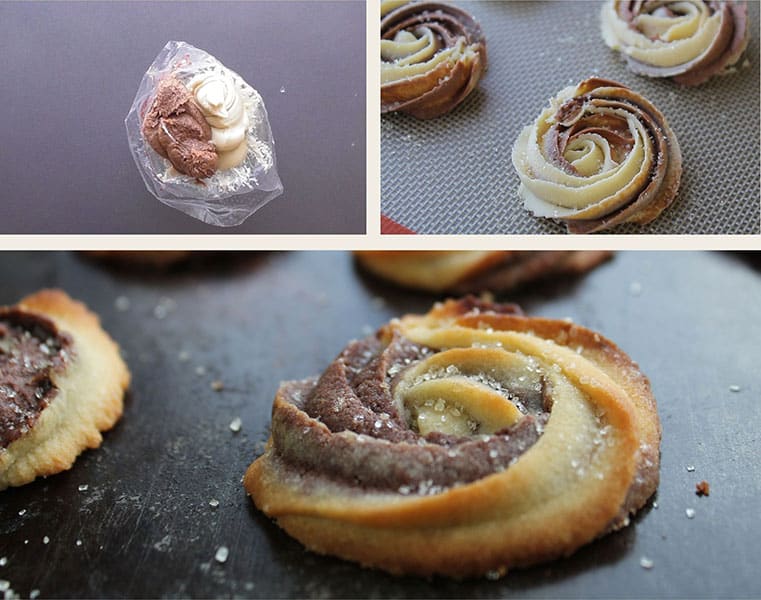
Prepare the piping bag: Insert a 1M tip into a piping bag or use an open star tip that is a bit wider, making the dough a bit easier.
Fill the piping bag: Use a spatula to spread the vanilla dough alongside half the edge of the piping bag. See the video for visual clarity.
Do the same with the chocolate dough, spreading it alongside the other half of the piping bag. The chocolate and vanilla dough should display side by side in the piping bag.
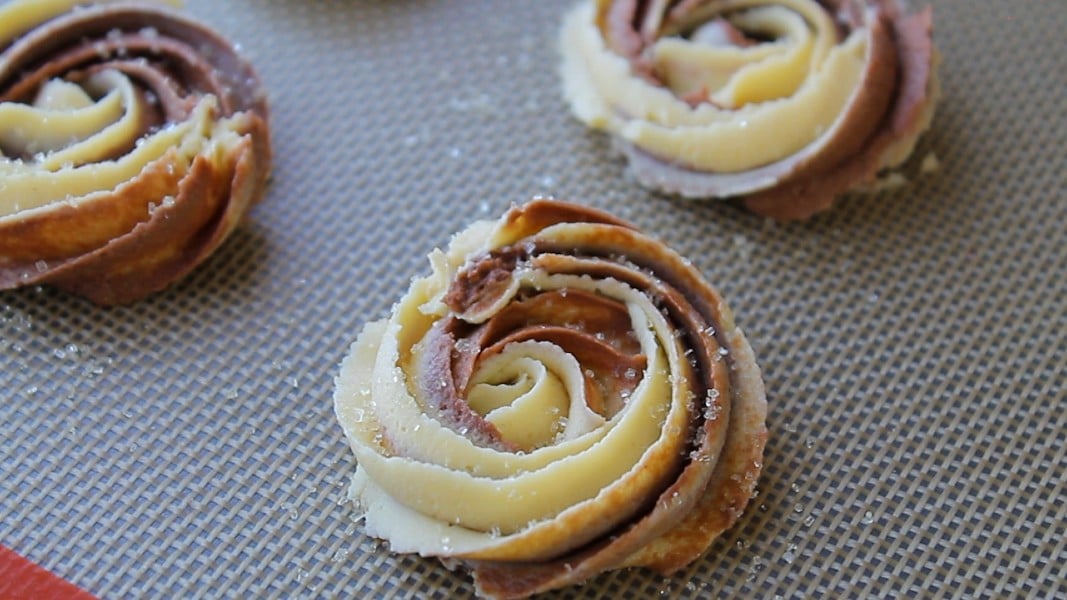
Pipe the dough to create swirls onto the lined baking sheet.
The first cookie you pipe may be all one color dough but you should begin to see both colors come out after that one.
Refrigerate the unbaked piped cookies: Place the sheet of unbaked cookies into the refrigerator for 30 minutes.
This allows the very soft butter in the cookies to harden. Allowing the butter to harden, prevents the dough from spreading while baking. This ensures that the cookies keep their defined and beautiful piped shape.
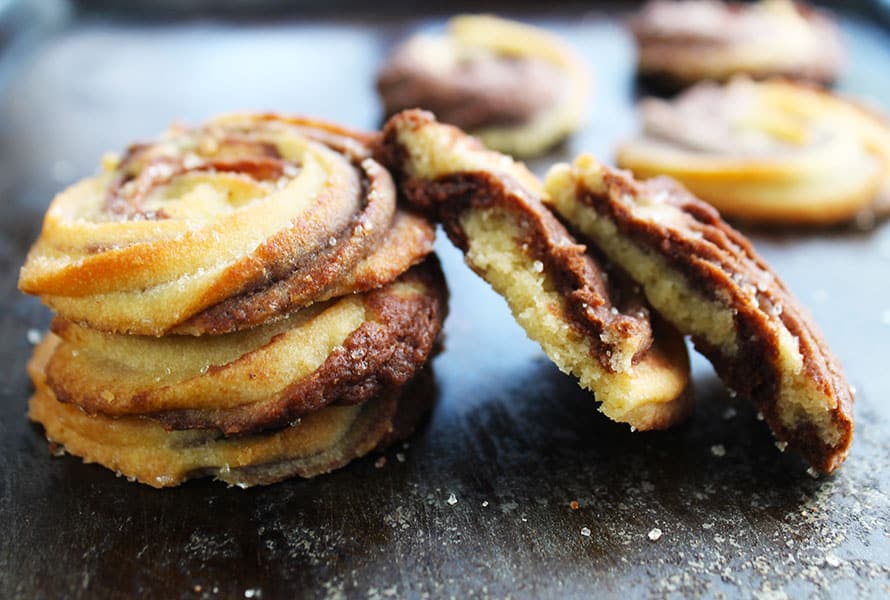
Bake in a preheated oven of 350°F / 180°C (160°C fan) for 15 minutes or until the edges begin to turn a golden color.
Remove from the oven and leave the cookies on the baking sheet to cool for 10 minutes before serving or store in an airtight container.
Tips and frequently asked questions
Why is it important to beat the butter until pale and creamy?
Two Reasons:
- Well beaten butter creates light, crisp cookies.
- When the butter has been well beaten, it makes piping out the dough much easier.
Why must I refrigerate the unbaked piped cookies?
This is an important step and should not be left out. Refrigerating the piped dough for about 30 minutes before baking prevents the dough from spreading while baking, ensuring that it keeps its beautiful piped shape.
Can I prepare and pipe the cookies in advance?
The best part of these cookies (besides the amazing flavor, is that they can be prepared and piped in advance.
The piped or shaped dough can be frozen overnight or up to 1 month before baking. The cookies can be baked from frozen, but might just require an extra 5 minutes of baking time.
Enjoy ♥
Chocolate Vanilla Danish Butter Cookies
Watch how to make the recipe
- ½ cup butter, very soft see note 1
- ¼ cup powdered sugar / icing sugar see note 2
- 1 teaspoon vanilla extract
- 1 cup all purpose OR cake flour
- 2 Tablespoons milk preferably full fat milk
- ¼ teaspoon salt
Divide the dough in half - Add the following to one half of the dough
- 2 Tablespoons unsweetened cocoa powder
- 1 Tablespoon milk preferably full fat milk
- Line a cookie sheet with parchment/baking paper.
Make the vanilla dough
- Cream the butter REALLY WELL for about 5 to 8 minutes. Add the powdered sugar and beat for another 2 minutes. The creamed butter and sugar should be light in color and fluffy in texture.
- Add the vanilla extract and milk and beat until just combined.
- Sift the flour into the creamed butter mixture. Fold it in gently with a spatula to form a very soft dough
Make the chocolate dough
- Divide the dough in two and place half of it into a separate bowl.
- To one-half of the dough add sifted cocoa powder and milk. Mix in until well combined and smooth.
Pipe the dough to form the cookies
- Insert a 1M tip into a piping bag or use an open star tip which is a bit wider making piping the dough a bit easier.
- Use a spatula to spread the vanilla dough alongside half the edge of the piping bag. See video or pictures above for visual clarity.
- Do the same with the chocolate dough, spreading it alongside the other half of the piping bag.
- The chocolate and vanilla dough should display side by side in the piping bag.
- Pipe the dough to create swirls onto the lined baking sheet.
- The first cookie you pipe may be all one color dough but you should begin to see both colors come out after that one.
Refrigerate the unbaked piped cookies
- Place the sheet of unbaked cookies into the refrigerator for 30 minutes. This allows the very soft butter in the cookies to harden. Allowing the butter to harden, prevents the dough from spreading while baking. This ensures that the cookies keep their defined and beautiful piped shape.
Bake
- Bake in a preheated oven of 350°F / 180°C (160°C fan) for 15 minutes or until the edges begin to turn a golden color.
- Remove from the oven and leave the cookies on the baking sheet to cool for 10 minutes before serving or store in an airtight container.
- The butter should be very soft which will make piping much easier. Soft butter also creates light crisp cookies. I usually leave the butter out of the refrigerator overnight to achieve the best consistency. Use this method to soften the butter if you do forget to get out of the refrigerator early. Soften butter by pouring a cup of hot water (not boiling) into a saucepan with a metal bowl set on top. The bottom of the bowl should not touch the water. Put the butter into the bowl. Allow to soften for about 2 minutes or just until the butter is soft but not melted. Keep an eye on it so the butter doesn’t start to melt.
- This type of sugar is used because it dissolves quickly when mixed with butter. Powdered sugar contains cornstarch responsible for giving these cookies that amazing light, crisp, melt in your mouth texture.
Enjoy ♥
If you like this recipe, be sure to check out my other amazing cookie and slice recipes
Still hungry for more?
Follow on Facebook, Pinterest, and Instagram, or Subscribe for the latest recipe updates.


Nancy F Lambert says
Ashika,
I love Danish cookies, I'm going to make theses.
Thank you.
Nancy
The Gardening Foodie says
Hi Nancy,
That’s absolutely great, I hope you enjoy making them. Let me know how they turn out 😊