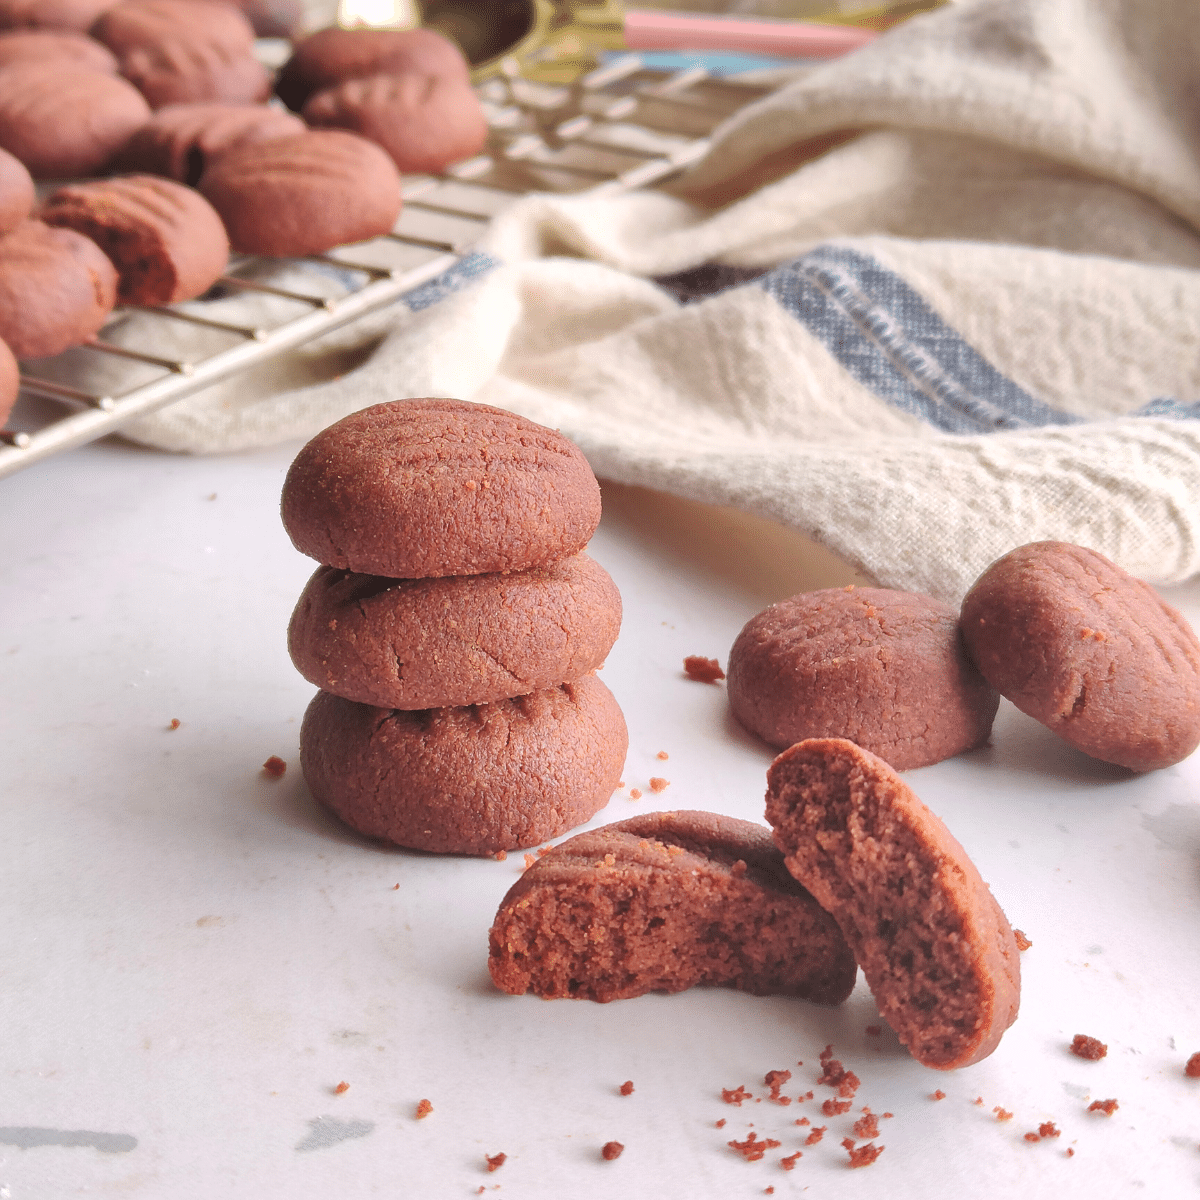
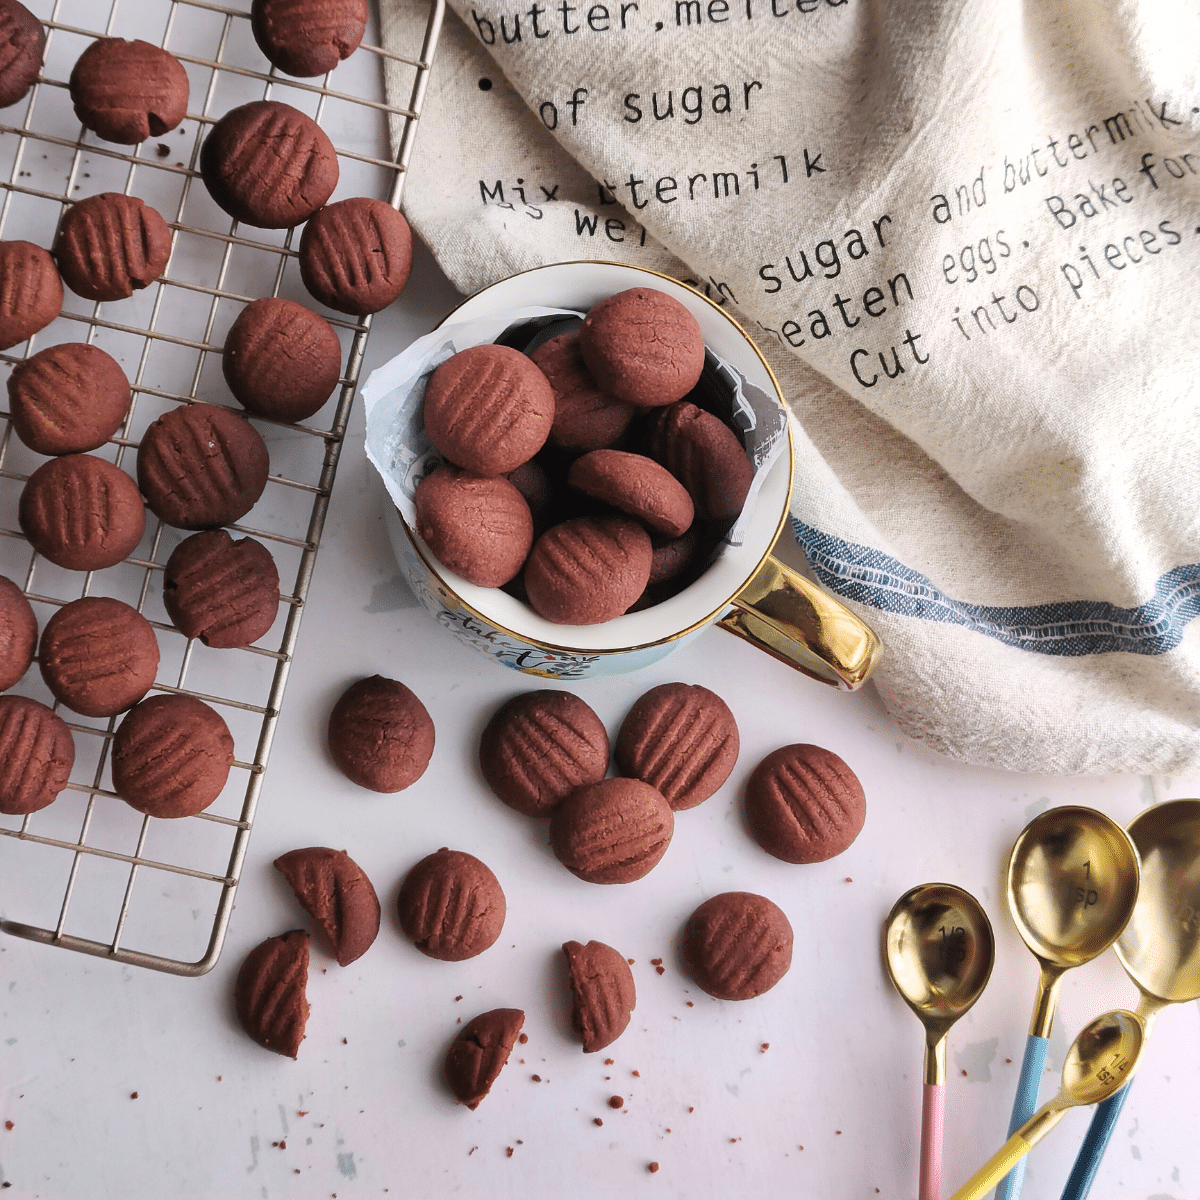
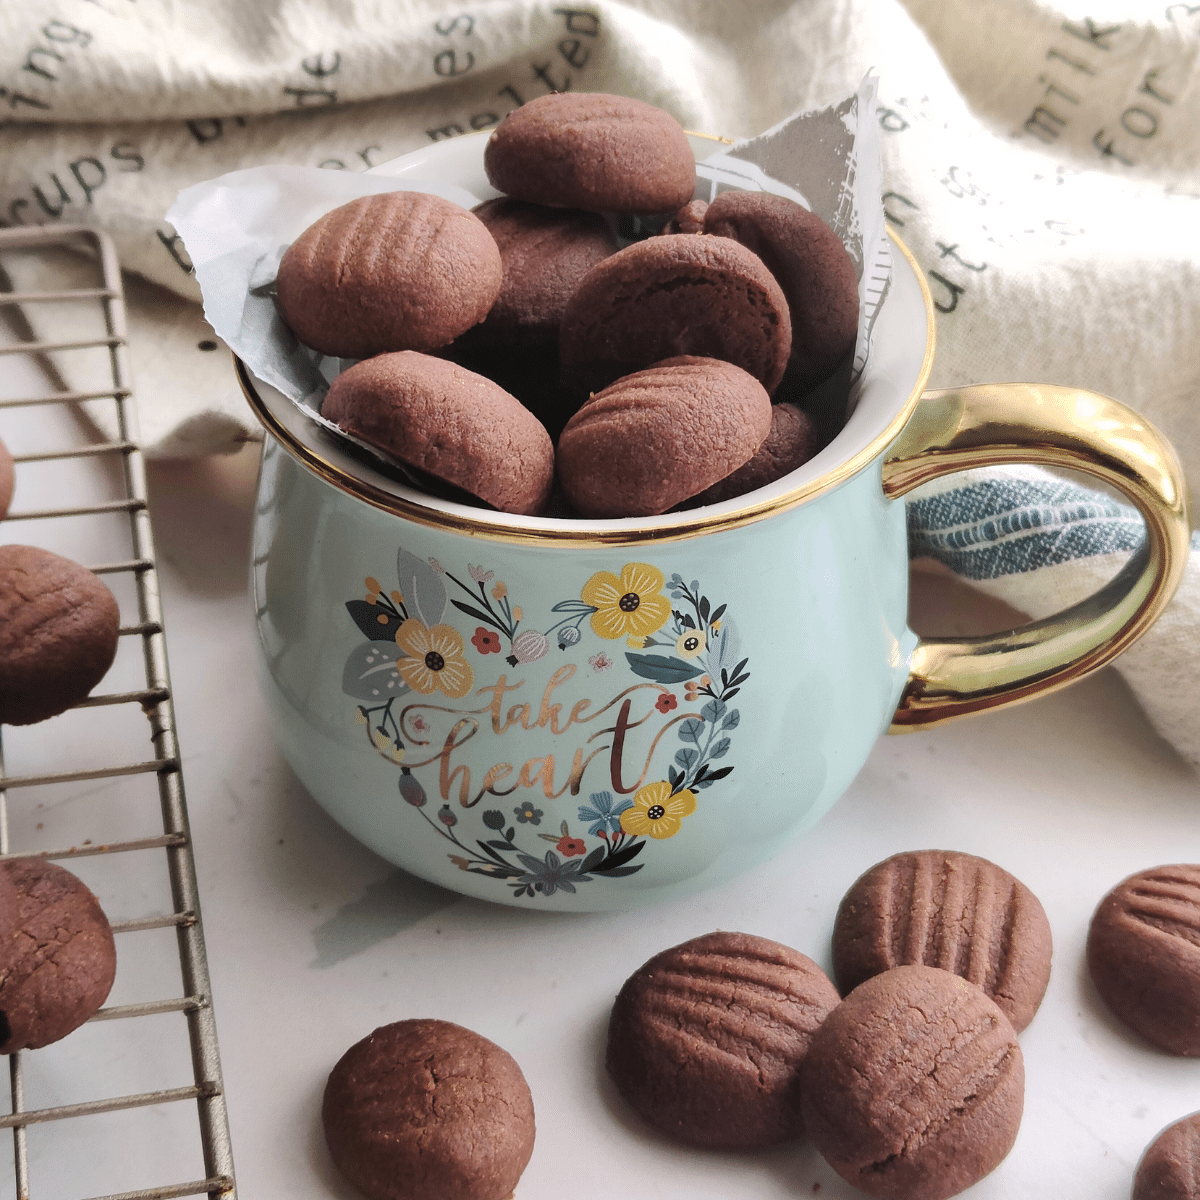
The perfect 4 ingredient Mini Chocolate Butter Cookies chocolate cookies — rich, chocolatey and crisp! Plus no cocoa powder, eggs or chilling of the dough required!
These cookies are a variation on my 3 ingredient mini butter cookies. It's the perfect blend of simplicity and decadence, making them an ideal go-to for an anytime treat.
Whip up a batch in under 40 minutes, and that includes the baking time and treat yourself to the irresistible deliciousness of these mini chocolate butter cookies.
What you need to make this recipe (substitutes if needed)
Scroll down to the end of the page for the printable recipe card with all measurements and complete instructions
- Powdered sugar (icing sugar)
- Butter (melted and slightly cooled): I used salted butter - add ¼ teaspoon salt to the flour if using unsalted butter.
- Chocolate (melted and slightly cooled): I like using bittersweet chocolate, but if you prefer a less intense chocolate flavor, you can use semi-sweet chocolate instead.
- Flour: Choose either cake flour, all-purpose, or plain flour. Avoid using self-rising flour. Self-rising flour is not advised, as it alters the flavor and texture, resulting in a dense rather than crisp and light texture.
If you're new to the process of melting chocolate, here are important tips to follow for the best results.
Use dry utensils when melting chocolate
When melting chocolate, whether in the microwave or on the stovetop, ensure that the bowl and spoon used are thoroughly dry before adding the chocolate.
If the chocolate comes into contact with wet utensils, it will harden, leading to a rough texture and making it unsuitable for these cookies.
How to melt chocolate on the stovetop
If you don't have a double boiler, you can create a simple substitute.
- Use a heatproof bowl (glass or stainless steel) and a saucepan. Ensure the bowl fits securely on the saucepan without touching the water.
- Fill the saucepan with a few inches of water and bring it to a gentle simmer over medium heat. The simmering water will produce steam to melt the chocolate.
- Place the dry heat proof bowl on top of the saucepan, creating a seal to trap the steam. Adjust the heat to maintain a gentle simmer.
- Break the chocolate into small pieces or if using chocolate chips, add them to the bowl. Stir (with a dry spoon) occasionally as the chocolate melts. The steam indirectly melts the chocolate without direct heat.
- Monitor and adjust heat to maintain a gentle simmer, avoiding direct heat or steam on the chocolate.
- Carefully lift the bowl once the chocolate is fully melted, and leave to cool for about 5 minutes before using in this recipe.
Visual instructions
This is just the overview so you can see the process. When you are baking, you’ll want to use the full recipe at the bottom of the page.
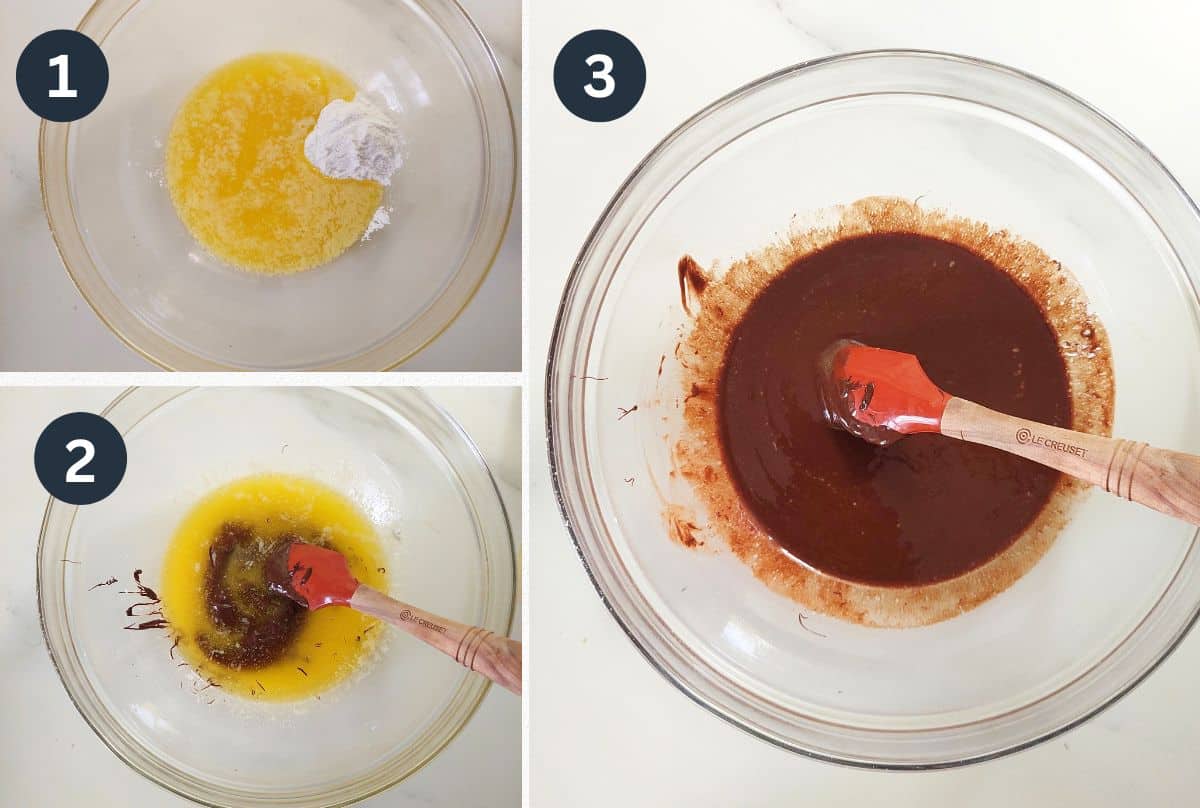
Step 1: Melt the butter in the microwave or on the stovetop. Allow it to cool for 5 minutes before combining it with the powdered sugar.
Step 2 and 3: Add the melted chocolate. Make sure the chocolate has cooled slightly to avoid curdling the mixture.
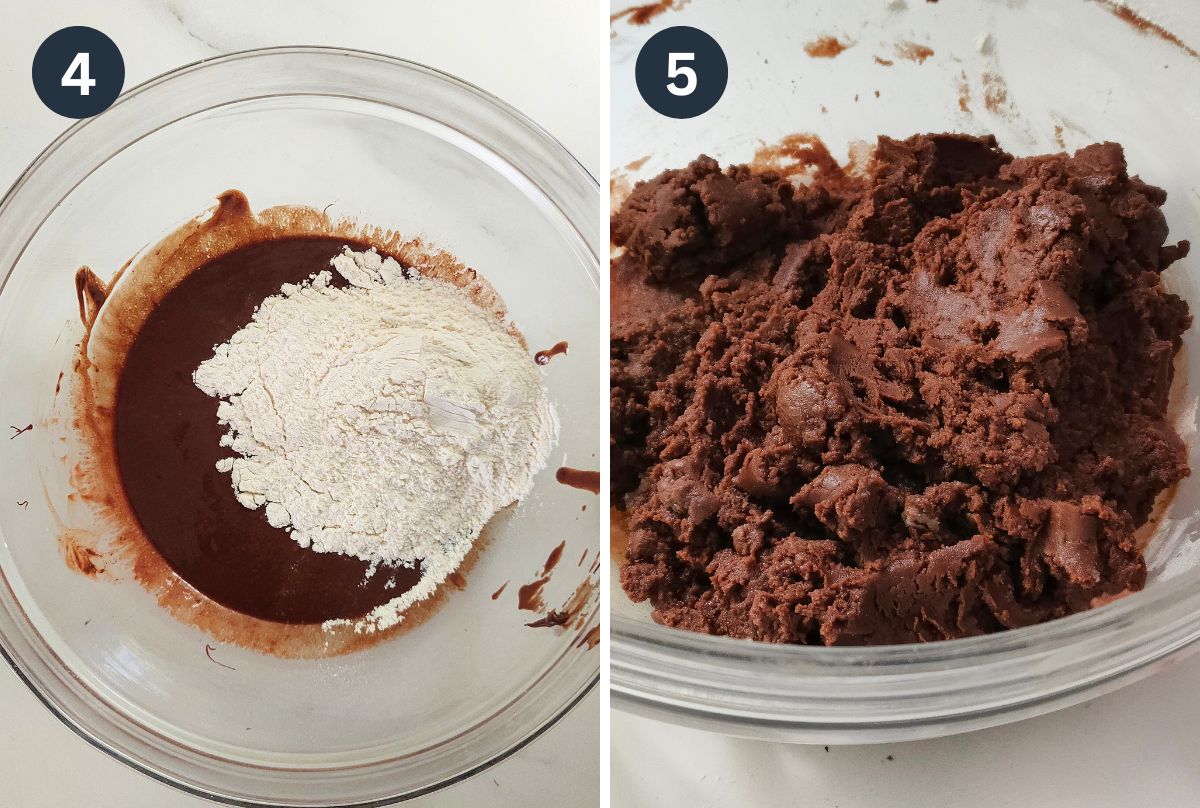
Step 4 and 5: Fold in the flour with a spatula to form a soft dough.

Step 6: Scoop the chocolate dough out in slightly heaping ½ teaspoon portions and drop them onto a baking tray lined with parchment paper. Shape each portion into a ball.
Step 7: Use a fork to lightly flatten each rolled-out chocolate dough. Each cookie should be at least 1 inch (2cm) round.
This recipe creates 70 mini cookies. Each bit of cookie dough is scooped with a ½ teaspoon and weighs around 0.21 oz (6g). Yep, they're super cute bite-sized cookies! 😋
- Bake for 10 to 12 minutes in a preheated oven of 356°F / 180°C (160°C fan) until the chocolate cookies are lightly browned. Be cautious not to overbake, as it can lead to burning.
- Remove from the oven but leave the cookies on the baking sheet for 5 minutes. The baked cookies will be soft when you take it out of the oven but crisp as they cool.
- After 5 minutes on the baking tray, the cookies will be firm and crisp enough to transfer to a cooling rack.
Storage
Room temperature: Once completely cool, store the cookies in an airtight jar for up to 5 days.
Freezing the baked cookies: Freeze baked and cooled cookies on baking sheets lined with wax or parchment paper until firm.
- Freezing them individually on the baking sheet prevents them from sticking together in the freezer.
- Transfer the frozen cookies to a freezer bag or another airtight container.
- Once ready to eat, simply thaw out at room temperature on a paper towel or parchment paper and enjoy. I would not recommend thawing them in the container or bag that they were frozen in because they will likely get soggy as they thaw.
Pro tips for making this recipe
Bake the cookies one sheet at a time, on the center rack. Because this recipe produces 70 cookies with minimal spread, you can space them about 1 inch (2 ½ cm) apart.
- If your baking sheet or oven is not large enough, I recommend dividing the rolled and shaped cookie dough and baking the cookies one sheet at a time on the center rack.
- This will ensure all your cookies cook evenly and the bottoms don't burn. Then let the cookie sheet cool completely between batches. This ensures the cookies cook evenly and don't spread too much by being put on a hot pan.
Don't over bake: Be cautious not to overbake, as it can lead to burning.
- Remove from the oven but leave the cookies on the baking sheet for 5 minutes.
- The baked cookies will be soft when you take it out of the oven but crisp as they cool.
Enjoy 😋
Recipe card
4 Ingredient Mini Chocolate Butter Cookies (Without Cocoa Powder)
- ⅔ cup (150 g) salted butter, melted and slightly cooled (see note 1)
- ¼ cup (32 g) powdered sugar (icing sugar) (see note 2)
- ⅔ cup (113 g)chocolate, melted and cooled chocolate (see note 3)
- 1 ¾ cups (218 g) plain flour (all purpose or cake flour)
- Melt the butter in the microwave or on the stovetop. Allow it to cool for 5 minutes before combining it with the powdered sugar.⅔ cup (150 g) salted butter, melted and slightly cooled , ¼ cup (32 g) powdered sugar (icing sugar)
- Add the melted chocolate. Make sure the chocolate has cooled slightly to avoid curdling the mixture.⅔ cup (113 g)chocolate, melted and cooled chocolate
- Fold in the flour with a spatula to form a soft chocolate dough.1 ¾ cups (218 g) plain flour
- Scoop the chocolate dough out in slightly heaping ½ teaspoon portions and drop them onto a baking tray lined with parchment paper.
- Shape each portion into a ball.
- Use a fork to lightly flatten each rolled-out chocolate dough. Each cookie should be at least 1 inch (2½ cm) round.
- Bake for 10 to 12 minutes in a preheated oven of 356°F / 180°C (160°C fan) until the chocolate cookies are lightly browned. (See note 4)
- The cookies will still be soft when you take them out of the oven but will crisp as they cool.
Servings and size of cookies
- This recipe creates 70 mini cookies. Each bit of cookie dough is scooped with a ½ teaspoon and weighs around 0.21 oz (6g). Yep, they're super cute bite-sized cookies! 😋
Storage
- Room temperature: Once completely cool, store the cookies in an airtight jar for up to 5 days.
How to freeze and store baked cookies
- These baked cookies can be frozen for up to 1 month
- Freeze baked and cooled cookies on baking sheets lined with wax or parchment paper until firm.
- Freezing them individually on the baking sheet prevents them from sticking together in the freezer.
- Transfer the frozen cookies to a freezer bag or another airtight container. Freeze for up to 1 month
- Once ready to eat, simply thaw out at room temperature on a paper towel or parchment paper and enjoy. I would not recommend thawing them in the container or bag that they were frozen in because they will likely get soggy as they thaw.
For best results, Check the above post for important tips on melting chocolate, especially if you're new to the process.
4. Bake the cookies one sheet at a time, on the center rack.- Because this recipe produces 70 cookies with minimal spread, you can space them about 1 inch (2 ½ cm) apart.
- If your baking sheet or oven is not large enough, I recommend dividing the rolled and shaped cookie dough and baking the cookies one sheet at a time on the center rack.
- This will ensure all your cookies cook evenly and the bottoms don't burn. Then let the cookie sheet cool completely between batches. This ensures the cookies cook evenly and don't spread too much by being put on a hot pan.
Want even more delicious recipes? Subscribe free to receive new post notifications emailed to you. Or follow along on Facebook, Pinterest, and Instagram. If you love sharing recipes please come and join my All about cooking and baking Facebook group or Subscribe to my YouTube channel


Leave a Reply