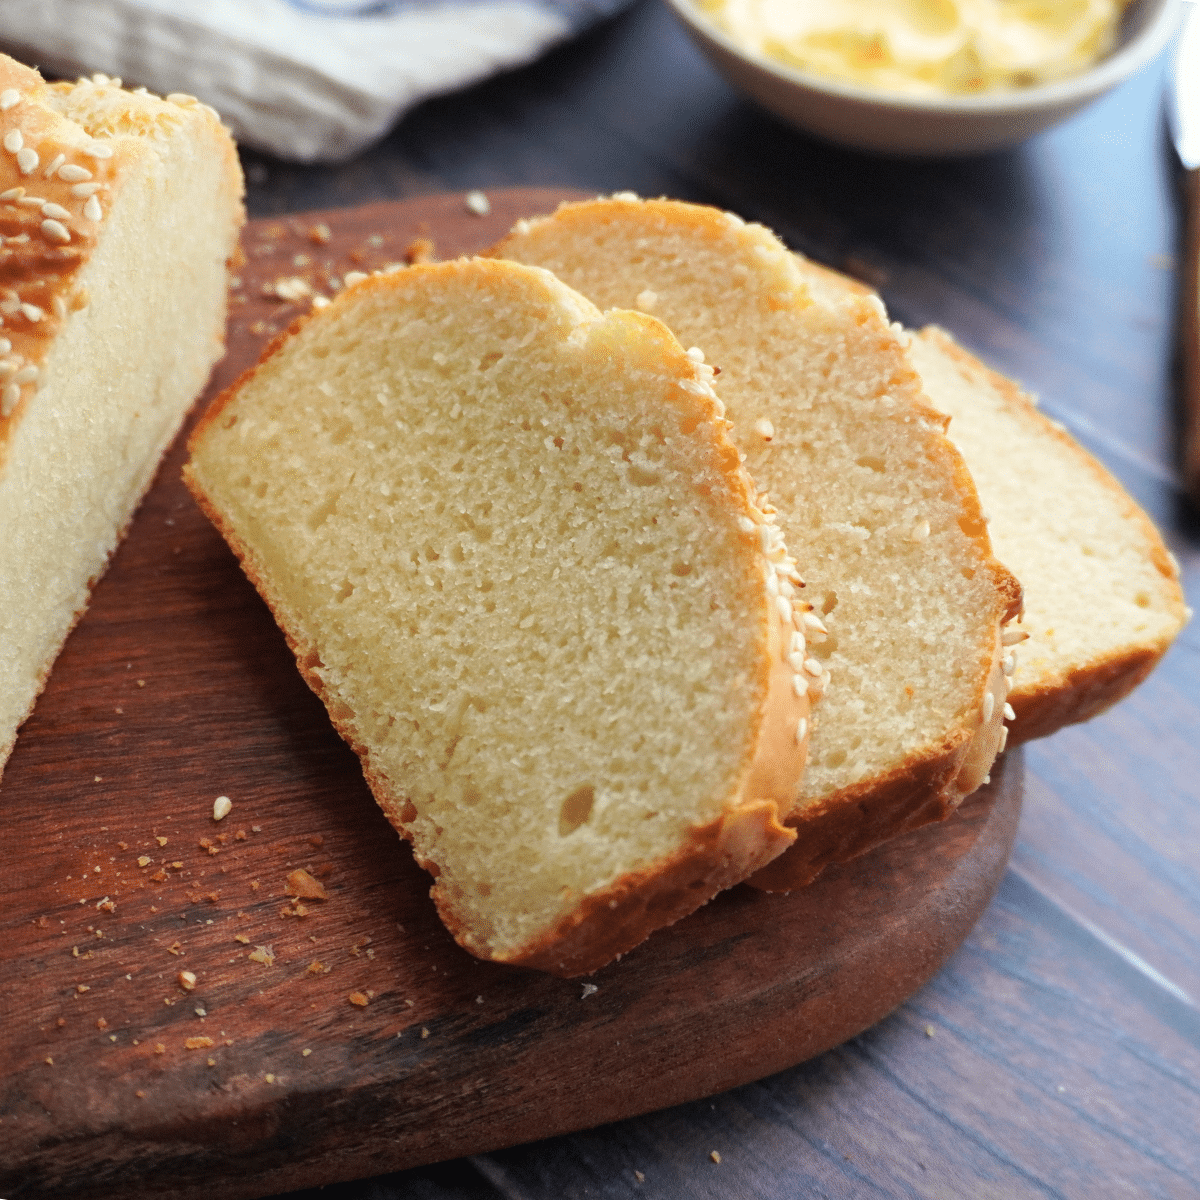
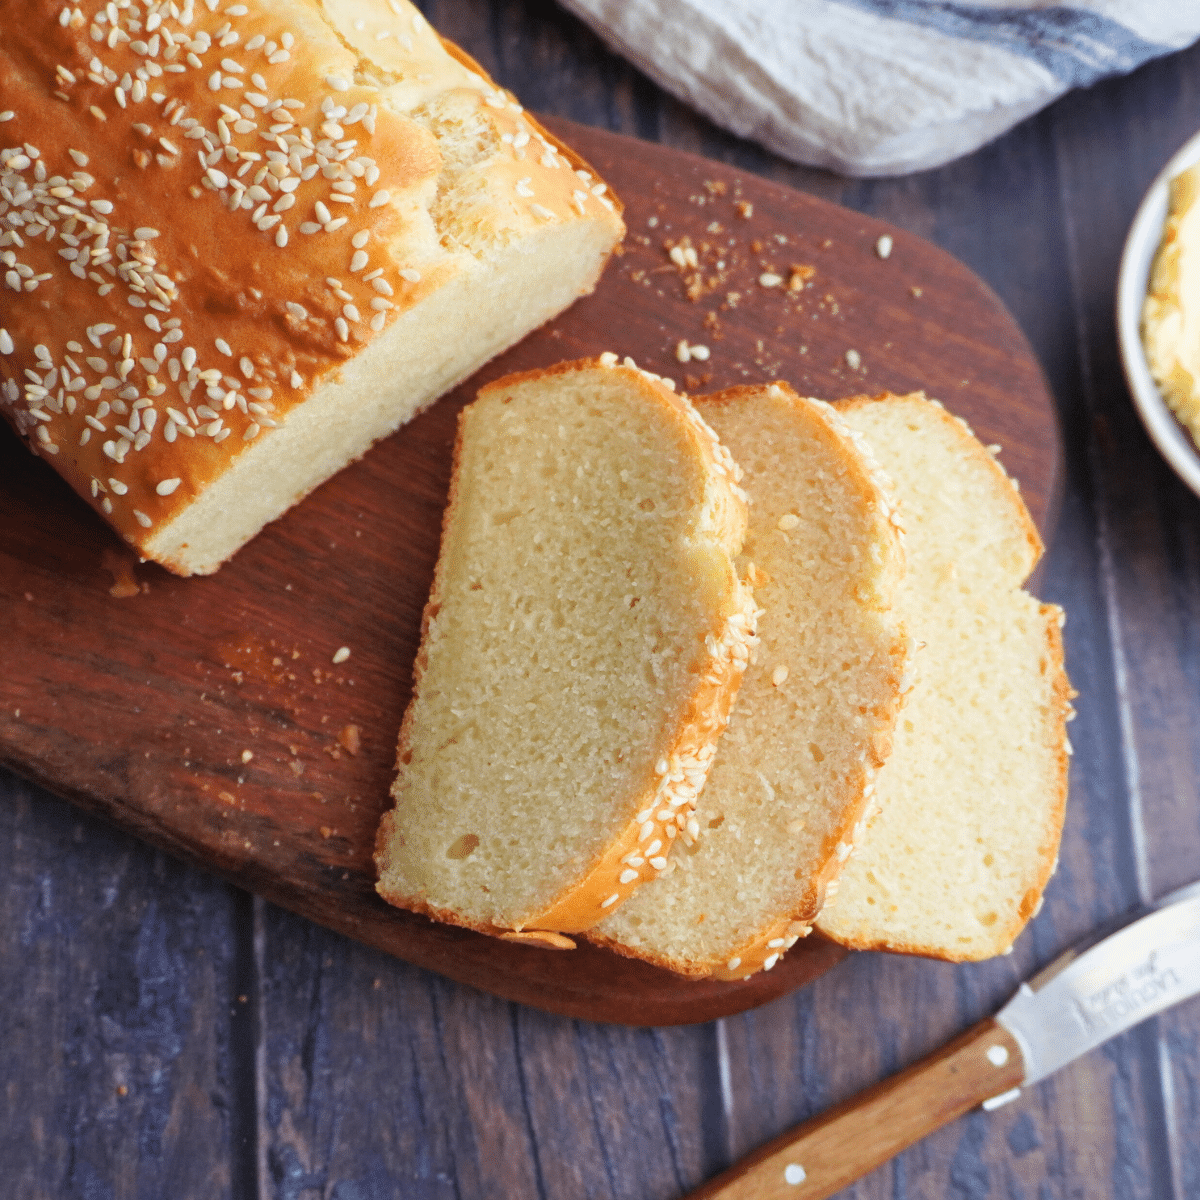
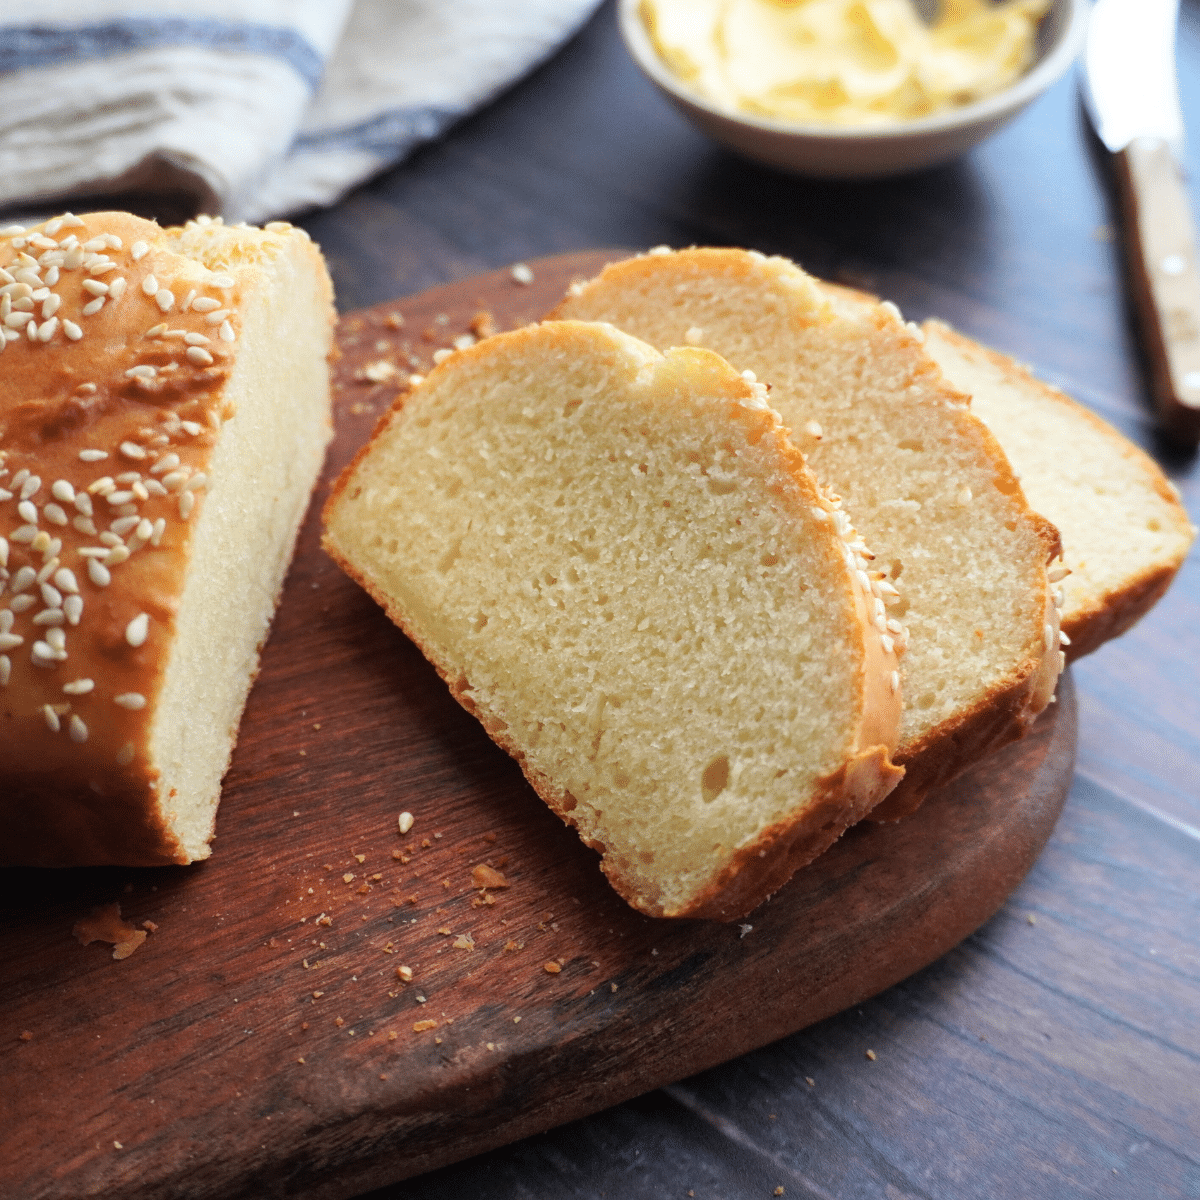
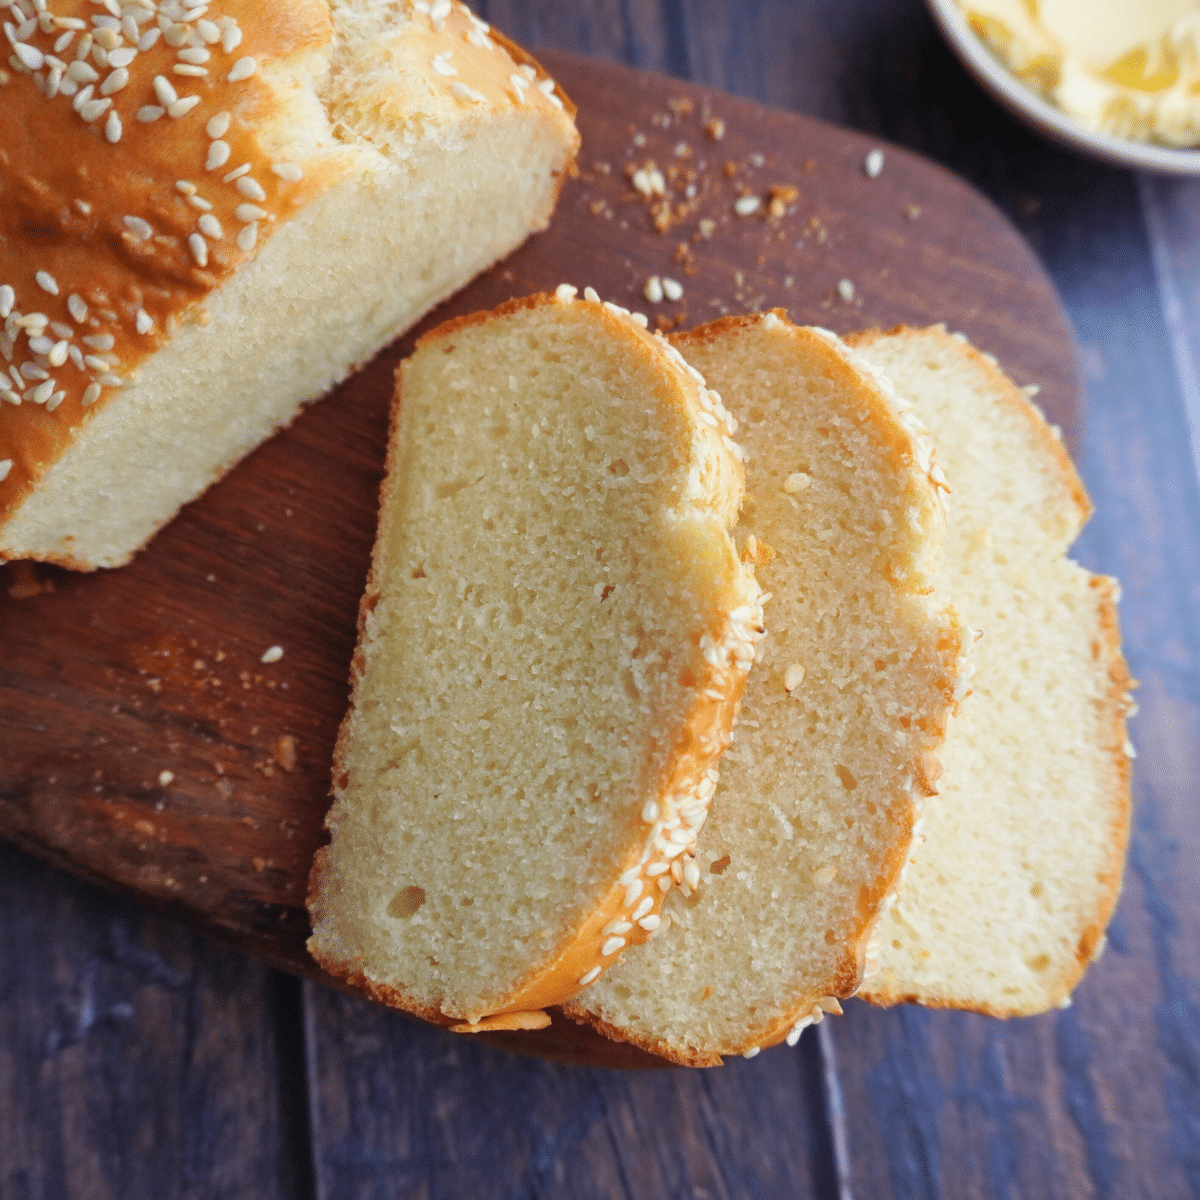
Prepared and baked in under 30 minutes, my recipe for Quick Mayonnaise Bread is super easy to make. Using just 4 basic ingredients to create a soft and fluffy bake, it makes the perfect accompaniment with your favourite meal.
This recipe does not require yeast, so there is no kneading or rising time. Just mix, scoop into the baking pan, and bake.
Ingredient list
This is just the overview so you can see the process. When you are baking, you’ll want to use the full recipe at the bottom of the page.
- Self-rising/raising flour: This ensures a well-risen bread. If you do not have self-raising flour, then make your own by adding 2 teaspoons of baking powder to 2 cups (240 g) of cake flour or all-purpose flour. Whisk the baking powder well into the cake flour or all-purpose flour to ensure that it is properly incorporated.
- Mayonnaise: Egg-free mayonnaise works just as well in this recipe as regular mayonnaise.
- Milk: Full fat milk is best to achieve a rich, soft bake.
- Salt: Simply used to enhance the flavour.
Visual instructions
This is just the overview so you can see the process. When you are baking, you’ll want to use the full recipe at the bottom of the page.
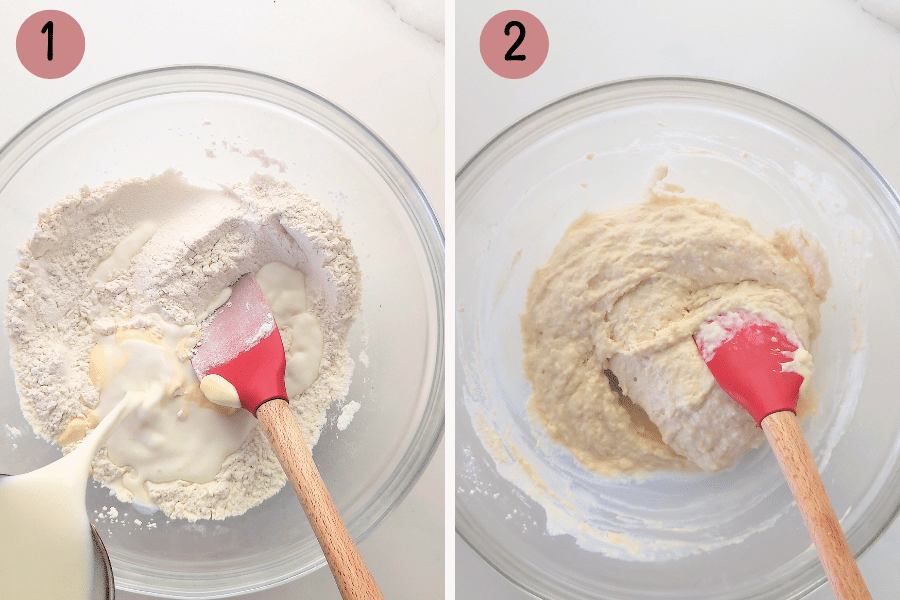
- Use a large bowl to whisk together the self rising flour (self raising flour) and salt. Then stir in the milk and mayonnaise.
- Mix until just combined. Once mixed the mixture resembles a thick batter like consistency. Do not overmix - you are just need to mix until there are no visible streaks of flour in the mixture.
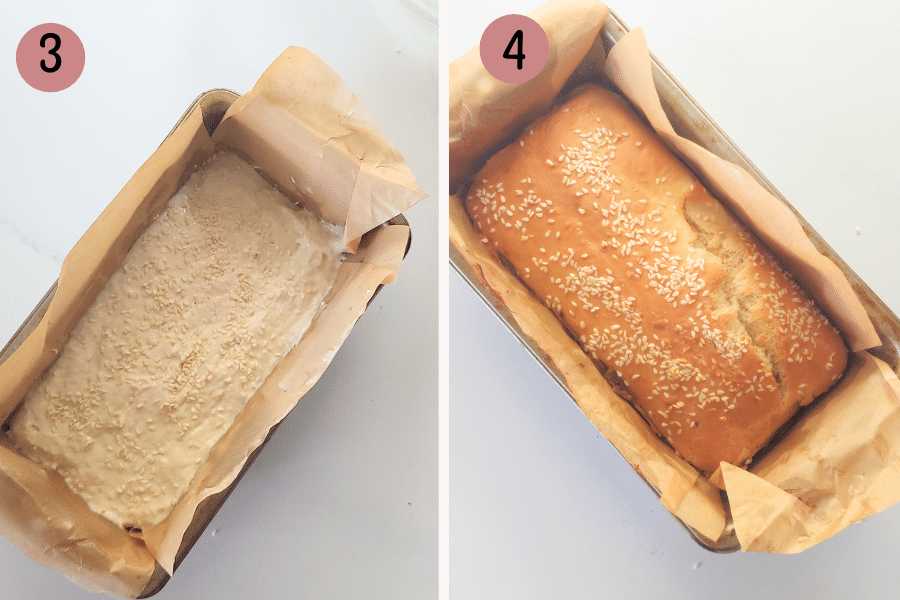
- Transfer the mixture to a lined baking pan. (Optional)- Sprinkle with any topping or leave as is.
- Bake in a preheated oven of 356° F / 180° C (160° C fan) for 20 -22 minutes or until a skewer or toothpick inserted in the center of the bread comes out clean (this means that there should be no batter clinging to it.
- Remove from the oven, but leave the bread in the baking pan for 10 minutes.
- Turn out onto a cooling rack and cool for about 10-15 minutes before slicing
Choosing the Right Baking Pan
This dough is more like a thick batter-like consistency. It works well in any type of pan.
Keep in mind that baking times will vary slightly according to the pan you decide to use. Here is an approximate guide for the baking time when using the pans you prefer.
- Muffin pan - 10 to 15 minutes
- I used an 8.5 x 4.5 inch (21 x 11 cm) loaf pan for this recipe.
- If you choose to use a larger pan, like a 9 x 5 inch (23 x 13 cm) pan, your loaf may come out a bit shorter and bake faster. Be sure to keep an eye on it and start checking for doneness a few minutes earlier than the recipe suggests.
Tips for the perfect bake
- The ingredients in this recipe can easily be doubled for a large loaf or a double batch of muffins.
- Avoid over mixing the batter. Mix until just combined. Overmixing is going to result in a dense, heavy textured bread
- Test if the bread is baked by inserting a skewer into the centre of the bread. The skewer should not have any batter clinging to it when removed.
- This bread is best eaten on the same day it has been baked. If you do have any leftovers, then store in an airtight container for up to 1 day. To reheat and soften, just pop it into the microwave for a few seconds.
- Using an egg-free mayonnaise in this recipe will work just as well as using mayonnaise containing egg. So use what you have and you will still end up with bakery-style deliciousness.
Recipe
Quick Mayonnaise Bread - (Just 4 ingredients-no yeast)
Watch how to make the recipe
- 2 cups (240g) self rising flour (self-raising flour) (See note 1)
- 4 Tablespoons (60g) mayonnaise (See note 2)
- 1 cup (240ml) milk
- ¼ teaspoon salt
- Grease and line a 8.5 x 4.5 inch (21 x 11cm) loaf pan with parchment paper. Ensure it hangs over the sides of the tin for easy removal after baking. (see note 4)
- Position the oven rack in the middle of the oven, and preheat to 356° F / 180° C (160° C fan).
- In a large bowl, whisk together the self rising flour (self raising flour) and salt.
- Then stir in the milk and mayonnaise. Mix until just combined. Once mixed the mixture resembles a thick batter like consistency.
- Do not overmix - you are just need to mix until there are no visible streaks of flour in the mixture. (See note 3)
- Transfer the mixture to the loaf pan(Optional)- Sprinkle with any topping or leave as is.
- Bake for 20 minutes or until a skewer or toothpick inserted in the center of the bread comes out clean with no unbaked mixture sticking to it.
- Remove from the oven, but leave the bread in the baking pan for 10 minutes. then transfer to a cooling rack and cool for about 10-15 minutes before slicing
- Muffin pan - 10 to 15 minutes
- I used an 8.5 x 4.5 inch (21 x 11 cm) loaf pan for this recipe.
- If you choose to use a larger pan, like a 9 x 5 inch (23 x 13 cm) pan, your loaf may come out a bit shorter and bake faster. Be sure to keep an eye on it and start checking for doneness a few minutes earlier than the recipe suggests.
Topping and filling suggestions
The choice of topping and filling which you can use in this recipe is absolutely endless. Here are a few of my favourites. Give it a try if you like or use whichever you prefer.
- Stir in some grated cheese and chopped baby spinach into the mix before baking.
- Add a bit of spice and colour by adding in chopped jalapenos or sweet pepper and dried chillies flakes.
- Chopped olives add amazing flavour and texture.
- Brush with garlic or herb butter after baking
- Top with seeds like sesame, poppy, or chia before baking.
This recipe was originally published on June 30, 2020 and updated on October 11, 2024 with updated content, photos and video.
Want even more delicious recipes? Subscribe free to receive new post notifications emailed to you. Or follow along on Facebook, Pinterest, and Instagram. If you love sharing recipes please come and join my All about cooking and baking Facebook group or Subscribe to my YouTube channel


Helen says
This was lovely. I made it with cheese and spinach. It took a bit longer to cook - more like 35 minutes, but that might have been because of the cheese. We ate it with lentil soup. Will definitely be making again.
The Gardening Foodie says
Hi Helen, Thank you 🙂
It must have tasted amazing with the addition of cheese and spinach. I am so glad that you enjoyed this recipe too 🙂
Kelly @ Kelly Lynn’s Sweets and Treats says
This is amazing!! I didn’t know you could make bread using mayonnaise! It looks so moist and delicious 🙂
Heather says
Haven't tasted it yet but it looks good
Sarah Mohd says
Fast and delicious! I added dried Italian herbs and topped it with some sesame 😊 had it with some olive oil & balsamic vinegar for bfast 😍 will make it again and I’m sharing this recipe with the family. Thank you! 🙏
Eileen Williamson says
I used very close to your recipe to make sweet bread it turned out wonderful .i used pineapple and coconut as a topping.thank you for your help.
The Gardening Foodie says
Hi Eileen, you are welcome and thank you for giving my recipe a try 🙂
I love your that you topped the bread with pineapple and coconut. It must have tasted amazing 🙂
anna says
I LOVE this bread! Make it 2-3 times a week!!! Have added fresh basil, rosemary, finely shredded, YUMMMMMM! I too have shared with many friends who LOVE it!
The Gardening Foodie says
Hi Anna, that is absolutely fantastic! Thank you for giving my recipe a try.
I am so happy that you and your friends are enjoying this bread too.
I love that you added herbs to the bread, it must taste amazing 🙂
Taryn Wilcher says
So I had made a nice dinner, a leg of lamb, some fried potatoes, and green beans with corn. I really wanted there to be a bread to finish the plate and I also wanted the challenge of making something from scratch. My husband would be home in less than an hour so I search for a no yeast bread recipe (seeing that I didn't have time for yeast, also didn't have any lol). This came up and I hesitated at first, but something in me said just try it. I will just say this will be a recipe I will be sharing and adding to over and over. I've made them once again already, and the hubby ate them with jelly, also just with butter plain. I bakrd them in my mandalin baking pan. The first batch, I added herbs, the second I just left plain and they were so good. I plan to make a cheddar batch soon
The Gardening Foodie says
Hi Taryn
Love this 🙂 and I am really glad that you did not hesitate making this bread. Its such a great base recipe to add your favorite herbs and ingredients. Adding cheddar sounds so good 🙂
Thank you for giving my recipe a try and I'm so happy that you and your husband enjoyed it too 🙂
ka yee says
OMG, this is soooo good!!! I made it this morning and added some caster sugar to make it a sweet bread. The result was a "cakey"-tasting bread that my children (and I) devoured in seconds!!!! Thanks so much!
Galiema Adams says
I tried this bread today. It was marvelously easy to make and very tasty. Lovely with butter and strawberry jam.
The Gardening Foodie says
Hi Galiema, that's absolutely wonderful to hear. I am so happy that you enjoyed the recipe 🙂
Jean M. says
My first ever try at baking bread and my husband said "Hey this is pretty good!" even though he didn't know that my flour AND baking powder were both a year past their "Best if used by date" and I used 1% Lactaid milk AND I forgot to add salt!! I can't wait to make it again with all the correct (and fresh) ingredients! 😆Thank you!!
The Gardening Foodie says
Oh my goodness, Your comment totally brightened my day, and I couldn't stop laughing!😂 You've got some serious baking skills!
Who needs fresh ingredients and precise measurements when you can work magic with expired flour, neglected salt, and 1% lactaid milk?
Your husband's compliment says it all—your talent is undeniable. It sounds like you're ready to conquer the world of bread-making with all the correct and fresh ingredients next time. So let the baking adventures continue!
Thanks for sharing your hilarious experience with me. Happy baking!😁🍞
Marisela says
Perfect loaf of bread, right out of the oven. I was looking for ways to use some leftover self-rising flour. This super simple loaf has a delicate crumb and flavor on its own, perfect for breakfast. Since it’s not as elastic and it’s “cake-y” as someone posted, I haven’t used it for sandwiches yet. I did increase the oven temp to 350, and 400 for a few minutes more because we like crusty bread. So glad to have this yummy recipe for every day use, thank you. 😊
The Gardening Foodie says
Hello Marisela, that's fantastic, and you're absolutely welcome 😊
I'm so grateful for you sharing the outcome of this bread, and so happy to know that you're enjoying this recipe as well😊
Betsy King says
Can this bread be frozen?
The Gardening Foodie says
Hi Betsy, sorry for the late reply. Yes this bread can be frozen in an airtight container or freezer safe bag for up to 1 month.
Happy baking 😊
Vee says
Has anyone tried converting this recipe to make it gluten free? I have non-celiac gluten sensitivity and would love to try this but don't know how to go about it with gluten free flour. Any tips would be greatly appreciated!
The Gardening Foodie says
Hi there, You can use Bob's Red Mill Gluten Free Self Raising Flour to make this recipe gluten-free. Just check the ingredients to make sure they work for you: it includes rice flour, sorghum flour, tapioca flour, and xanthan gum, along with baking powder and salt.
Just substitute the regular self-raising flour with the gluten-free version in equal amounts.
If the batter seems a bit thicker than usual, you might want to add a little more milk to reach the desired consistency. This should help achieve a similar texture and rise.
Happy baking
Enjoy 😊
Tammy B. says
Can I make this with dairy free milk?
The Gardening Foodie says
Hi Tammy, yes, you can definitely make this with dairy-free milk. You can use any dairy-free milk, but almond, oat, or soy milk are good options. They tend to work well in baking without affecting the texture too much.
Enjoy and happy baking 😊
Ann Marie says
Would it work using whole wheat flour?
The Gardening Foodie says
Hi Ann Marie, Yes, it will work with whole wheat flour, but the bread will be denser due to the higher fiber content. Since this recipe uses self rising flour, you’ll need to add 1 ½ teaspoons of baking powder per cup of whole wheat flour to replicate the leavening. Whole wheat flour also absorbs more liquid, so increase the milk slightly (1–2 extra tablespoons) to maintain a moist texture. If you'd prefer a lighter bread, consider using half whole wheat and half self-raising or all-purpose flour.
Robyn says
Do you mean 365 degrees, not 356?
The Gardening Foodie says
Hi Robyn, Thanks for your comment, The temperature is correct , 356°F is the same as 180°C.
365°F (185°C) would be a bit higher, but 356°F (180°C) is the right one for this recipe. 😊
Gayle says
If you're using AP flour, wouldn't you also need to add 1/2 tsp salt in addition to what the recipe calls for? I'm really anxious to try this recipe! Thank you!!
The Gardening Foodie says
Hi Gayle,
If you’re using all-purpose flour instead of self-raising flour, you can add an extra 1/4 teaspoon of salt to the dry ingredients. That will bring the total salt to 1/2 teaspoon (including the 1/4 teaspoon already in the recipe), which balances the flavors perfectly without being too salty.
I’m so glad you’re excited to try this recipe. It’s super easy and quick to make.
Happy baking 😊
Kim says
I made this bread last night, baked on 355 degrees, since my oven doesn't do 356. Other than it taking 20 minutes to bake it took almost 40 but the result was an almost biscuit bread flavor and crumb. My son, who is a whatever kind of guy nothing impressed him, wanted to know if there was more left over, he was upset that he didn't have more to eat with butter and jelly ate he used most of it with the gravy from his dinner. I think next time I will drop it into muffin tins or find a much smaller bread pan.
Question: are you supposed to grease the parchment paper or the pan? I did the pan but had no issue getting the paper off.
The Gardening Foodie says
Hi Kim, Thank you so much for trying the recipe. I absolutely love that your son enjoyed this bread too 😊.
Muffin tins sound like a great idea for next time. Faster bake time and easier to portion out
And great question! If you’re using parchment, there’s usually no need to grease the pan underneath. The paper does all the non stick work. But I sometimes give the parchment a light spray too, as some brands can be a little clingy, so it’s a nice extra step if you’ve ever had issues with sticking.
If you’re skipping parchment entirely, though, then yes, definitely grease the pan well.
Thanks again for the great comment it totally made my day 😊
Beth Conner says
Oh my goodness!! I am 56 years young and just now discovering this !! I made it and added some shredded cheddar cheese to the batter and oh my gosh!! Can’t wait to make this a staple in our house!!!
The Gardening Foodie says
Hi Beth, I’m so glad you enjoyed the recipe and added your own twist.
Cheddar is a delicious addition, and it’s absolutely great to hear that it’s already a favorite at home 😊