Ready in 30 minutes with just 10 minutes of prep, this no yeast focaccia is soft inside with crisp edges. No kneading, no rise time needed. Just good bread, fast.

If you’ve ever wanted fresh, homemade bread without dealing with yeast or waiting around for dough to rise, this focaccia is for you.
It’s made with simple ingredients including yogurt, olive oil, and baking powder.
And no, I promise it doesn’t taste like a biscuit or a scone 😉 Just real, delicious bread that’s easy to make, and even better to eat.
Ingredient notes
This is just a quick look at the key ingredients. Full list with amounts is in the recipe card below.
- Flour: All-purpose flour (plain flour) works best here.
You can also mix in 2 tablespoons of fine semolina into the flour for a more bakery-style texture. But if you don’t have any, just leave it out. I’ve made it with and without, and it’s still amazing either way.
- Plain unflavored Yogurt gives this bread the soft texture (or use sour cream, thinned with a splash of water)
- Olive oil: It’s mixed into the dough, brushed on before baking, and again after. It adds flavor and helps the crust turn golden and crisp
- Baking powder: This replaces the yeast and makes the focaccia fluffy. If it’s been sitting in your pantry for a while, test it by stirring a little into hot water. It should fizz right away. If not, time for a fresh one.
- And don’t forget the salt. Trust me. 😅
Visual Instructions
These visual instructions help you see the process. You can also find the full printable recipe with instructions and ingredients at the end of the post.
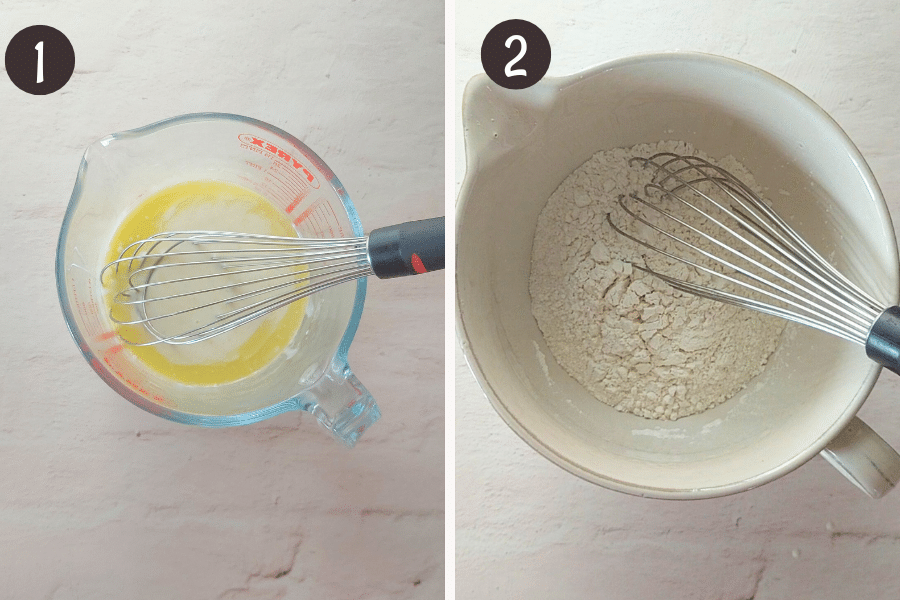
- Whisk together the wet ingredients: yogurt, olive oil, and water in a small bowl or jug
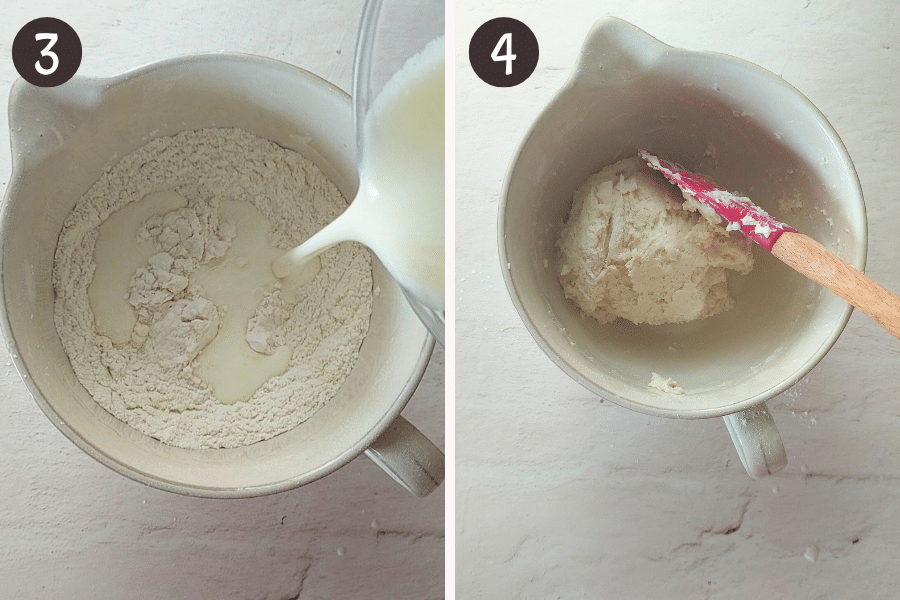
- In a separate bowl, whisk the dry ingredients: flour, baking powder, salt, and semolina if using.
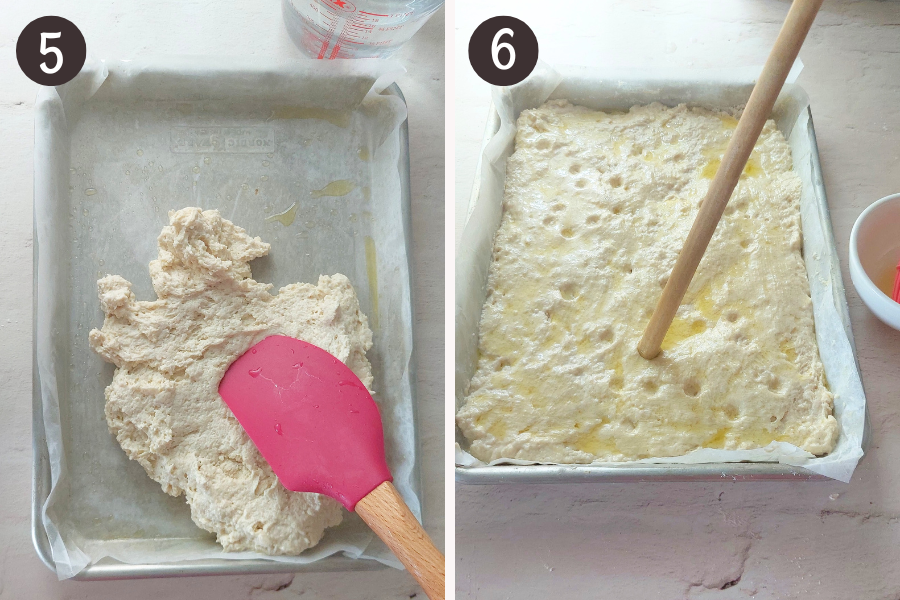
- Pour the wet ingredients into the dry.
- Use a spatula or spoon to mix everything together until a sticky dough forms. The dough will be soft and sticky, closer to a thick batter than kneadable bread dough. This is normal.
- Transfer the dough to a pan lined with baking paper and brushed with olive oil. Use a spatula dipped in water to gently spread it into an even layer.
- Water helps the spatula glide without sticking, so there’s no need to add extra flour. Too much flour can dry out the dough.
- Don’t worry about making it perfect, just keep pressing and smoothing it toward the edges. You’ll get the feel for it as you go.
- Rest and preheat: Once the dough is spread, preheat your oven to 400°F (200°C). Let the dough rest for 10 minutes. This allows it to relax and gives the baking powder time to activate for a better texture. Brush with olive oil, then dimple the surface with fingertips or the end of a spoon handle.
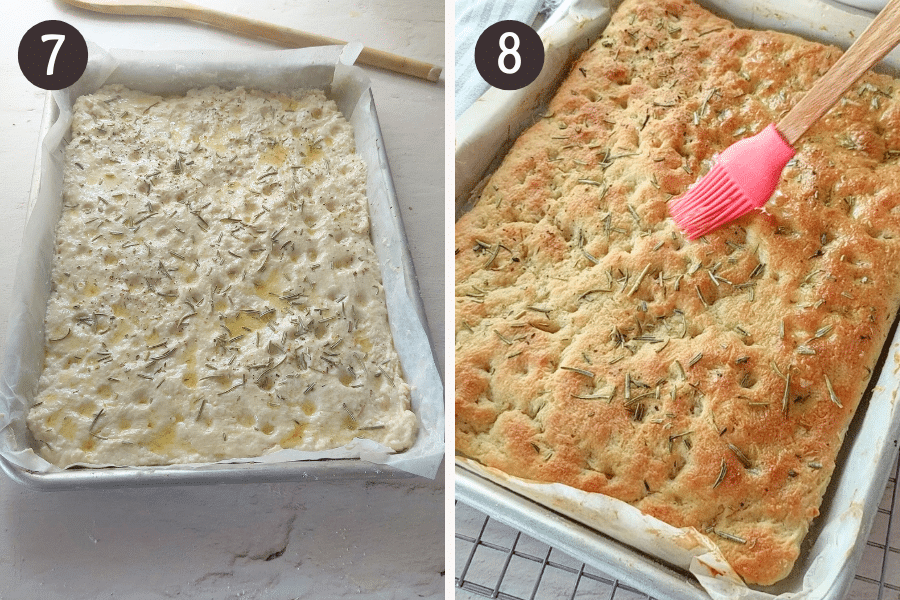
- Add toppings if using. Bake for 20 to 25 minutes, or until golden brown and puffed.
- Remove from the oven and while still warm, brush the top with olive oil, either plain or mixed with crushed garlic and herbs if you want extra flavor. Brushing it warm helps the oil soak in, soften the top, and give the bread that golden, glossy finish.

Serving ideas
- A cozy bowl of soup (tomato, pumpkin, or whatever’s simmering)
- As a side with salads or pasta
- Toasted for breakfast with eggs or cheese
- Packed for a picnic or snack board
- Honestly? It’s good enough to eat plain, standing over the kitchen counter 😉
Enjoy ♡
Recipe
No-Yeast Focaccia – No Knead, No Rise
Watch how to make the recipe
For the dough
- 2 cups (250g) all purpose flour (plain flour)
- 2 Tablespoons (20g) fine semolina flour (optional) (mix into the flour if using for a bakery style - softer texture)
- 2 level teaspoons (8g) baking powder (see note 1)
- 1 teaspoon salt
- 2 Tablespoons (30ml) olive oil
- ½ cup (125g) plain unflavored yogurt (or sour cream, thinned with 1 to 2 teaspoons of water until it reaches a similar consistency to yogurt)
- ½ cup (120ml) water (regular tap water is perfect, no need to warm it)
Before baking topping
- 2 Tablespoons (30ml) olive oil (for brushing over spread dough)
- optional toppings: rosemary, cherry tomatoes, caramelized onions Flaky salt
After-bake topping
- 2 Tablespoons (30ml) olive oil
- 1 clove garlic finely crushed or grated (optional)
- ¼ teaspoon dried Italian herbs (optional)
Prepare the pan
- Line a metal baking pan with baking paper and brush generously with olive oil.
- Use a 9×13-inch (23×33 cm) pan for thinner focaccia, or an 8-inch (20 cm) square pan for a thicker one..
- You’ll preheat the oven later, after the dough is spread.
Mix the dry ingredients
- In a large bowl, whisk together the flour, baking powder, salt, and semolina (if using).
- Don’t worry if you don’t have semolina, it’s optional. I’ve made it both ways and it’s great either way.
Mix the wet ingredients
- In a separate bowl or jug, stir together the yogurt, water, and olive oil.
- Pour the wet mixture into the dry ingredients.
Combine
- Mix with a spatula until a sticky, thick batter-like dough forms.
- It should feel soft and spreadable, more like thick batter than kneadable bread dough. That's totally normal.
Spread the dough
- Transfer the dough to your prepared pan.
- Use a spatula dipped in cold water to gently spread it into an even layer.
- Don’t add flour to handle the dough, it’ll dry it out. Water makes it easy to spread without sticking.
- It doesn't need to be perfect. Just press and smooth it toward the edges. You’ll get the hang of it as you go.
Rest and preheat
- Now preheat your oven to 400°F (200°C), or 180°C if using a fan oven
- Let the dough rest in the pan for 10 minutes while the oven heats.
- This gives the dough time to relax and lets the baking powder start doing its job. It also makes dimpling easier.
Dimple and top
- After resting, brush the surface with olive oil and add any toppings you like.
- Dimple the surface with fingertips or the end of a wooden spoon handle and add any toppings you like. Or just plain with olive oil and flaky salt is great.
Bake
- Bake for 20 to 25 minutes, until golden brown on top and around the edges, and puffed in the center.
Brush After Baking (Don’t skip this step)
- While still warm, brush the top with olive oil, plain, or mixed with garlic and herbs.
- Brushing while warm helps the oil soak in, soften the top, and give it that beautiful glossy finish.
Cool and serve
- Let cool for 5–10 minutes before slicing. Serve warm or at room temperature.
- Great on its own, with soup, or turned into a sandwich. See below for serving ideas.
Storage
- Store covered at room temperature for up to 2 days
- Reheat slices in a pan or oven to bring back that crisp edge
- Wrap and freeze individual slices, reheat straight from frozen
What to Serve It With
- soup
- salad or pasta dish
- Toasted for breakfast with eggs or cheese
- Packed for a picnic or snack board
- Or just warm from the pan, standing at the counter 😋
- Baking powder: This replaces the yeast and makes the focaccia fluffy. If it’s been sitting in your pantry for a while, test it by stirring a little into hot water. It should fizz right away. If not, time for a fresh one.
Hungry for more?
Sign up for my free newsletter to get emails about new recipes .And don't forget to follow me on YouTube, Facebook, Pinterest, and Instagram for all the latest deliciousness


Rachel says
I made this today and it is very delicious- lovely and moist and a great flavour.
The Gardening Foodie says
Rachel, that makes me so happy to hear! I’m really glad you liked it. Appreciate you sharing how it turned out. That means a lot 🙂