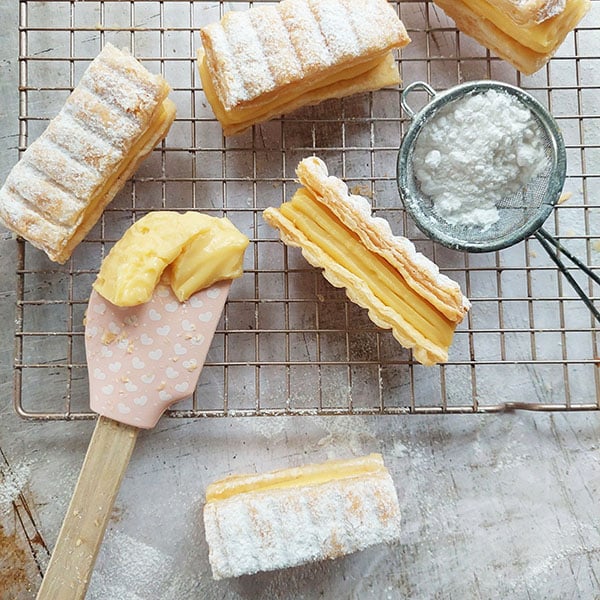
If you're a fan of dreamy decadent desserts, you'll love my Easy Vanilla Custard Slice made without eggs. With a creamy, custard filling sandwiched in a flaky pastry crust, it's rich and indulgent, yet completely egg-free. It's the perfect dessert for any occasion, sure to impress family and friends.
A twist on a classic recipe this Vanilla Custard Slice is perfect whether you're catering to dietary restrictions or just want to try something a little different.
It's super easy to make, yet produces amazing flavour.
The filling (custard) is made with a combination of milk, corn starch, sugar and vanilla extract. Its cooked until smooth and creamy.
To assemble, simply cut the pastry into rectangles, then bake until golden and flaky.
Pipe and sandwich the custard between the baked pastry and chill. And for a finishing touch, top the pastry with a sprinkle of powdered sugar. It's really that easy!

For a perfect bake, read through the Brief Guide to some of Ingredients And Their Substitutes, Visual Guide for this recipe and tips.
Or else simply skip to the full recipe and video at the end of this post
A Brief Guide to some of Ingredients And Their Substitutes
This is just a quick rundown of what ingredients you'll need and options if you need to exchange any of them. Full recipe with amounts and instructions can be found at the bottom of this post.
- Milk: When you're making this recipe, you've got options! If you prefer dairy, whole milk (full-fat) is the way to go for the creamiest and richest custard. Or, if you're avoiding dairy, there's plenty of delicious non-dairy milks like soy, almond, or coconut.
- Corn starch: (cornflour in UK, Australia, NZ and SA) A fine, white soft powder in appearance. It's used to thicken the filling, giving it a smooth, creamy texture. Tapioca starch or arrowroot powder make great alternatives to corn starch.
- Sugar: White granulated sugar is used in this recipe. Feel free to substitute with brown sugar if you prefer.
- For the yellow color: If you're looking for the classic yellow custard appearance, there are a few ways to achieve it. Gel or powder based food coloring will blend in nicely with the custard recipe, whereas liquid coloring might cause it to look a bit spotty. If you want to go all-natural, turmeric is another great option.
- Frozen puff pastry: Allow your puff pastry to thaw on the counter for at least 45 - 60 minutes before beginning the recipe.
Visual Guide for this recipe
Make the custard
NOTE: Visual guide only - full recipe with ingredient amounts and instructions at the end of this post
-
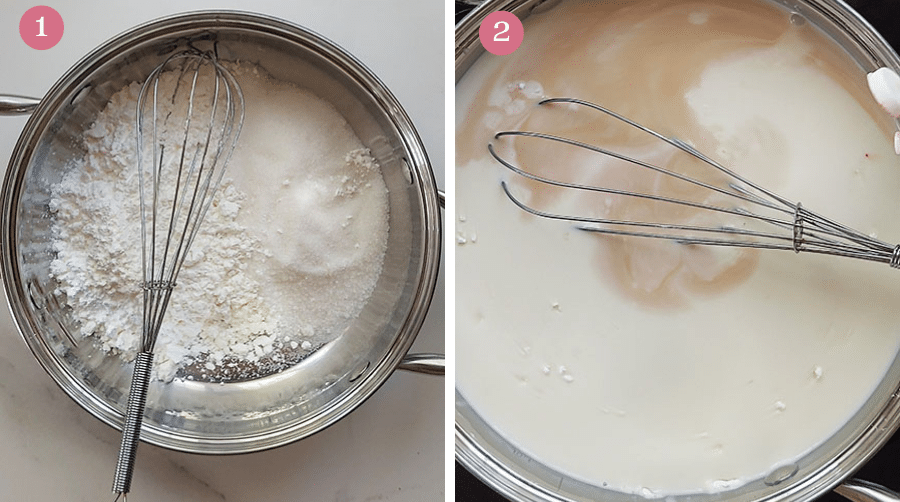
For the custard, whisk the cornstarch and sugar into a large saucepan.
-
Pour in the milk, vanilla extract and a few drops of yellow food coloring stirring with a whisk so no lumps form.
-
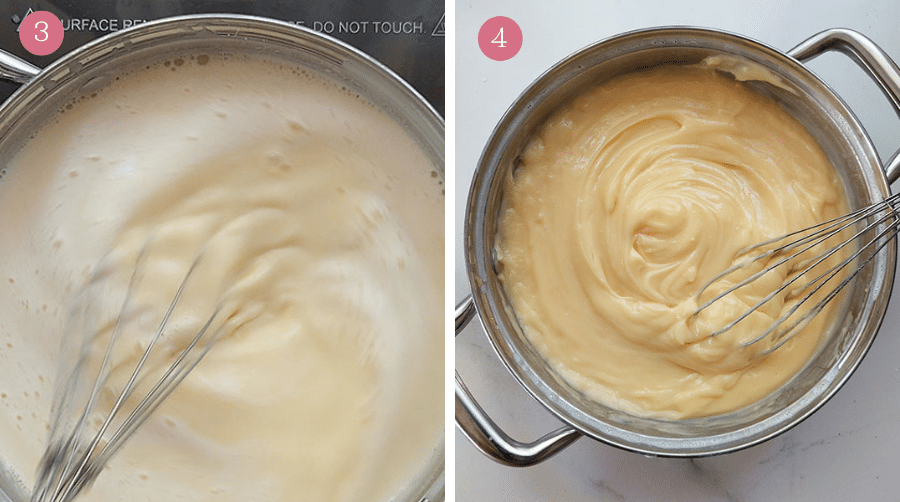
Place the saucepan on medium low heat and bring the mixture to a boil, while constantly whisking. Within 6-8 minutes you will notice, as you whisk, the mixture becomes thicker.
-
At this point, remove the pot from the stove but continue to whisk for at least another minute until the mixture is thick and creamy.
Pastry
NOTE: Visual guide only - full recipe with ingredient amounts and instructions at the end of this post
-
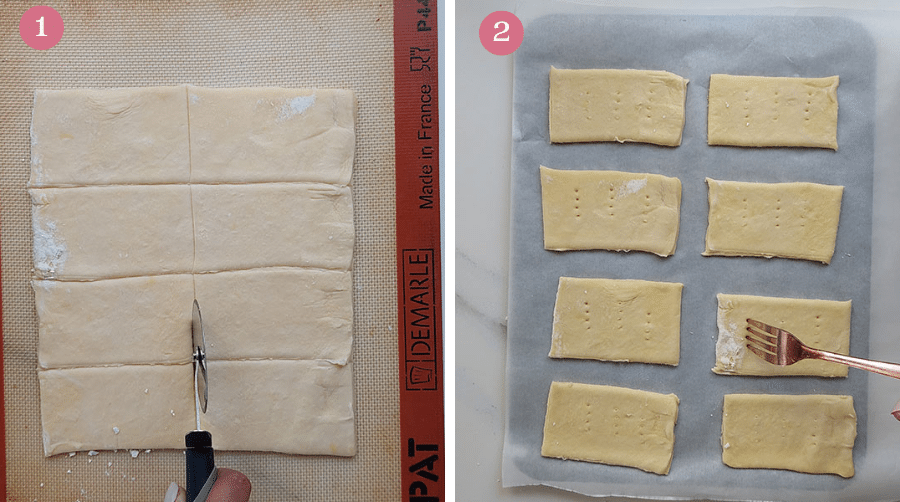
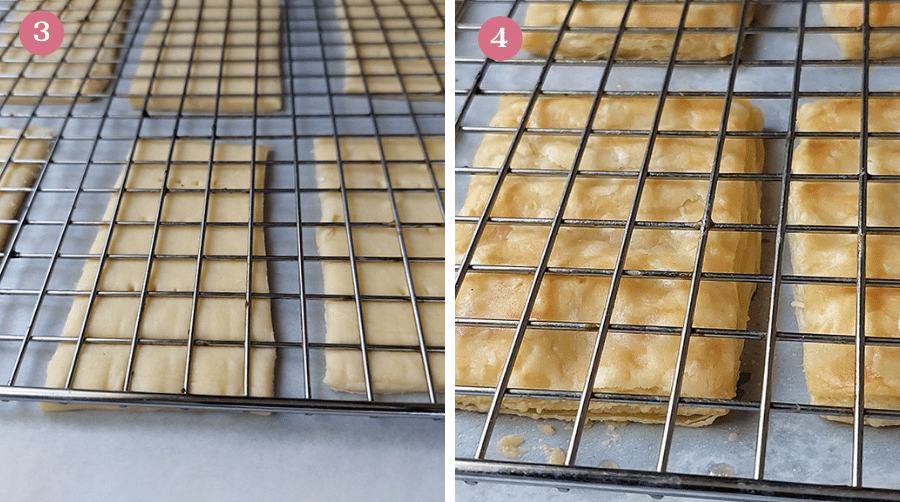
Roll out the pastry until it's around 1/16th of an inch thick (2mm), then use a sharp knife or pizza cutter to make 1x3 inch (3x8 cm) rectangles.
-
Place on a lined baking sheet and pierce each with a fork.
-
To ensure your pastry doesn't rise too much, weigh it down with a metal cooling rack that you have sprayed with non stick cooking spray.
-
Bake it for 20 to 25 minutes until it's golden brown and crisp. Remove the baking sheet from the oven and lift the cooling rack off the pastry. If the pastry is stuck to the cooling rack, gently slide a butter knife or a spatula between the pastry and the cooling rack to help loosen it. Leave the baked pastry to cool completely before filling with the custard.
To Assemble
NOTE: Visual guide only - full recipe with ingredient amounts and instructions at the end of this post

-
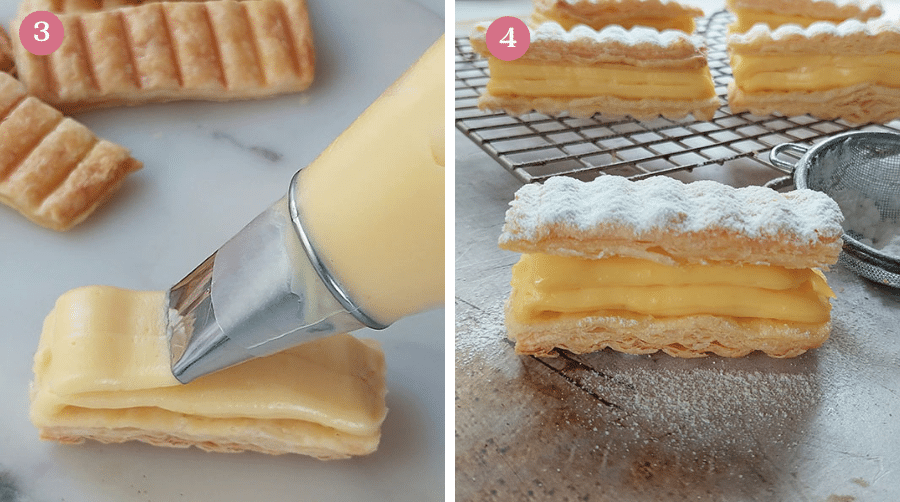
If the custard has set while cooling, whisk it well to break up any lumps and get it to a creamy consistency. If you still see some lumps, don't worry - they will either disappear or be hardly noticeable once the custard is piped onto the pastry.
-
Transfer the custard to a piping bag fitted with a large ribbon tip (like the Ateco 789 ribbon pastry tip) Pipe a double row of custard onto one of the pastry pieces
-
Pipe a double layer of custard onto one of the pastry pieces.
-
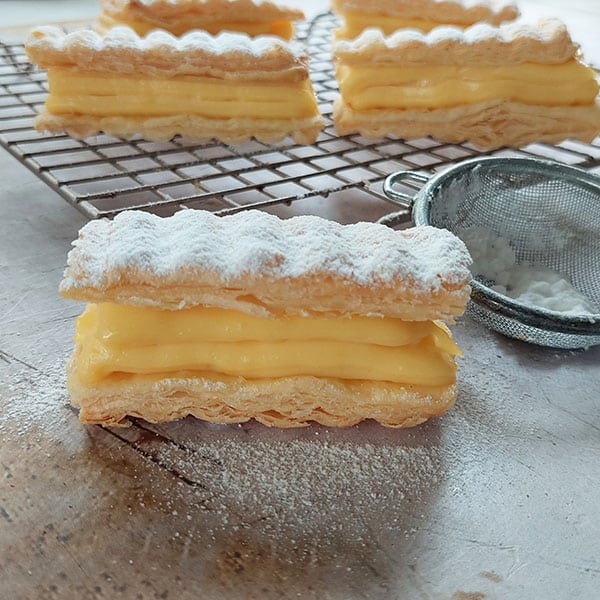
Place a second pastry piece on top, repeating the process with the remaining pastries and custard. To finish, top with sifted powdered sugar.
Tips for Vanilla custard slice
- For best results, heat the custard over low heat to prevent burning on the bottom of your saucepan. It may be tempting to turn up the heat to speed up the thickening process, but this can lead to lumpy, charred results.
- For a perfectly smooth custard, whisk continually over low heat until it is thick enough to hold its shape when piping.
- Piercing the puff pastry with a fork is essential in keeping the pastry from rising too much during baking.
Enjoy ♥
This post may contain affiliate links. Please read my disclosure policy.
Easy Vanilla Custard Slice - without eggs
Watch how to make the recipe

For the custard
- ¾ cup cornstarch see note 1
- ⅔ cup white granulated sugar
- 3 cups milk see note 2
- 1 teaspoon vanilla extract
- ⅛ teaspoon yellow food coloring see note 3
For the pastry
- 1 roll of frozen puff pastry thawed at least 45 minutes before baking
For the topping
- ¼ cup powdered sugar
Make the custard
- Place the cornstarch and sugar into a large saucepan and mix.
- Slowly add in the milk while whisking vigorously so that no lumps form.
- Stir in vanilla and yellow food coloring.
- Place the saucepan on medium low heat and bring the mixture to a boil, while constantly whisking. Within 6-8 minutes you will notice, as you whisk, the mixture becomes thicker.
- At this point, remove the pot from the stove but continue to whisk for at least another minute until the mixture is thick and creamy.
- To prevent a skin from forming, cover the custard with plastic wrap, making sure that the plastic is in contact with the surface of the custard.
- Leave to cool at room temperature for at least 45 - 60 minutes.
Pastry
- Allow your puff pastry to thaw on the counter for at least 45 - 60 minutes before beginning the recipe.
- Unroll one sheet onto a lightly floured surface. Preheat the oven to 400 °F (200 °C) (180°C fan assisted oven)
- Line a baking sheet with parchment paper
- On a lightly floured surface, roll out the pastry to about 1/16 inch (2mm) thickness. Use a sharp knife or pizza cutter to cut 1x3 inch (3x8 cm) rectangles.
- Place the rectangles about 2 inches (5cm) apart on the lined baking sheet. Pierce each rectangle well with a fork.
- To ensure your pastry doesn't rise too much, weigh it down with a metal cooling rack that you have sprayed with non-stick cooking spray. If you really want to put extra weight on your pastry, you can put any metal or glass baking pan filled with water (or baking beans) on top of the cooling rack.
- Bake for 20 to 25 minutes until the pastry is golden brown and crisp.
- Remove the baking sheet from the oven and lift the cooling rack off the pastry.
- Make sure to use oven mitts to avoid burning your hands, because the cooling rack will also be hot.
- If the pastry is stuck to the cooling rack, gently slide a butter knife or a spatula between the pastry and the cooling rack to help loosen it.
- Leave the baked pastry to cool completely before filling with the cooled custard.
To assemble
- If the custard has set while cooling, whisk it well to break up any lumps and get it to a creamy consistency. If you still see some lumps, don't worry - they will either disappear or be hardly noticeable once the custard is piped onto the pastry.
- Transfer the custard to a piping bag fitted with a large ribbon tip (like the Ateco 789 ribbon pastry tip) See note 4
- Pipe a double layer of custard onto one of the pastry pieces. Place a second pastry piece on top, repeating the process with the remaining pastries and custard.
- To finish, top with sifted powdered sugar. They can now be served immediately or refrigerated for an hour before serving.
Storage
- Can be refrigerated for up to 2 days in an airtight container. However, it is important to keep in mind that the longer the pastry is stored, the more likely it is to absorb some liquid from the custard, leading to a loss of crispness.
If you like this recipe, be sure to check out my other amazing dessert recipes
Follow on Facebook, Pinterest, and Instagram, or Subscribe for the latest recipe updates.


Tom Kessler says
My search is for a custard recipe to come close to the firni I have enjoyed at and Indian restaurant. Several sites have given directions similar to yours.
But I am confused as you mention vanilla but it is not in your ingredients list. Do you need vanilla? How much (knowing various types of vanilla can vary)?
Thank you.
The Gardening Foodie says
Hi Tom,
I’m so sorry for the oversight. You’re absolutely right, I should have included the vanilla in the ingredients list. You’ll need 1 teaspoon of vanilla extract for this recipe. I’ve also updated the recipe to reflect this.
Thank you for catching that, and I really appreciate your patience. I hope this recipe helps you recreate the firni you enjoyed at the restaurant.
Happy baking 😊