These Mini Cream Scones are buttery, soft, and perfectly sized for layering with jam and cream (or both 😋). They bake up tender, tearing apart easily in the center for that classic scone texture, never dry or crumbly. Perfect for piling high with your favorite toppings.

Buttery and soft, these mini scones are made with cold butter and cream, no eggs needed in the dough.
They are super easy to make with just a few basic ingredients these. You can mix the dough by hand, or in a food processor, whatever you have works.
Love scones? Give these a try too:
Ingredient notes
This is just a quick look at the key ingredients. Full list with amounts is in the recipe card below.
- Flour: All-purpose (plain) flour works best.
- Baking powder: Make sure it’s fresh, it’s the only raising agent. Test it by stirring a little into hot water. It should fizz right away. If not, time for a fresh one..
- Sugar: Just a touch for balance, easily adjust to taste.
- Butter: Use cold for the best texture. I used cold salted butter and added ½ teaspoon salt. If you're using unsalted butter, just use ¾ teaspoon salt instead.
- Cream: Use heavy cream or double cream, anything rich and pourable. Depending on where you are, it may also be labeled as whipping cream or thick cream. Just avoid single or light cream, they’re too thin for the dough.
- Optional for brushing before baking: Use a little cream or milk for a classic soft top. Or whisk an egg yolk with a tablespoon of milk for a deeper golden finish. Or skip it entirely, they’ll still bake up beautifully.
Visual Instructions
These visual instructions help you see the process. You can also find the full printable recipe with instructions and ingredients at the end of the post.
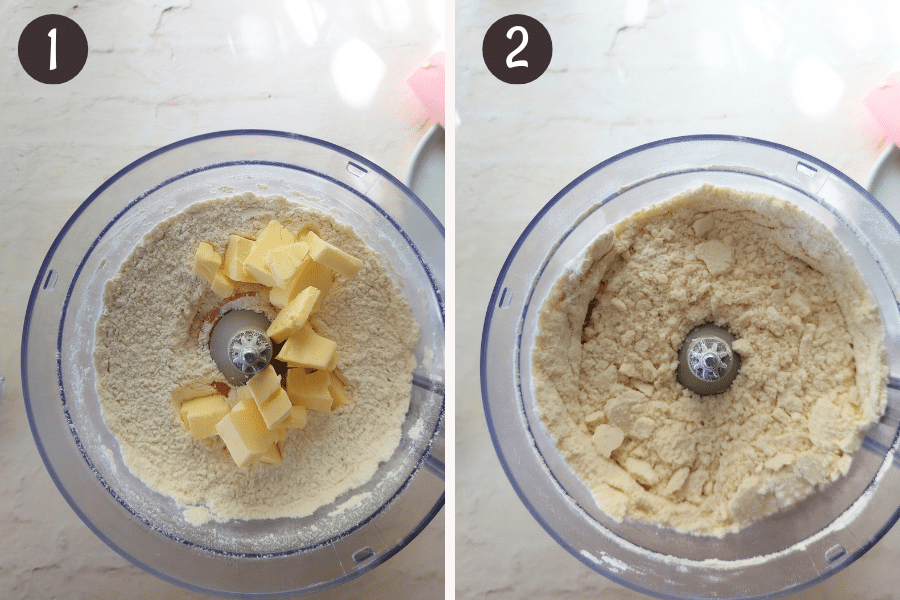
- Add cold, cubed butter to the mixture of flour, baking powder, sugar, and salt in your food processor (or mixing bowl)
- Pulse or rub the butter into the flour until the texture looks like coarse crumbs.
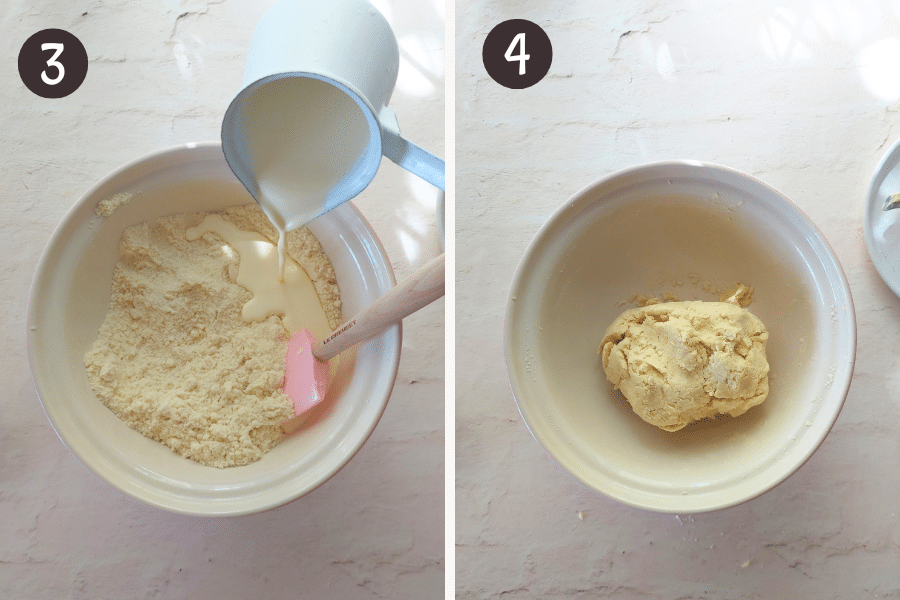
- Transfer mixture to a bowl (if using food processor). Pour in the cream and mix gently until a dough just starts to form.
- The dough should be soft and slightly rough (perfect for tender scones. It doesn't need to be perfectly smooth.
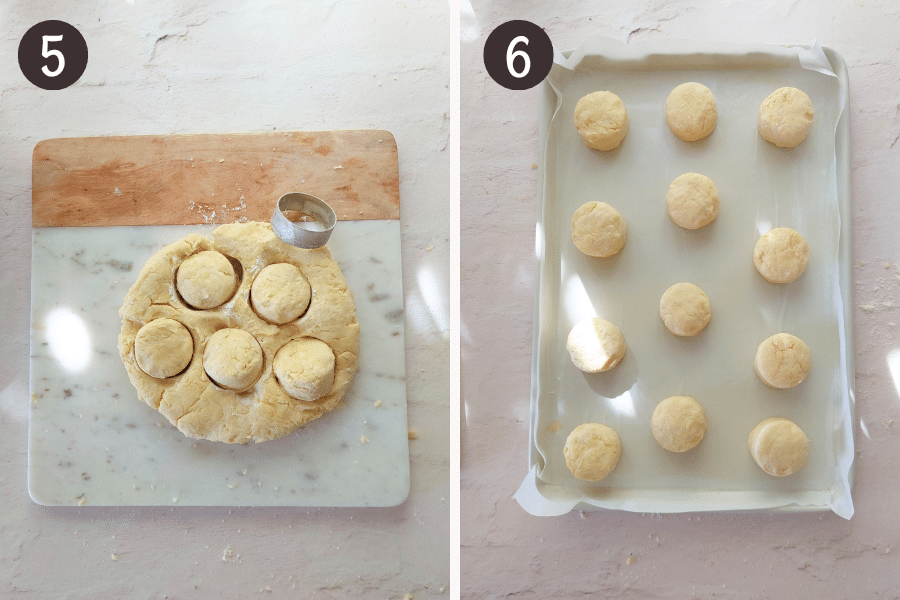
- Lightly press out the dough on a floured surface to about ¾ inch (2 cm) thick. Use a small round cookie or biscuit cutter about 1¾ to 2 inches (4.5 to 5 cm) wide. Press straight down and lift, don’t twist, as that can seal the edges and affect the rise.
- Brush the tops with cream or milk for a lighter color finish or beaten egg yolk for a glossy top
I used a beaten egg yolk mixed with 1 tablespoon of milk for the glossy, golden, color you see in the photos.
- Then bake for 12–15 minutes, or until lightly golden and puffed. Let them cool for 10 minutes, loosely covered with a cloth to keep the tops soft.

Storage and reheating
Let the scones cool completely before storing.
- Room temperature: Store in an airtight container for up to 2 days.
- Freezer: Freeze in a single layer, then transfer to a freezer safe container or bag. Reheat straight from frozen. No need to thaw.
Scones are best served warm.
To reheat, microwave for 5-10 seconds for one, or about 15 seconds for a few.
For the oven, wrap in foil and warm at 320°F (160°C) for about 5 minutes until warmed through.

Recipe
Mini Cream Scones
- 2 cups (240 g) all-purpose flour (plain flour)
- 3 level teaspoons baking powder
- 3 Tablespoons (38 g) white granulated sugar
- ½ teaspoon salt (use ¾ teaspoon if using unsalted butter)
- 5 Tablespoons (70 g) cold salted butter (cut into small cubes)
- 1 cup (240 ml) heavy cream (double cream) (see cream note below)
Optional for brushing:
- A little cream or milk (for a lighter color top)
- Or: 1 egg yolk whisked with 1 Tablespoon milk (for a golden, shiny finish)
- Or skip it, they’ll still bake up beautifully
Preheat the oven
- Preheat to 360°F (180°C) conventional or 350°F (175°C) fan
- Line a baking tray with parchment (baking) paper and place the oven rack in the center.
Mix dry ingredients
- Whisk together the flour, baking powder, sugar, and salt either in a large bowl (if mixing by hand) or in the bowl of a food processor.
Rub in the butter
- If mixing by hand: Add the cold butter to the dry ingredients. Use your fingertips to quickly rub it in until the mixture looks like coarse crumbs, with a few larger pieces.
- If using a food processor: Add the cold butter to the bowl. Pulse about 10 times (1 second pulses) until it resembles coarse crumbs.
Add the cream
- If you used a food processor, transfer the mixture to a bowl now and pour in the cream.
- If you're mixing by hand, just pour the cream into your bowl and continue.
- Gently mix with a spoon or spatula just until a soft, slightly rough dough forms. It doesn’t need to be perfectly smooth.
Shape and cut
- Lightly flour your surface and gently pat the dough to about ¾ inch (2 cm) thick.
- Cut with a small 1¾–2 inch (4.5–5 cm) round cookie cutter, pressing straight down without twisting (twisting can seal the edges and affect the rise)
- Gather and gently re-shape leftover dough to cut more.
- If you don’t have a cookie cutter: Shape the dough into a round disk and slice it into mini triangles, about the same size as you’d cut with a small round cutter.
- Optional: Brush the tops with cream, milk, or the egg yolk mixture for a golden color like in the photos above.
Bake
- Bake for 12–15 minutes, or until puffed and lightly golden.
- Cool for about 10 minutes, loosely covered with a clean cloth to keep the tops soft.
Storage and reheating
- Room temperature: Store the cooled scones in an airtight container for up to 2 days.
- Freezer: Freeze in a single layer first, then transfer to a freezer safe bag or container.
To serve warm
- Reheat directly from frozen, no need to thaw.
- Microwave one scone for 5–10 seconds, or a few for about 15 seconds.
- Or wrap in foil and warm in a 320°F (160°C) oven for 5 minutes.
Hungry for more?
Sign up for my free newsletter to get emails about new recipes .And don't forget to follow me on YouTube, Facebook, Pinterest, and Instagram for all the latest deliciousness


Leave a Reply