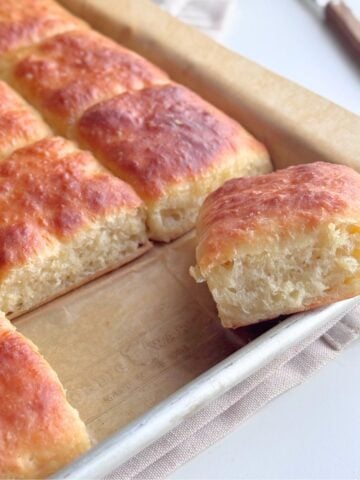
Enjoy a batch of buttery 3 ingredient scones, prepared and baked in under 30 minutes! A classic recipe super easy to make, plus my secret tip for light, soft, perfect scones every time.

These 3 ingredient scones are made without the additional sugar and eggs.
However, sugar is optional and I've included guidelines in the recipe card below on how it can be added. This makes it versatile in terms of serving and diet preference.
Super easy and convenient. Why?
- You are using cold ingredients straight from the freezer or fridge. You don’t have to wait for any ingredient to reach room temperature before you start baking.
- There is no kneading of the dough. The dough is just lightly mixed until combined. In fact, the less mixing results in the lightest scones.
What's the secret?
My secret tip for making tender, light scones: Grated frozen butter! Trust me, this makes a world of a difference to your baked scones.
Firstly, it’s easier to incorporate frozen grated butter throughout the flour compared to little blocks of cold butter.
Secondly as the grated frozen butter melts during baking, it creates pockets of butter throughout, releasing steam and helping the dough rise perfectly instead of spreading out.

What you need to make 3 Ingredient scones
The ingredients are super simple, nothing complicated here! (Scroll down to the end for the full printable recipe.)

How to make 3 ingredient scones
Keep scrolling down to the recipe card for a list of FULL ingredient amounts and instructions or click the “Jump to Recipe” button at the top of the page


Storage
Scones are best eaten or served warm from the oven. Preferably eaten on the same on which it has been baked.
- On the countertop at room temperature: Store in an airtight container for about two days
- In the refrigerator: Store in an airtight container for about a week,
- In the freezer: Store in an airtight container for about two months.
Food safe / Freezer safe airtight containers or zip bags ensures that your scones do not absorb scents from other food while they are stored.

Tips for perfect scones
Don't soften your butter. Cold butter makes scones rise higher.
Measure your flour with a kitchen scale or by scooping it out of the bag and into a dry measuring cup with a spoon. Do not pour your flour into the measuring cup or it will be too dense and you'll use more flour than you should.
Use your fingertips only When rubbing the butter in to the flour mixture, try not to use your palm of your hand to do so. The palm of your hand is warmer than your finger tips and will soften the butter.
Avoid over-mixing the dough. Too much stirring will produce dense scones.
Prevent lopsided baked scones by pressing down on the dough and lifting out. Don't twist the cutter.

Frequently asked questions
Can you freeze Scones?
YES! You can.
They can be frozen in their unbaked or baked form.
Here’s how it’s done
How to freeze baked scones
- Let the baked scones cool then pop them into a Ziploc bag or airtight container for up to 2 weeks.
- Thaw at room temperature. Or defrost in the microwave on medium setting for 35 to 40 seconds.
How to freeze unbaked scones
You can freeze the unbaked scone dough or shaped unbaked scones.
- Wrap your scone dough well in cling film.
- Place the wrapped scone dough in an airtight container or freezer safe bag.
- Label and Freeze. Write the date that you prepared your scone dough, as well as its use-by date on the front of the container or bag, before placing it in the freezer
- Freeze for up to 1 month.
- Remove it from the freezer the night before you plan to bake it, transferring it to the fridge to thaw completely before cutting and baking.
To freeze unbaked cut out scones
- Prepare your dough according to the recipe instructions
- Cut the scones with a round cookie cutter. separate out each scone using parchment paper and place in an airtight container or freeze safe bag
- The parchment paper will stop them from sticking together when they freeze.
- Label and Freeze Write the date that you prepared your cut out unbaked scones, as well as its use-by date on the front of the container or bag, before placing it in the freezer
- Freeze for up to 1 month.
- Bake straight from frozen, adding a couple more minutes to the baking time.
Do I need a cookie cutter?
No, You could also use a sharp knife to cut the dough into triangles or squares.

Serving suggestion
Delicious served with sweet or savory filling
Sweet
- Any flavor jam/jelly
- Whipped cream
- Honey
- Lemon curd
- Marmalade
- Nutella
Savory
- Guacamole
- Smoked salmon
- Cheese and chutney
Enjoy ♥
Follow on Facebook, Pinterest, and Instagram or Subscribe for the latest recipe updates.
3 ingredient scones
- 3 cups self-raising flour see note 1
- ⅓ cup grated frozen butter see note 2
- 1 cup milk cold
- If you don’t already have butter kept in the freezer, then pop a block in for about 15 minutes before grating.
- Grate the frozen butter into a bowl with the flour.
- Rub the butter into the flour with your fingertips until it resembles breadcrumbs. Lift your fingers above the bowl while rubbing to help aerate the mixture. See Note 4
- If using sugar, stir it into the flour mixture now.
- Pour the cold milk over the flour mixture combining with a butter knife or an offset spatula to form a soft dough. Mix only until combined. Do not overmix. See note 5
- Turn the dough out onto a lightly floured surface. Gather the dough gently to form a smooth ball.
- Pat the dough out to about 1 inch (2cm) thick.
- Dip a 2½ inch (6cm) round cookie cutter or cup in some extra flour and push down into the mixture. Don’t twist! If you do, it will result in lopsided baked scones. See note 6
- Gently form the dough back together and cut again until you have used up all the dough.
- Place the cut-out scone dough on a baking sheet lined with parchment paper or a Silpat silicone mat.
- Bake for 12-15 minutes until risen and golden brown in a preheated oven of 390°F/200°C (standard) or 350°F/180°C (fan / convection)
- Remove from the oven and serve either warm or cooled.
Storage
- Scones are best eaten or served warm from the oven. Preferably eaten on the same on which it has been baked.
- On the countertop at room temperature: Store in an airtight container for about two days
- In the refrigerator: Store in an airtight container for about a week,
- In the freezer: Store in an airtight container for about two months.
- Food safe / Freezer safe airtight containers or zip bags ensures that your scones do not absorb scents from other food while they are stored.
Serving suggestions
- Delicious served with sweet or savory filling
- Sweet
- Any flavor jam/jelly
- Honey
- Lemon curd
- Marmalade
- Nutella
- Savory
- Guacamole
- Smoked salmon
- Cheese and chutney
- Self-rising flour: Ensure that your self-rising flour is fresh and not past the expiry date. If the self-rising flour is expired, the scones will not rise and will have a dense texture. If you do not have self-rising flour, then you can make your own by just adding 2 teaspoons of baking powder to every cup of all-purpose OR cake flour called for in the recipe.
- Cold grated butter: My secret tip for making tender, light scones: Grated frozen butter! Trust me, this makes a world of a difference to your baked scones. Firstly, it’s easier to incorporate frozen grated butter throughout the flour compared to little blocks of cold butter. Secondly as the grated frozen butter melts during baking, it creates pockets of butter throughout, releasing steam and helping the dough rise instead of spreading out.
- Sugar: This is optional and about ¼ cup (or according to taste) can be added to the flour after rubbing in the butter.
- Use your fingertips only When rubbing the butter in to the flour mixture, try not to use your palm of your hand to do so. The palm of your hand is warmer than your finger tips and will soften the butter.
- Avoid over-mixing the dough. Too much stirring will produce dense scones.
- If you do not want to use a cookie cutter, you could also use a sharp knife to cut the dough into triangles or squares.

Julie E says
Is the butter measured before or after the shredding? I would normally measure prior to shredding, but want to confirm.
Thank you,
Julie
The Gardening Foodie says
Hi Julie, the butter is measured before shredding.
Happy baking 😊