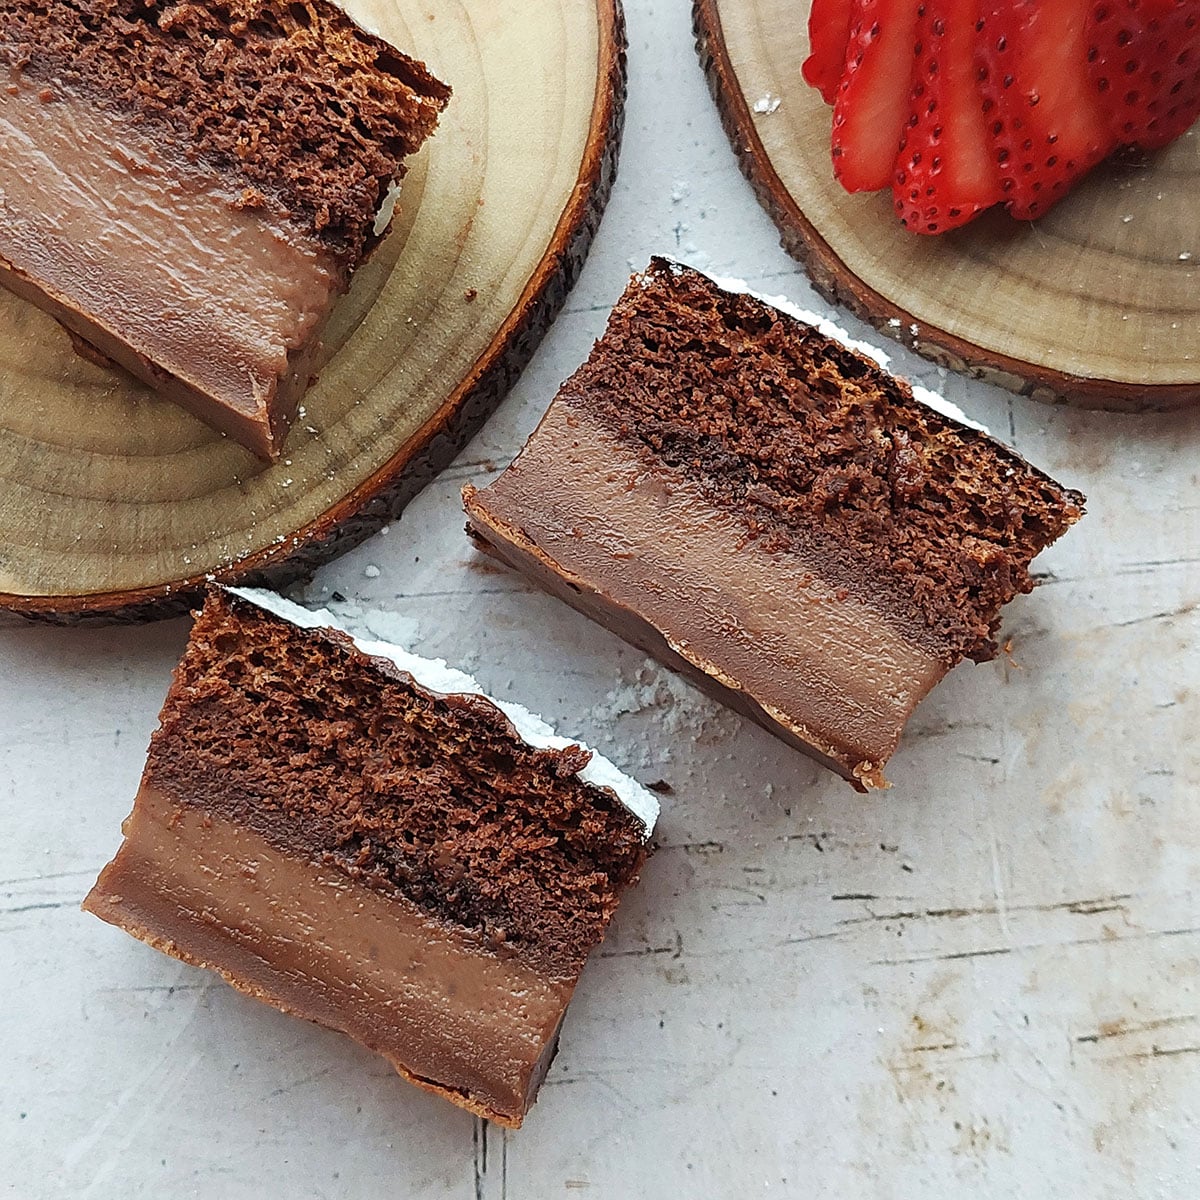
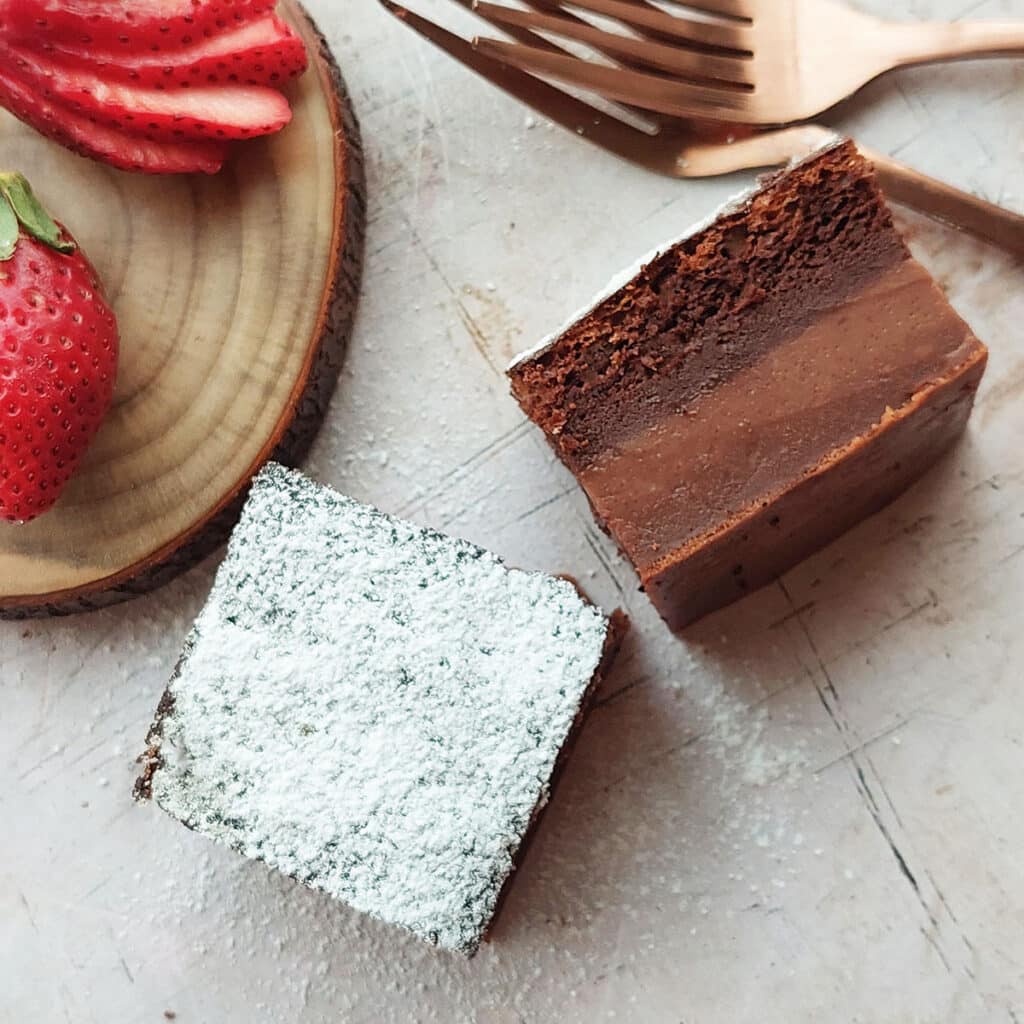
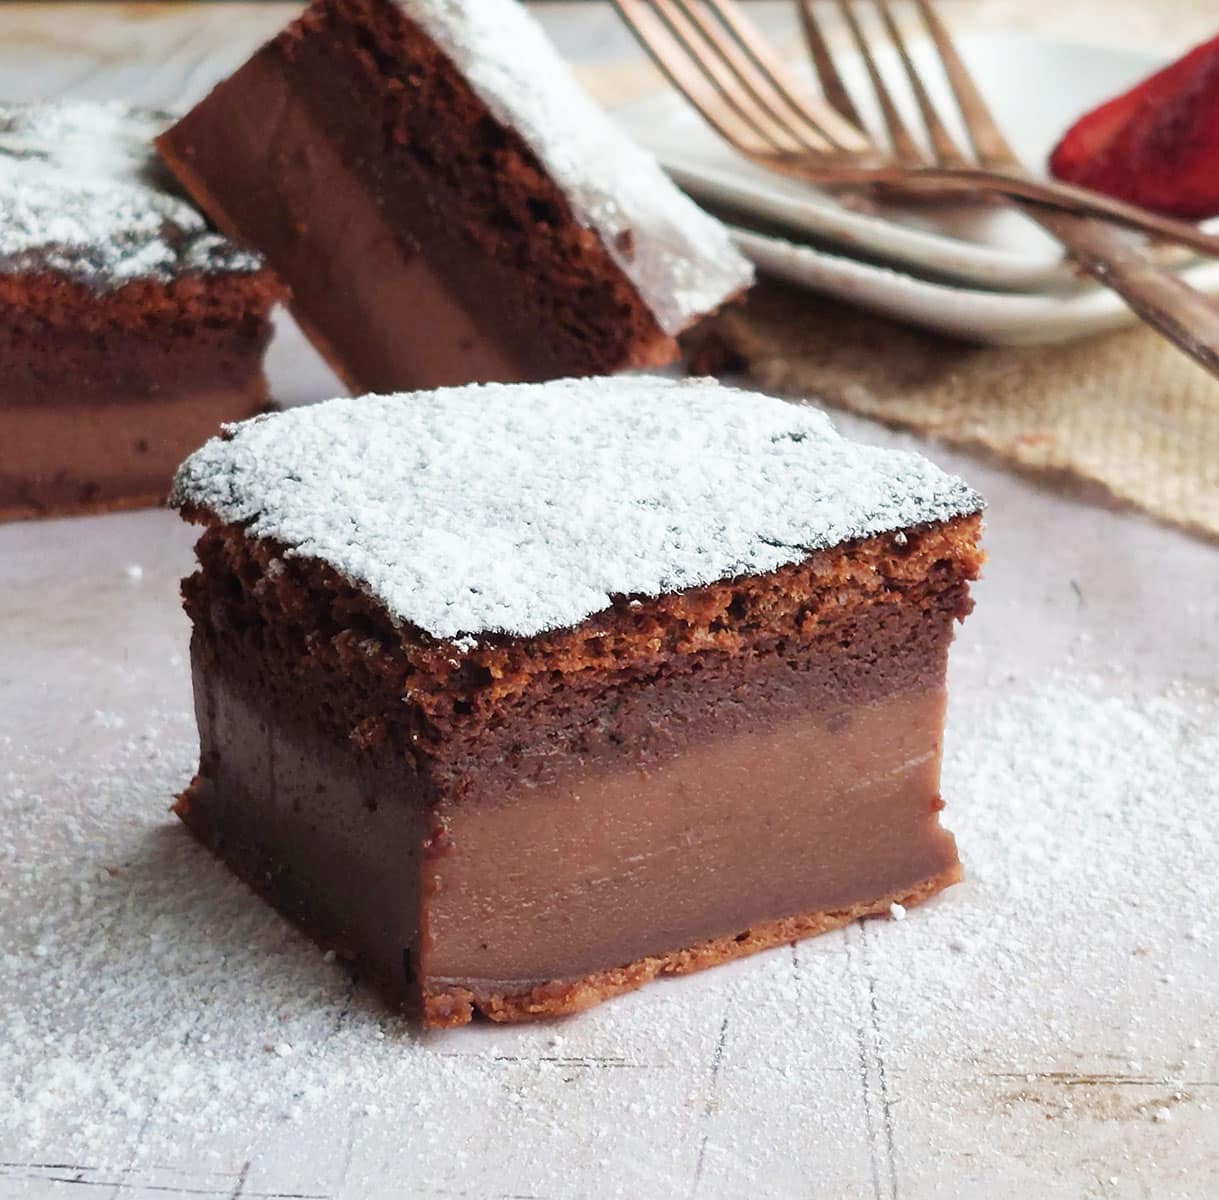
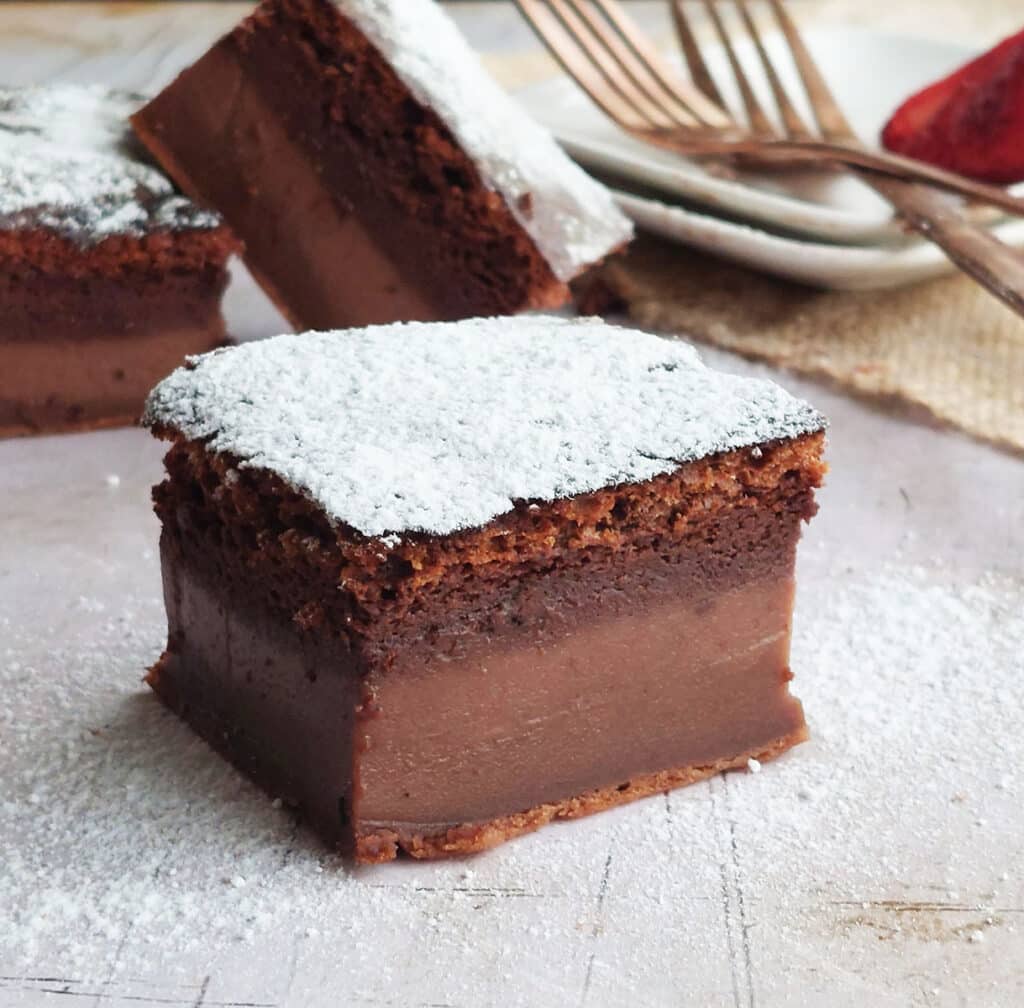
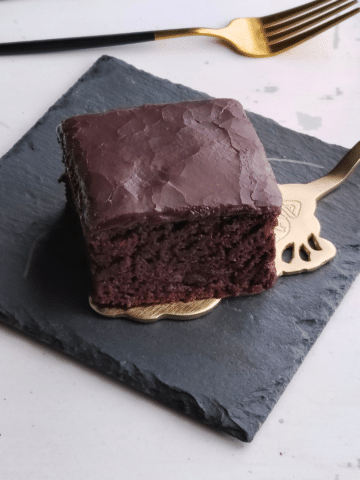
Chocolate Magic Custard Cake transforms into 3 layers of decadence with just one batter! Poured into a baking pan it bakes up separately into a fudgy bottom layer, custard middle and chocolate sponge cake top. Made with basic ingredients, it's easy to make super impressive too.
If you prefer gluten-free Chocolate Magic Custard Cake, I've got some exciting news for you. I tested the recipe with gluten-free flour, and it turned out absolutely fantastic. I've gone ahead and made updates to the post and recipe card below, including the gluten-free alternative. Enjoy!
Ingredient Preparation
For this cake, its important that all your ingredients are at room temperature. Get the eggs and milk out of the fridge at least an hour before baking.
However if you forgot to take the eggs and milk out of the fridge earlier, you can get it to room temperature within a few minutes.
- Here's how: Place the cold eggs in a bowl of lukewarm water, not boiling. Ensure that they are covered with the water. Within 10 minutes the eggs should reach room temperature.
- Seperate the eggs, yolks in one bowl and whites in another.
- Milk: Warm in the microwave for about 1 minute or on the stovetop, just until lukewarm, not hot, not boiling.
- Melted butter: You can use either salted or unsalted butter.
I use salted butter in this recipe plus I also scooped in an additional ½ teaspoon of salt to the egg whites.
If you are using unsalted butter: Then add ¼ teaspoon of salt to the flour and cocoa powder when sifting. Also add that ½ teaspoon of salt into the egg whites as well.
Melt the butter in the microwave or stovetop. You just want it to melt, not boil or bubble.
Remove it off the stove while it still has a few slightly solid pieces. Then stir, the heat in the pot will help melt the remaining solid pieces. Leave to cool for about 5 minutes before using. The butter should only be slightly warm, not hot.
How to make Chocolate magic Custard cake
Here are step by step pictures so you can see what the batter at each stage should look like. The full printable recipe with amounts and instructions are at the end of this post.
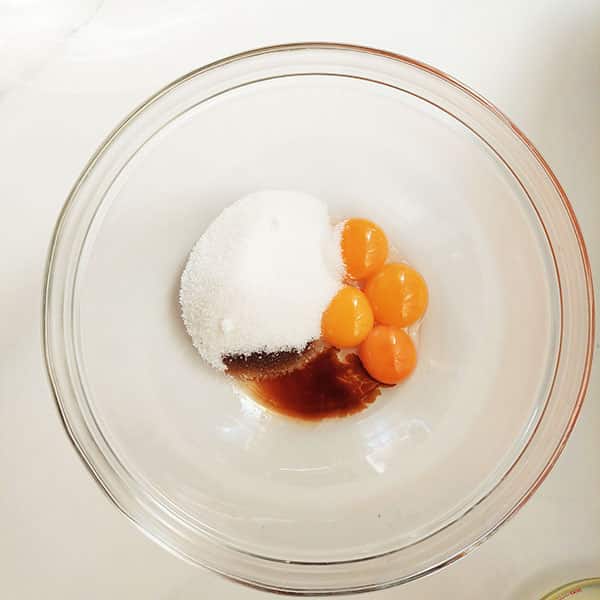
- Separate the eggs. Yolks in one bowl and whites in another.
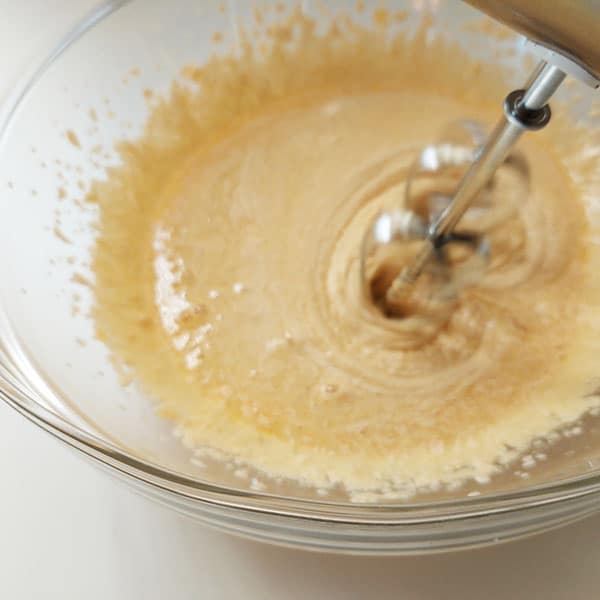
- Add sugar and vanilla extract to the bowl with the yolks. Beat until the mixture turns pale and creamy (about 4 to 5 minutes)
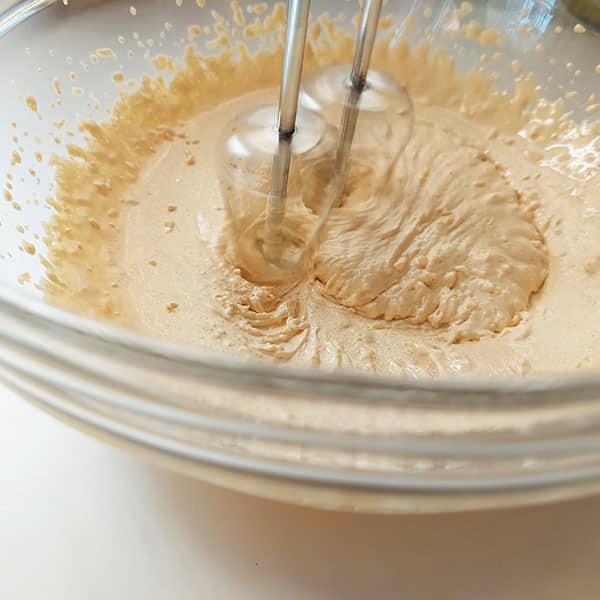
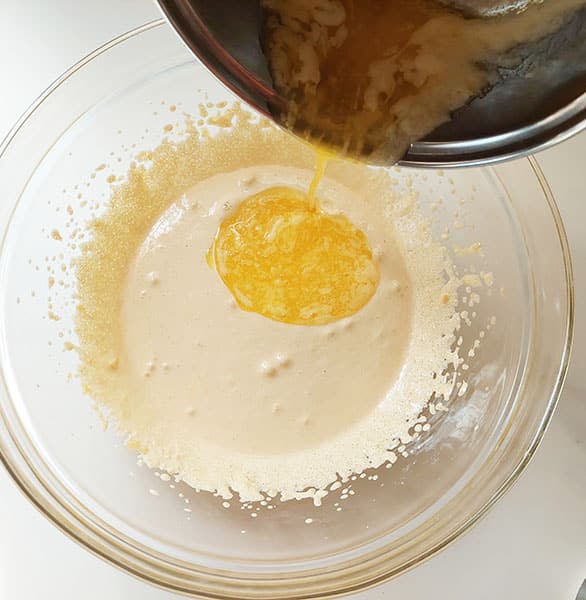
- Pour in the cooled melted butter and mix for 1 minute on low speed.
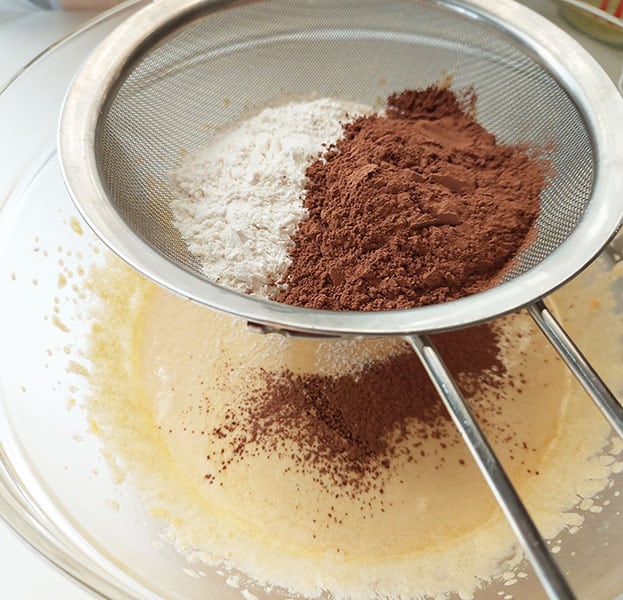
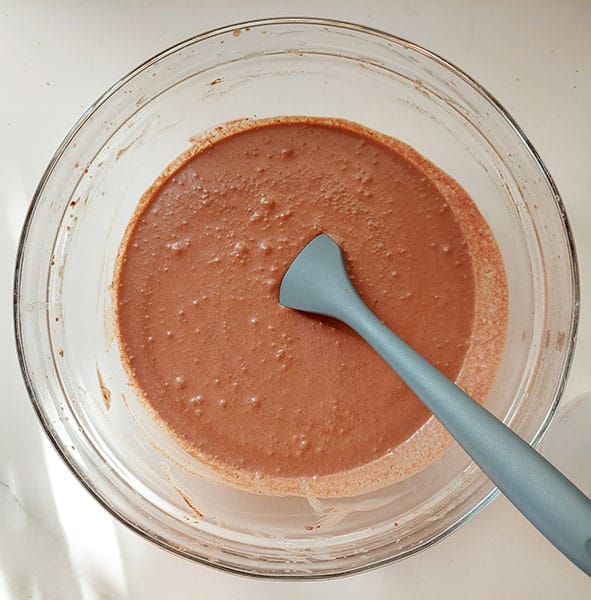
- Sift in the flour and cocoa powder. Beat or whisk to combine.
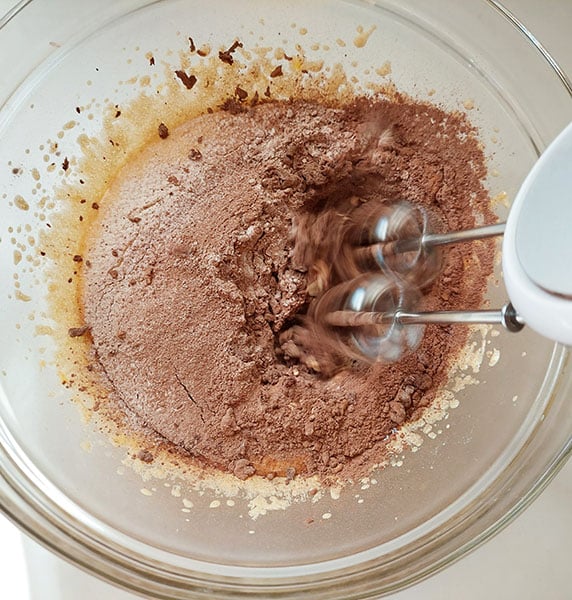
- Pour in the milk: Slowly pour in the milk while beating the mixture and until just combined.
Set the bowl aside.

- Preheat the oven now to 325°F / 170°C (150°C)if you are using a fan assisted oven)
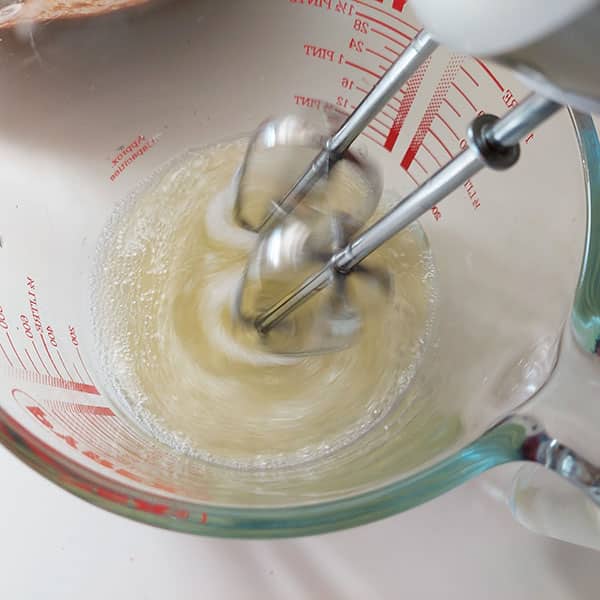
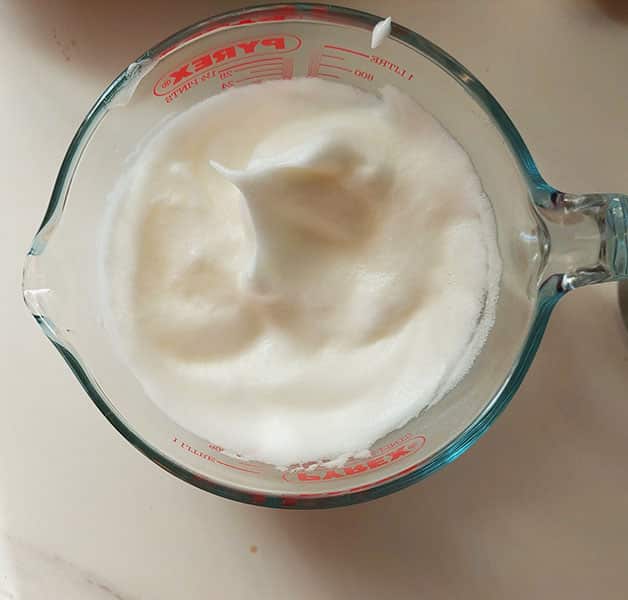
- Egg white mixture: Rinse out and dry the whisk or beaters (if you were using for the yolk mixture) Beat the egg whites on medium speed for 1 minute. Then add in the sugar and salt. Continue beating for about 4 minutes.
When the beaters are lifted from the bowl, the whites should now form stiff peaks. Be careful not to overbeat the egg whites past this stage. Or the result will be curdled egg whites.
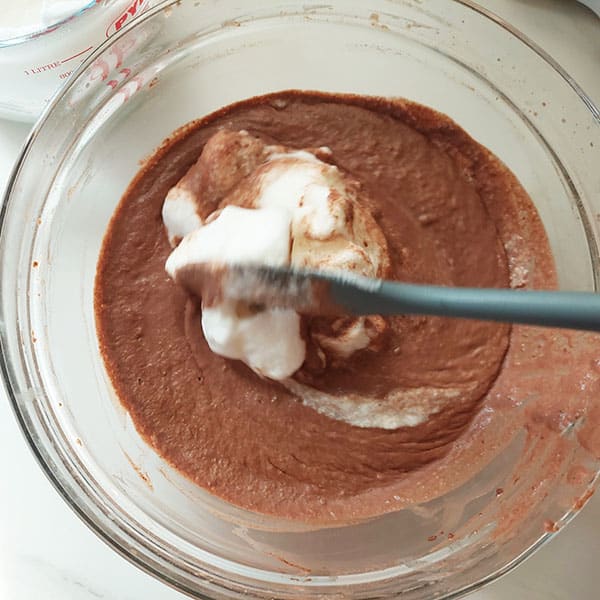
- Combine mixture: Use a spatula to transfer the beaten egg whites to the yolk mixture. Fold the beaten whites (½ of the mixture at a time) gently into the yolk mixture with a spatula.
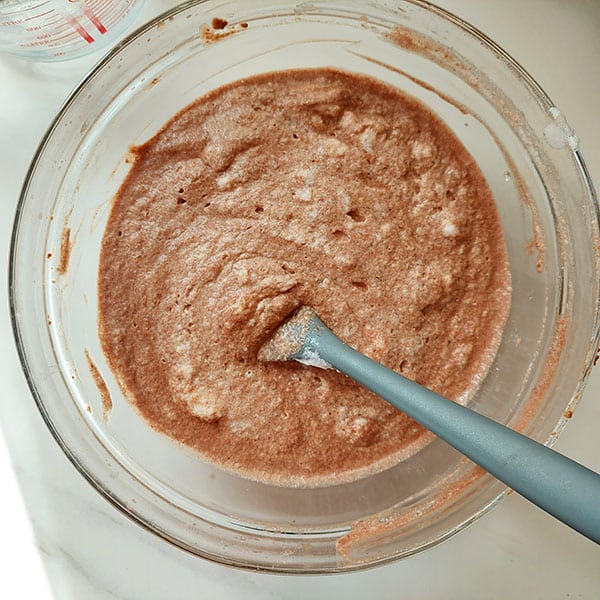
Don't worry if you see a few specks of egg white on the surface like this. Its fine. You don't want to overbeat it.
The mixture will look thin and quite runny as you pour it into the baking pan. This is also perfectly normal.
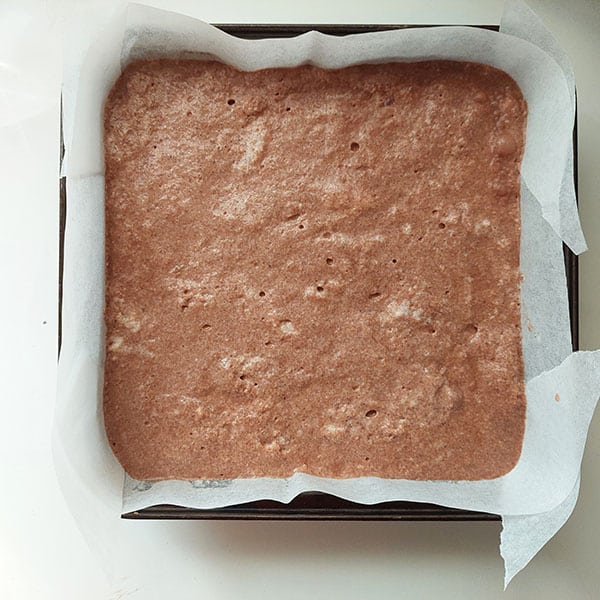
- Pour the mixture into your prepared pan and bake for 40-45 minutes. If the top is browning too quickly before its baked, then shape foil into a dome and place it over the cake. It should not touch the batter.

- Check the cake at 40 minutes. The top of the cake should be firm to the touch. To make sure that its baked, very gently, shake the tin.
- There should be no movement of batter beneath the top of the cake. If there is, simply place it back into the oven, cover with foil (so that the top does not burn). Check on it every 5 minutes until firm.
- Once baked, turn the oven off. Open the oven door but leave the cake in the oven for 5 minutes. This prevents it from collapsing too harshly due to the sudden temperature change.
- Remove the cake from the oven, leave it in the pan to cool for 30 minutes.
- Refrigerate: Leave the cake in the pan and refrigerate for 1 hour, allowing the custard to set. cake will shrink down slightly as it cools and this is normal
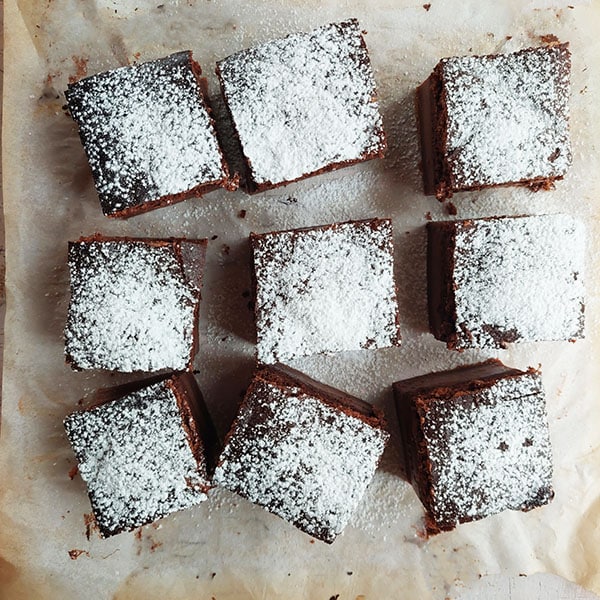
- Remove the cake from the fridge, Sift cocoa powder or powdered sugar over the top if you like. Use the overhang of the parchment paper to lift the cake out of the pan. Then slice into portions and serve.
Frequently asked questions
Keep in mind that ovens bake differently. Some may bake a cake faster than others. Because my oven is really fast, it took between 40 to 45 minutes for this cake to be completely baked. It can take up to 60 minutes if your oven is slower.
Check the cake at 40 minutes. Then every 5 minutes after that. The top of the cake should be firm to the touch.
To make sure that its baked, very gently, shake the tin. There should be no movement of batter beneath the top of the cake. If there is, simply place it back into the oven, cover with foil (so that the top does not burn). Check on it every 5 minutes until firm.
When lining your baking pan, leave an overhang of parchment paper. This will make it easy for you to hold on to when lifting the cake from the pan once baked and cooled.
The slices can be enjoyed either cold straight out of the fridge or left to reach room temperature before serving. Eaten cold, the texture of the entire cake is firmer. At room temp, the texture of the cake is softer and the custard creamier.
Absolutely, just ensure you are using the correct gluten free ingredients:
It's extremely important for individuals with gluten allergies or gluten intolerance, to opt for brands that are officially certified as gluten-free.
Gluten free flour: I tested this recipe with Bob's Red Mill 1-to-1 Gluten-Free Baking Flour, and the outcome was great. This flour already has xanthan gum, so don't add any more or the cake might end up too dense.
If you go with a different brand, just read the packaging to make sure you're getting gluten-free baking flour that works well for cakes, cupcakes, muffins, and brownies, and ideally has xanthan gum already added into it.
Although cocoa powder is naturally gluten free, there's a possibility of cross-contamination in the location where it was manufactured.
Check out the ingredients label to get allergen details. This step is essential for figuring out if a product might have been manufactured in a facility that handles other ingredients containing gluten.
If you're gluten intolerant, choose certified gluten-free brands.
How to store the baked cake
Store the cake in an airtight container in the refrigerator for up to 7 days. Serve cold or leave to warm to room temperature before serving.
Eaten cold, the texture of the entire cake is firmer. At room temp, the texture of the cake is softer and the custard creamier.
Chocolate Magic Custard Cake
Watch how to make the recipe
For the egg yolk mixture
- 4 egg yolks at room temperature (see note)
- ⅔ cup granulated white sugar
- 1 teaspoon vanilla extract
- ½ cup / 1 stick salted butter, melted (see notes)
- 2 cups of milk at room temperature or lukewarm (see notes)
- ¾ cup cake or all-purpose flour (see notes if you prefer a gluten-free option)
- ⅓ cup unsweetened cocoa powder
For the egg white mixture
- 4 egg whites
- 1 Tablespoon white granulated sugar
- ½ teaspoon salt
- Grease and line an 8×8-inch (20x20cm) baking pan with parchment paper. Leave an overhang of parchment paper making it easy to lift out the cake after baking
- Separate the eggs. Yolks in one bowl and whites in another.
Make the Egg yolk mixture
- Add sugar and vanilla extract to the bowl with the yolks. Beat until the mixture turns pale and creamy (about 4 to 5 minutes)
- Pour in the cooled melted butter and mix for 1 minute on low speed.
- Sift in the flour and unsweetened cocoa powder. Beat or whisk to combine.
- Slowly pour in the milk while beating the mixture and until just combined.
- Set the bowl aside.
Preheat the oven
- Preheat the oven now to 325° F / 170°C (150°C if you are using a fan assisted oven)
Make the Egg white mixture
- Rinse out and dry the whisk or beaters (if you were using for the yolk mixture)
- Beat the egg whites on medium speed for 1 minute. Then add in the 1 Tablespoon white granulated sugar and salt.
- Continue beating for about 4 minutes. When the beaters are lifted from the bowl, the whites should now form stiff peaks. Be careful not to overbeat the egg whites past this stage. Or the result will be curdled egg whites.
Combine the egg yolk mixture with the egg white mixture
- Use a spatula to transfer the beaten egg whites to the yolk mixture. Fold the beaten whites (½ of the mixture at a time) gently into the yolk mixture with a spatula.
- Don't worry if you see a few specks of egg white on the surface. You don't want to overbeat it. The mixture will look thin and quite runny even as you pour it into the baking pan. This is also perfectly normal.
Bake
- Pour the mixture into your prepared pan and bake in the preheated oven for 40-45 minutes. see notes
- If the top is browning too quickly before its baked, then shape foil into a dome and place it over the cake. It should not touch the batter.
- Check the cake at 40 minutes. The top of the cake should be firm to the touch.
- To make sure that its baked, very gently, shake the tin. There should be no movement of batter beneath the top of the cake. If there is, simply place it back into the oven, cover with foil (so that the top does not burn). Check on it every 5 minutes until firm.
- Once baked, turn the oven off. Leave the cake in the oven for 5 minutes with the door slightly open. This prevents the cake from collapsing too harshly due to the sudden temperature change. You can wedge a wooden spoon between the door which will help keep it open.
Remove from the oven and cool to room temperature
- Remove the cake from the oven, leave it in the pan to cool for about 30 minutes.
Refrigerate for 1 hour
- Leaving the cake in the pan, refrigerate for 1 hour, allowing the custard to set. The cake will shrink down slightly as it cools, and this is normal
Slice and serve
- Remove the cake from the fridge, sift cocoa powder or powdered sugar over the top if you like. Use the overhang of the parchment paper to lift the cake out of the pan. Then slice into portions and serve. (See notes)
- Please see the visual step by step pictures and read the helpful info in the post above before making this recipe to ensure success.
- This recipe requires the use of large-sized eggs..
- If you forgot to take the eggs out of the fridge earlier, you can get it to room temperature within a few minutes.
- Here's how: Place the cold eggs in a bowl of lukewarm water, not boiling. Ensure that they are covered with the water. Within about 10 minutes the eggs should reach room temperature.
- I use salted butter in this recipe plus I also scooped in an additional ½ teaspoon of salt into the egg whites.
- If you are using unsalted butter: Then add ¼ teaspoon of salt to the flour and cocoa powder when sifting. Also add that ½ teaspoon of salt into the egg whites as well.
- Melt the butter in the microwave or stovetop. You just want it to melt, not boil or bubble. Remove it off the stove while it still has a few slightly solid pieces. Then stir, the heat in the pot will help melt the remaining solid pieces. Leave to cool for about 5 minutes before using. The butter should only be slightly warm, not hot.
To make sure that its baked, very gently, shake the tin. There should be no movement of batter beneath the top of the cake. If there is, simply place it back into the oven, cover with foil (so that the top does not burn). Check on it every 5 minutes until firm. Serving: The slices can be enjoyed either cold straight out of the fridge or left to reach room temperature before serving. Eaten cold, the texture of the entire cake is firmer. At room temp, the texture of the cake is softer and the custard creamier. Storing Store the cake in an airtight container in the refrigerator for up to 7 days. Serve cold or leave to warm to room temperature before serving. Eaten cold, the texture of the entire cake is firmer. At room temperature, the texture of the cake is softer and the custard creamier. Can I make this Chocolate Magic Custard Cake Gluten Free?
Absolutely, just ensure you are using the correct gluten free ingredients:
It's extremely important for individuals with gluten allergies or gluten intolerance, to opt for brands that are officially certified as gluten-free. I tested this cake with Bob's Red Mill 1-to-1 Gluten-Free Baking Flour, and the outcome was great. This flour already has xanthan gum, so don't add any more or the cake might end up too dense.
If you go with a different brand, just read the packaging to make sure you're getting gluten-free baking flour that works well for cakes, cupcakes, muffins, and brownies, and ideally has xanthan gum already added into it. Although cocoa powder is naturally gluten free, there's a possibility of cross-contamination in the location where it was manufactured.
Check out the ingredients label to get allergen details. This step is essential for figuring out if a product might have been manufactured in a facility that handles other ingredients containing gluten.
If you're gluten intolerant, choose certified gluten-free brands.
Want even more delicious recipes? Subscribe free to receive new post notifications emailed to you. Or follow along on Facebook, Pinterest, and Instagram. If you love sharing recipes please come and join my All about cooking and baking Facebook group or Subscribe to my YouTube channel
Martha says
I would like to know if I could use cashew or almond milk? I make.
The Gardening Foodie says
Hi Martha, yes, sure, cashew or almond milk can be substituted as a dairy free alternative.
To substitute either of these milks for the regular milk called for in the recipe, you would use the same amount, which is 2 cups (500 ml) in this case.
Happy baking 🙂
Julia says
I chose to double the recipe, what size pan should I use? And should I adjust the baking time? Thank you, this looks delicious
The Gardening Foodie says
Hi Julia, I've never doubled this recipe, so I'm not sure about the pan size or baking time for a larger batch. If you're looking for a larger serving, one idea is to prepare two separate cakes using their own batter.
I hope this helps
Happy baking 🙂
Al says
Hello!!
Is the egg yolk and flour mixture supposed to be runny after adding milk? Mine was very runny/ liquid?
The Gardening Foodie says
Hi Al, yes it’s fine the mixture is supposed to be runny and very liquid. You will be able to see the images in the post to determine exactly how the batter should look at each stage.
It will bake up just fine 😌
Sylvia says
Wow, looks delicious, definitely will try. Have done vanilla but not chocolate, my hubby will be thrilled. Also, thank you for the clear set of directions and hints.
Jeanne says
Do you think a gluten free flour mix like King Arthur Measure for Measure or BRM 1:1 will work for this?
Looks delish- can’t wait to try it!
The Gardening Foodie says
Hello Jeanne, absolutely, using BRM 1:1 will be suitable for this recipe.
Happy baking 😊
Jeanne says
Excellent! I bake gf a lot because of my daughter and my doctor.
Thanks for your reply
Jeanne
The Gardening Foodie says
Hello Jeanne, I wanted to inform you that I've made an update to this post. It now includes a video so you can see the process and contains extra details about the Gluten-free variation.
I hope this helps
Enjoy your baking 😊
Jeanne says
Thanks, I’ll check it out!
Stephanie Jones says
How would I adjust the leavening if I wanted to use Dutch process cocoa powder?
The Gardening Foodie says
Hello Stephanie, in this particular recipe, there's no reliance on leavening agents like baking powder or baking soda.
So, you can easily swap out unsweetened cocoa powder for Dutch process cocoa powder in the same amount mentioned in the recipe.
Happy baking 😊
Jayne says
This looks tasty! Can a 9” x 9” pan be used, or is the 8” x 8” the only size you recommend? What would the bake time be if using a 9” x 9” pan?Also, how many servings or slices does this make?
The Gardening Foodie says
Hi Jayne, Thank you😊
Yes sure a 9” x 9” pan can be used. Here are some tips to help and changes which you might expect.
Bake Time: The bake time for a 9" x 9" pan will likely be slightly shorter than the recommended time for an 8" x 8" pan. I would suggest checking for doneness around 5-10 minutes earlier than the recipe suggests. Look for a lightly set center with a slight jiggle.
Thickness: Using a larger pan will result in a thinner cake layer. This may affect the texture and thickness of the cake. It will be slightly thinner compared to the recipe.
Servings: I portioned the cake into 9 servings. The exact number of servings will depend on how you cut the cake.
Texture: Keep in mind that the texture may differ slightly from the recipe due to the change in pan size. It may be slightly thinner and may not have the exact same texture.
I hope this helps. If you have any more questions, please don't hesitate to ask, I'll be happy to assist 😊
Happy baking 😊
Jayne says
Thank you for responding so quickly! I didn’t think it through about the thickness, which is much more important in this layered dessert vs. a cake layer or brownies. A new pan will be here soon!
Please forgive the double post. I’m a newbie here, not too tech savvy and my phone has a lot of issues!
The Gardening Foodie says
Hi Jayne, No problem at all! and don't worry about the double post – we all have these moments😊 Tech can be really tricky sometimes!
I'm glad to hear you're getting a new pan, and I'm sure that the cake will turn out fantastic.
If you have any more questions or need assistance with the recipe, feel free to ask.
Enjoy your baking, and have a great day 😊
Tara says
Can this be frozen? Only thinking because cooking for one. Have you tried a keto version with monk fruit sweetener and almond flour? Thank you sharing recipe- looks yummolicious!
The Gardening Foodie says
Hello Tara,
I'm sorry for the delayed response, but I wanted to test how well this cake freezes before answering your question. So, I baked a magic custard cake, froze a few slices for a few days, and then thawed them in the refrigerator overnight before eating. The result was perfect. So, yes, you can freeze individual slices in an airtight container, and I recommend doing so for up to one month. When you're ready to enjoy them, simply place them in the refrigerator for a few hours or overnight to thaw.
As for the keto version, I haven't tried it yet, but I plan to work on a keto recipe in a few days.
I hope this helps
Happy baking 😊
Dianne Kulp says
Can this recipe be done in 4-6 oz. ramekins?
If so how would I adjust the baking times?
Thank you
The Gardening Foodie says
Hello Dianne, certainly! You can absolutely prepare this recipe using 6 oz ramekins. However, it's advisable to halve the recipe to avoid having excess batter. Here are some helpful tips to adapt this recipe:
Fill each ramekin to about 3/4 full. Ensure that you scoop both the liquid part of the mixture and the egg white lumps into each ramekin.
Bake for approximately 22-25 minutes or until the cakes are firmly set in the center. Begin checking at the 15-minute mark. Overbaking may result in a loss of the desired three-layer texture.
If you notice that the tops are browning too quickly before the cakes are fully baked, you can shield them with a piece of foil to prevent any burning. Continue baking until the cakes are completely set.
Once the cakes are done baking, turn off the oven and leave the ramekins inside for 5 minutes with the oven door slightly ajar. This gradual cooling process helps prevent sudden temperature changes that could affect the cakes.
Remove the ramekins from the oven and let them cool to room temperature.
Refrigerate the ramekins for a minimum of 1 hour to allow the custard to firm up.
You can serve the cakes directly in the ramekins or use a knife to loosen the edges and then invert them onto serving plates.
I hope this helps 😊
Happy baking😊
Rosemary says
Is thinking that this would be a great dessert to serve at Christmas time. Can I substitute, powdered cranberries for the chocolate?
The Gardening Foodie says
Hey Rosemary, I haven't actually given the powdered cranberries a try in this recipe, so I can't really say how it'll turn out. Sorry!
Barbara Jones says
Hi, love the look of this and I want to do it for thanksgiving. Can I freeze it whole? I would like to fix it in advance.
The Gardening Foodie says
Hello Barbara, that's fantastic and it'll be a delightful Thanksgiving dessert. However, freezing the Chocolate Custard pie is not recommended as it tends to become watery upon thawing. However, you can bake it in advance and store the baked pie in the fridge for up to three days in an airtight container.
If I may offer a friendly suggestion, consider making or testing this recipe before Thanksgiving. Practicing in advance will help you fix any issues and ensure that you can prepare the chocolate custard tart correctly. After trying the recipe ahead of time, you can decide if any adjustments are needed.
Feel free to reach out. I'm more than happy to assist with any issues you might encounter while practicing the recipe if needed.
Happy baking! 😊
Nancy de says
Has any one tried this using cupcake liners - muffin pan ?
Sarah says
Made this for a friend's birthday party and it was a big hit! It has a subtle sweetness and paired well with a bit of ice cream. I definitely had my doubts when I folded the two mixes together, because it looked unappetizing even though it smelled great. lol
Love the step-by-step instructions with pictures--it gave me more confidence, as I've never made a custard-based dessert on my own before (only creme brulee with my ex years ago).
The Gardening Foodie says
Hi Sarah
This absolutely made my day, thank you! I love that you made it for a birthday party, that’s the best kind of test, and glad to hear it turned out beautifully.
That “what on earth is this batter?” stage is part of the magic cake experience 😂 It never looks impressive in the bowl, and then the oven works it's quiet magic and gives you those layers. It’s such a fun one to bake.
I’m especially happy the step by step photos helped. Custard style cakes can feel intimidating, but once you’ve made one, you realize how simple the process really is.
And now that you’ve conquered this one… I have a few other magic cake variations you might enjoy here
Maybe one for the next celebration 😉