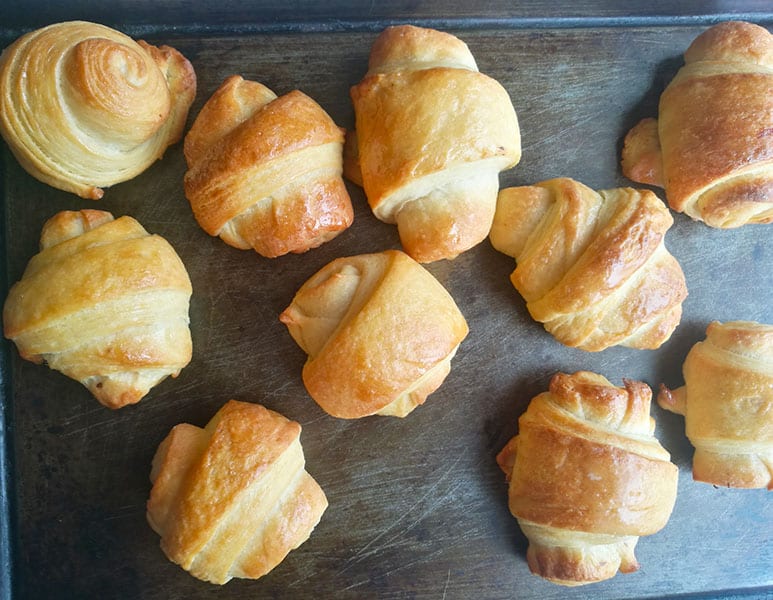
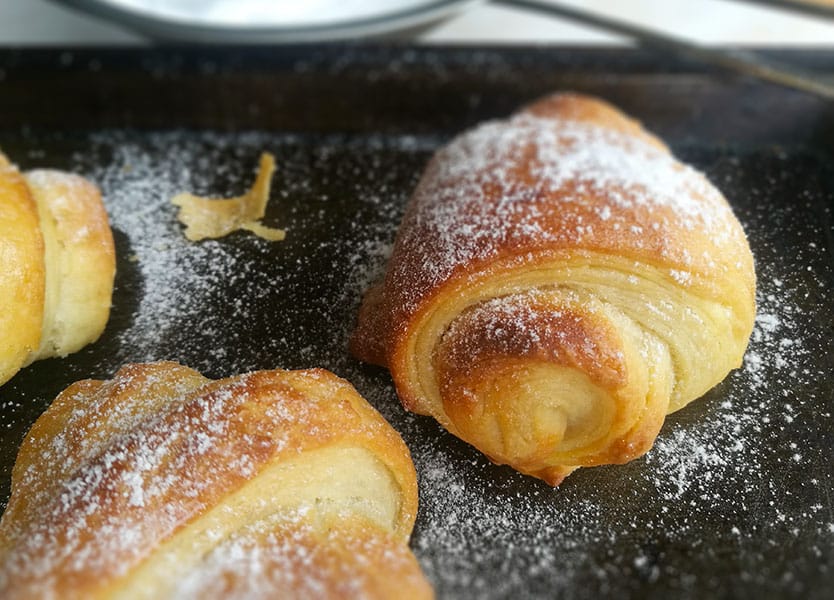
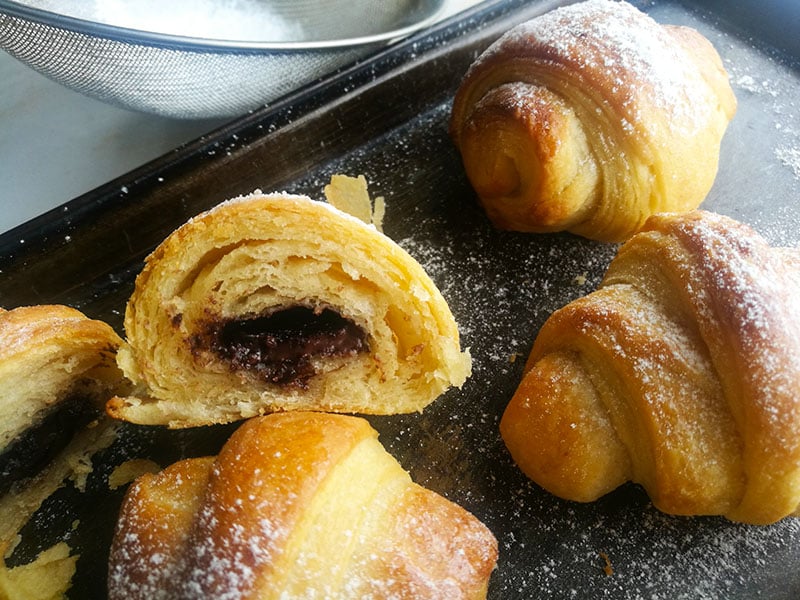
These buttery, flaky, melt in your mouth, Chocolate filled Croissants make an extremely delectable dessert. Indulge in these delicious pastries, glazed with sugar syrup or dusted with powdered sugar.

Everytime I make these croissants, it really amazes me how such basic ingredients can create this beautiful and delicious pastry.
Helpful tips when working with yeast
These croissants are SUPER easy to make, and I really want you to love the way these turn out. To make certain that you always succeed, follow my easy tips when working with yeast in this and all my other bread recipes
- Yeast is an important ingredient in bread making. Always check the expiry date on the yeast packaging. If it has reached or passed the expiry or use-by date, then chances are that it will not work in your recipe. If it has reached or passed the expiry or use-by date, then chances are that it will not work in your recipe.
- Check that the packaging. It should be well sealed and airtight. It should not be torn or broken. If it has been exposed to air, then the yeast will be stale and unusable.
- As with all my bread recipes, I use instant dry yeast. The yeast is added directly to the dry ingredients. When adding the yeast to the flour, make sure that it is not placed directly onto the sugar or salt.
- Add the yeast on one side of the bowl and the sugar and salt on the other side of the bowl. Placing salt or sugar directly onto the yeast can negatively affect the rising process or kill the yeast. Using a fork or whisk mix the salt, sugar and salt into the flour. This helps to aerate the flour and break up any lumps in the flour.
- The liquid added to the combined dry ingredients must be warm. Not boiling hot and not cold either. Just lukewarm is perfect. If you have a thermometer, then use it to check the temperature of the liquid before adding it to the dry ingredients. It should read between 110°F - 115° F (43°C - 46°C). If the water is either too hot or cold, the dough will not rise.
- Knead the dough for at least five minutes. This helps to distribute the yeast evenly in the dough and also helps to develop the gluten.
- After kneading, rub a little oil over the dough, cover with clear plastic wrap or a kitchen towel and leave to rise for at least one hour in a draft-free warm area of your kitchen.
Keep these above tips in mind when working with yeast, to help you bake great sweet, savoury or plain bread always. So let's get baking
Making the chocolate filled croissants
Start by sifting the flour into a large bowl. Add the yeast on one side of the bowl and the sugar and salt on the other side of the bowl. Using a whisk or fork, mix these ingredients together.
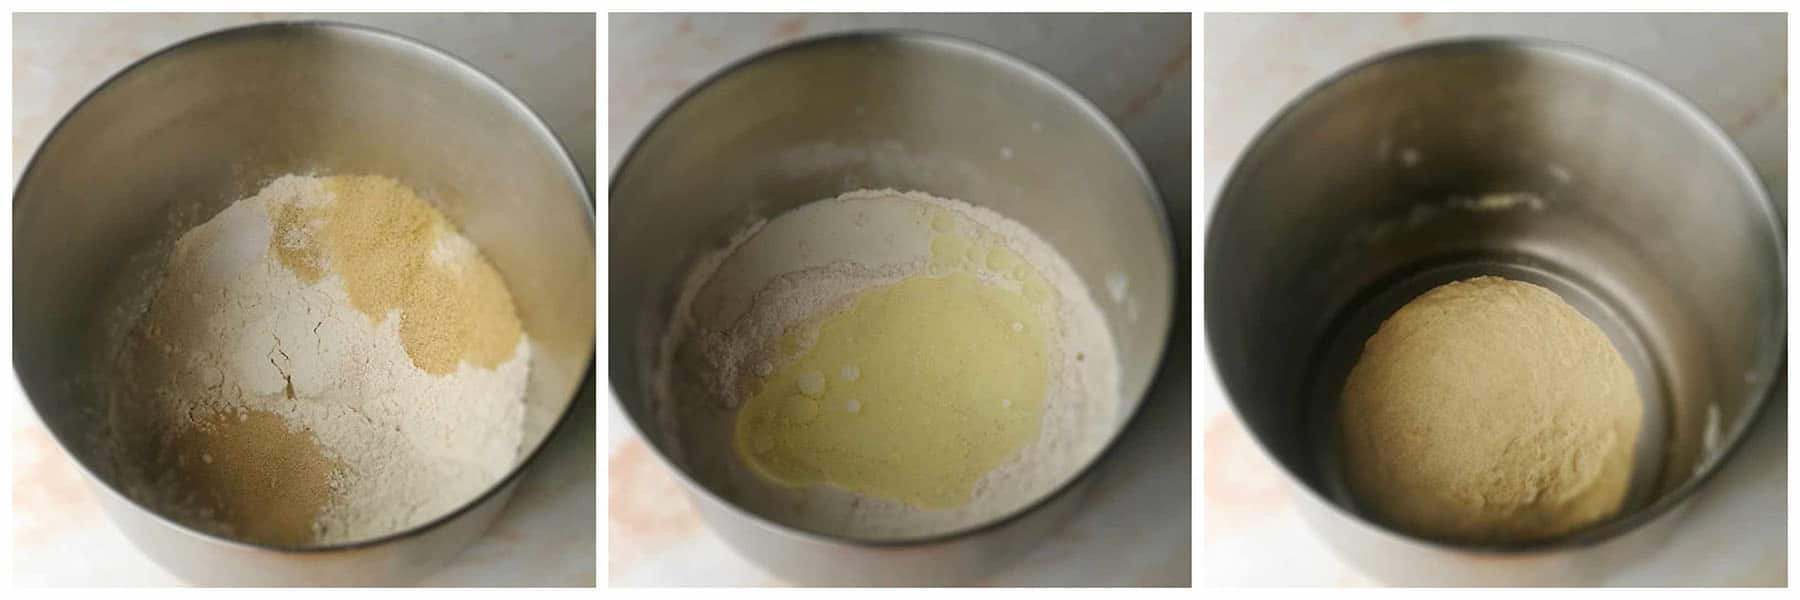
Pour warm milk and oil into the dry ingredients and mix to combine. Knead for about 4 minutes, until the dough is soft and smooth.
Rub a little oil in the bowl and on the dough. place the dough into the oiled bowl and cover with plastic wrap or a kitchen towel. Place the covered bowl in a warm, draft-free area of your kitchen for 45 minutes to an hour.
After an hour, punch down the dough and roll into the shape of a log. Using a pizza cutter or sharp knife, cut the dough into approximately 10 pieces.
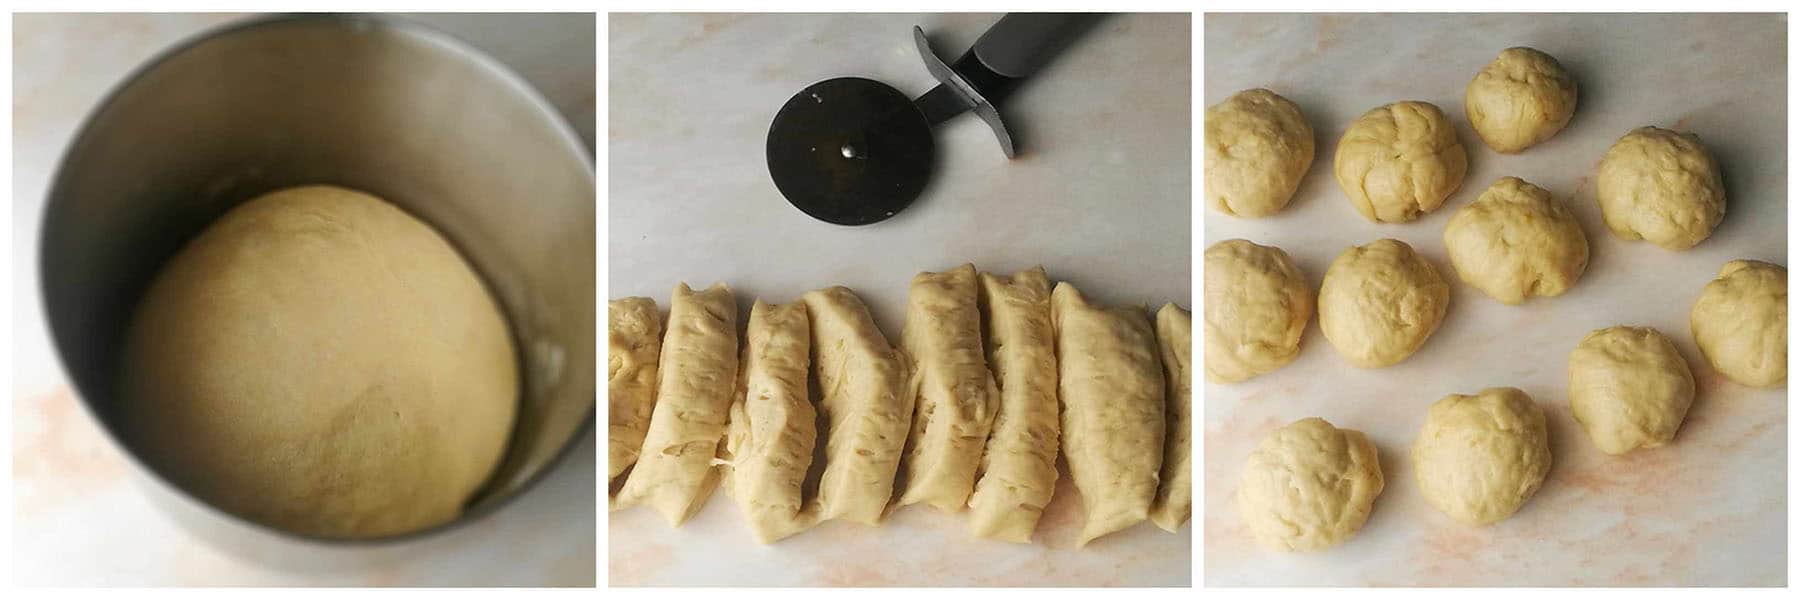
Shape each piece of dough into a ball. Using a rolling pin, Roll out each piece of dough into roughly a 12 inch ( 30 cm ) circle. Brush the rolled out dough with melted butter and place onto a board or your countertop.
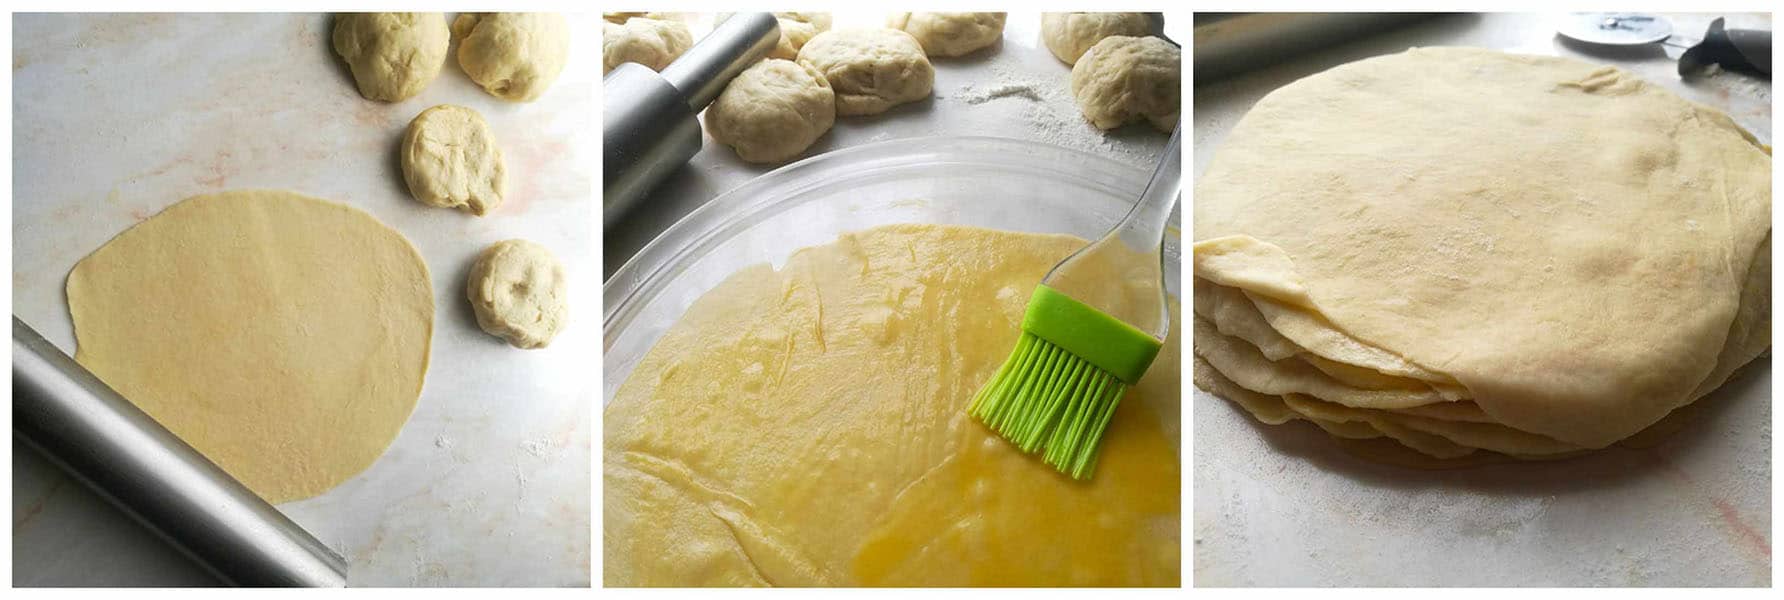
Roll out another piece of dough and stack it over the first rolled and brushed out circle.
Brush with butter and continue the process of rolling, brushing and stacking until all the pieces of dough are used. This is creating the beautiful flaky layers you will see when baked
Do not brush the top of the last circle of dough. Gently pull the top layer of dough over the edges of the stacked circles of dough.
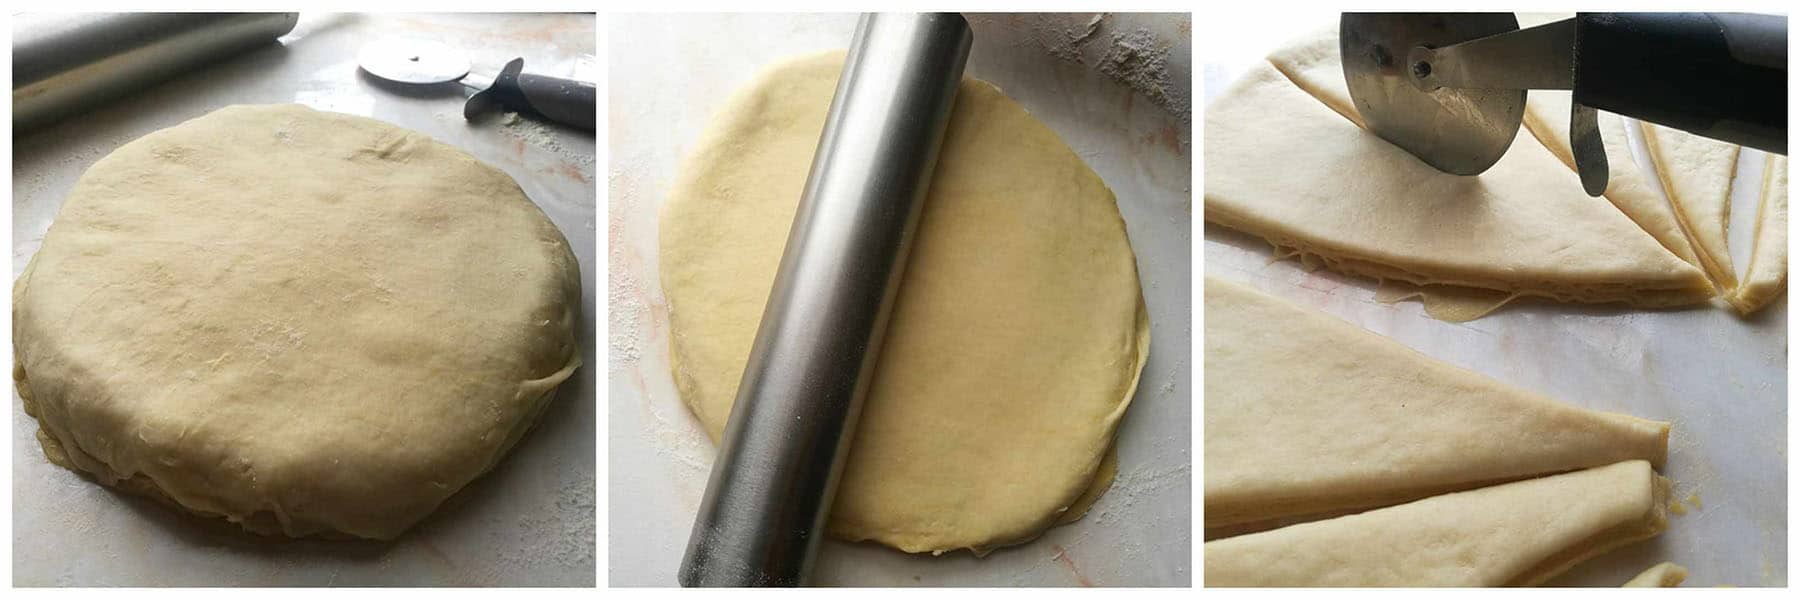
Then roll out this entire stack of dough to about 14 to 15 inch ( 37 to 40 cm) large circle. Using a pizza cutter or very sharp knife, divide into 16 triangles.
Cut a small slit in the centre of each triangle base
Add a piece of chocolate to the wide end then roll the dough up. Place, tip side down, on a tray lined with baking paper.
Repeat with the rest of the dough, spacing the croissants a few inches apart on the tray. Leave to rise on the tray for 15 minutes.

After 15 minutes, bake the croissants in a preheated oven of 356°F (180°C ) for 15 minutes.
Remove from the oven and brush with a sugar glaze or dust with powdered / icing sugar.
To make the sugar glaze, mix 2 Tablespoons of sugar with 2 Tablespoons of boiling water. Mix until the sugar has dissolved and brush over warm baked croissants.
Serve warm. These are best eaten on the day it has been baked. If you do have any leftover, then store it in an airtight container. When you are ready to eat them, then warm the croissants for 10 to 15 seconds in the microwave to soften the pastry and melt the chocolate, if it has hardened.
With any leftovers here at home, I especially love these warmed croissants with coffee for breakfast ?. It is irresistibly delicious.
Super easy to make too, this is one impressive dessert or breakfast that you have got to try.
Enjoy ♥
Chocolate filled Croissants
FOR THE CROISSANTS
- 2 ½ cups / 300g all purpose/ cake flour
- 2 teaspoons / 6g instant dry yeast
- 2 Tablespoons / 25g white or brown sugar
- ½ teaspoon salt
- ¾ cup / 180ml warmed milk
- ¼ cup / 60ml canola or vegetable oil
- 4 Tablespoons / 50g melted butter for brushing the dough
- 16 pieces of chocolate or chocolate chips to fill croissants
- Powdered / icing sugar for dusting
FOR THE SUGAR SYRUP ( OPTIONAL )
- Instead of dusting with powdered sugar brush with a sugar glaze
- 2 Tablespoons / 25g white or brown sugar
- 2 Tablespoons / 30ml boiling water
FOR THE CROISSANTS
- Sift the flour into a large bowl. Add the yeast on one side of the bowl and the sugar and salt on the other side of the bowl. Using a whisk or fork, mix these ingredients together.
- Pour warm milk and oil into the dry ingredients and mix to combine. Knead for about 4 minutes, until the dough is soft and smooth. Rub a little oil in the bowl and on the dough. Place the dough into the oiled bowl and cover with plastic wrap or a kitchen towel. Place the covered bowl in a warm, draft free area of your kitchen for 45 minutes to an hour.
- After an hour, punch down the dough and roll into the shape of a log. Using a pizza cutter or sharp knife, cut the dough into approximately 10 pieces.
- Shape each piece of dough into a ball. Using a rolling pin, roll out each piece of dough into roughly a 12 inch ( 30 cm ) circle. Brush the rolled out dough with melted butter and place onto a board or your countertop.
- Roll out another piece of dough and stack it over the first rolled and brushed out circle.
- Brush with butter and continue the process of rolling, brushing and stacking until all the pieces of dough are used. This is creating the beautiful flaky layers you will see when baked
- Do not brush the top of the last circle of dough which you place on the stack.
- Gently pull the top layer of dough over the edges of the stacked circles of dough.
- Then roll out this entire stack of dough to about 14 to 15 inch ( 37 to 40 cm) large circle. Using a pizza cutter or very sharp knife, divide into 16 triangles.
- Cut a small slit in the centre of each triangle base
- Add your chocolate to the wide end then roll the dough up. Place, tip side down, on a tray lined with baking paper.
- Repeat with the rest of the dough, spacing the croissants a few inches apart on the tray. Leave to rise on the tray for 15 minutes.
- After 15 minutes, bake the croissants in a preheated oven of 356°F (180°C ) for 15 minutes.
- Remove from the oven and brush with a sugar glaze or dust with powdered / icing sugar.
TO MAKE THE SUGAR GLAZE
- To make the sugar glaze, mix 2 Tablespoons of sugar with 2 Tablespoons of boiling water. Alternately warm the mixture in a pot on the stove until the sugar has dissolved. Mix until the sugar has dissolved and brush over warm baked croissants.


Ron says
These look like a real treat to eat and fun to make. I've never made a croissant type bun for fear of failure, but your excellent tutorial makes it very doable. Thanks for sharing.
Kelly @ Kelly Lynn’s Sweets and Treats says
Dang girl!!! That’s so cool you made your own croissant dough for this! I bet these taste amazing!!
Chitu says
Hi tried this looking at the youtube, i found that milk measurement was mentioned as 1/4 th cup which i realised was incorrect when mixing the dough so i tried to increase. But it turned out to be hard. Now in this website it’s mentioned as 3/4th cup. Would you mind correcting it on youtube?
The Gardening Foodie says
Hi Chitu, I do have a YouTube channel, but this recipe has not been uploaded to YouTube. I have never done a video on this recipe, so its possible that you could have seen a video from another blogger, and have used my recipe which will differ from the video.
I also do not include measurements in my videos. It's just the ingredients that are mentioned in my videos.
I am sorry that you are having a problem with the recipe, but here is the link to my Youtube channel, so you can see how my videos appear: https://www.youtube.com/channel/UCQlLGd7wQT4SquRkfKpIhVA
I hope this helps 🙂
Chitu says
It turned out great. Thanks for the recipe. One question why is that slit required if you could explain pls
The Gardening Foodie says
Hi Chitu, thank you for giving this recipe a try. I am glad that you enjoyed it too 🙂
To answer your question: I find that making the slits helps roll up the pastry neater. It's not really necessary, just what I am used to and what works well. I hope that this helps answer your question 🙂