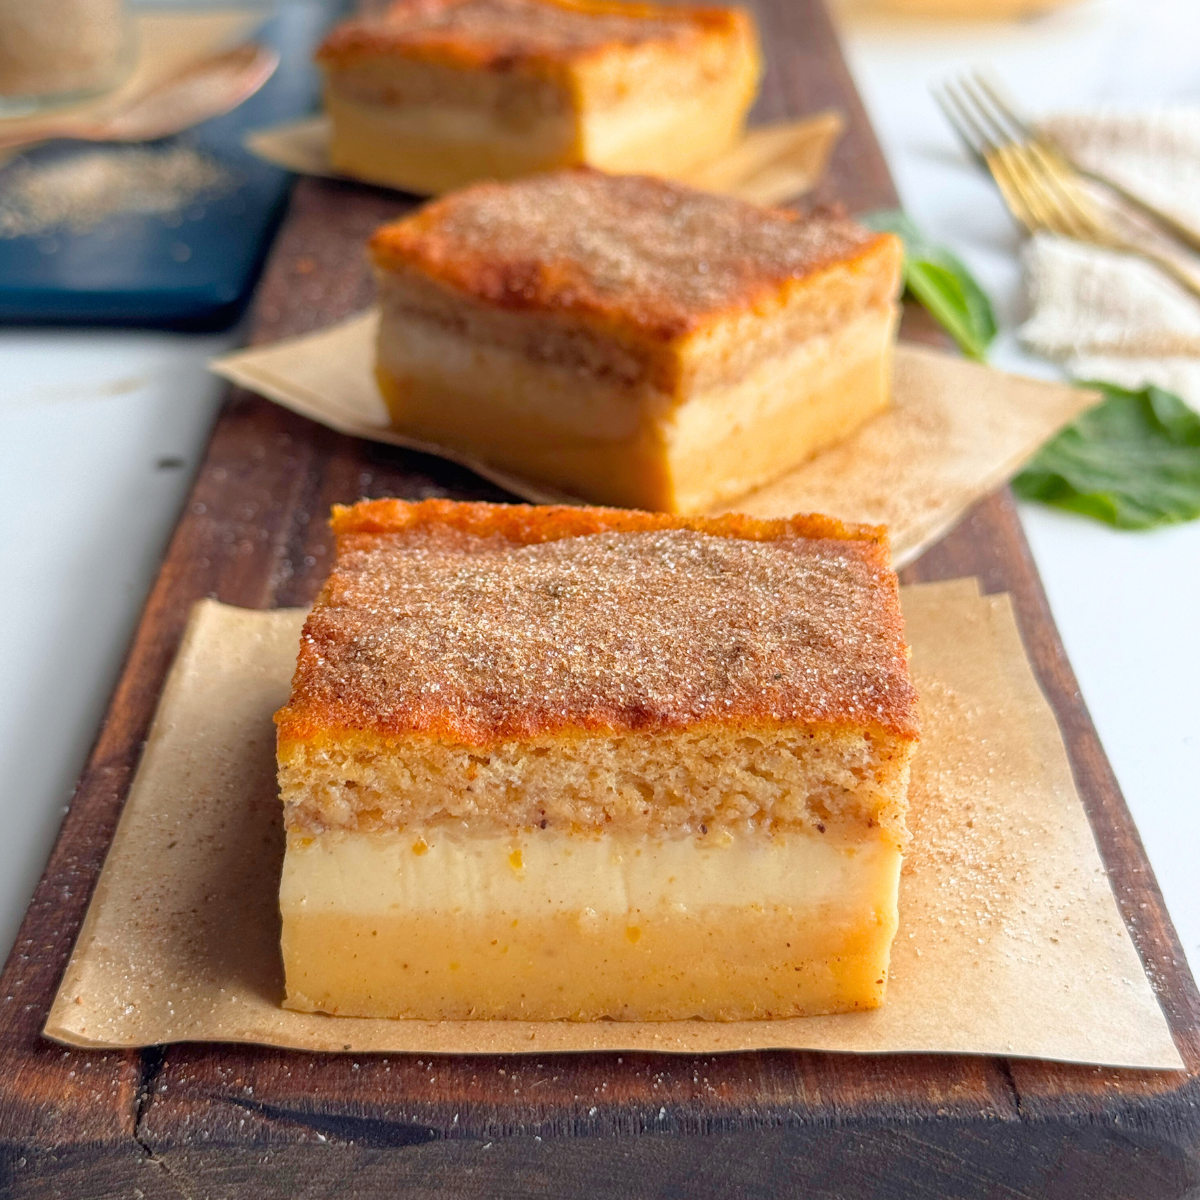
Inspired by the French gâteau magique, this Pumpkin Custard Cake looks impressive but is wonderfully simple to make. One easy batter creates three layers, sponge, custard, and pumpkin as it bakes.
Want seconds? See every magic custard cake I’ve shared
A quick note before you bake
This recipe is simple to make, but I’ve added a few extra details, like ingredient notes and substitutions , step by step photos, video, and frequently asked questions - to help you get perfect layers before you reach full printable recipe below.
If anything's unclear, leave a comment and I’ll gladly help before you bake.
Ingredient notes and substitutes
- 4 large eggs, separated — Separate while cold - (it’s easier). Place the whites in one bowl and the yolks in another, then leave at room temperature for 15–20 minutes before using. Room-temperature whites whip better and give more volume.
- 1 Tablespoon (12–13 g) white granulated sugar — for egg whites
- ⅔ cup (133 g) white granulated white sugar — for yolks
- ½ cup (115 g) unsalted butter, melted and cooled
- ⅔ cup (150 g) thick pumpkin or butternut purée — You can use 100% pure canned pumpkin (not pumpkin pie filling), or make your own, that’s what I did! I steamed and strained butternut to remove excess water, then blended it until smooth. It’s naturally sweet, silky, and low in water and the closest match to canned pumpkin.
Make sure you don’t accidentally buy pumpkin pie filling, which can look similar to regular canned pumpkin but has added sugar and spices that will change the flavor and texture of the cake.
- 1 teaspoon pumpkin pie spice (or use 1 teaspoon cinnamon, it still gives a lovely warm flavor)
- 1 teaspoon vanilla extract
- ¾ cup (95 g) all-purpose flour (plain flour)
- 1¾ cups (420 ml) milk — The milk shouldn’t be cold. You can either leave it out while you prep the batter (about 15–20 minutes) or warm it in the microwave for about 10 seconds, just enough to take off the chill, not to make it warm.
- ½ teaspoon salt (or ¼ if using salted butter)
Step by step photos: Making Pumpkin Custard cake
These visual instructions help you see the process. You can also find the full printable recipe with ingredient amounts and instructions at the end of the post.
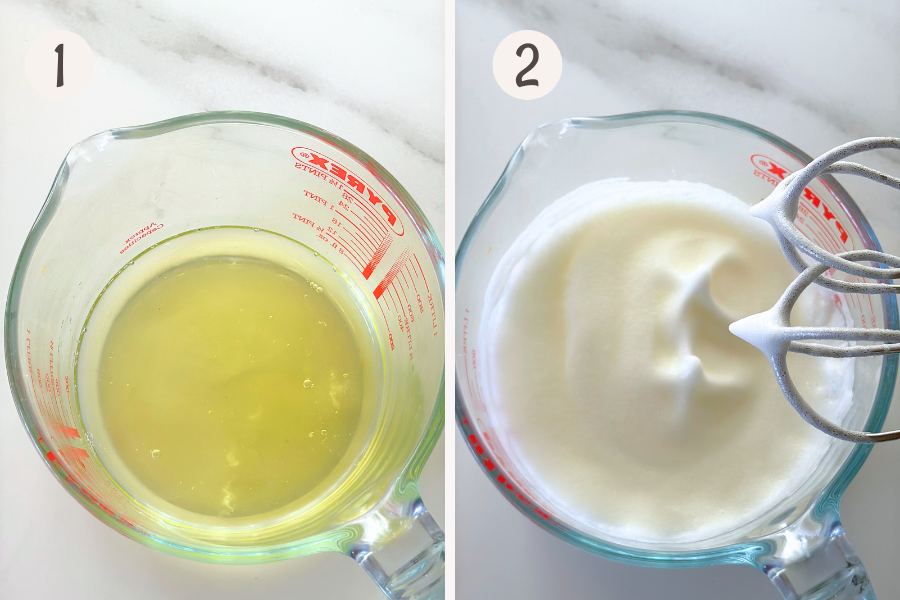
- Separate the eggs and place the whites in a bowl.
- Beat the whites on medium speed for 2 minutes until foamy and bubbly. Add the sugar, then continue beating for 3–4 minutes until stiff, glossy peaks form.
- When you lift the beaters, the whites should stand straight without drooping.
- Don’t overbeat: if you go past this stage, the whites can become curdled and dry, making them hard to fold and affecting the cake’s texture.
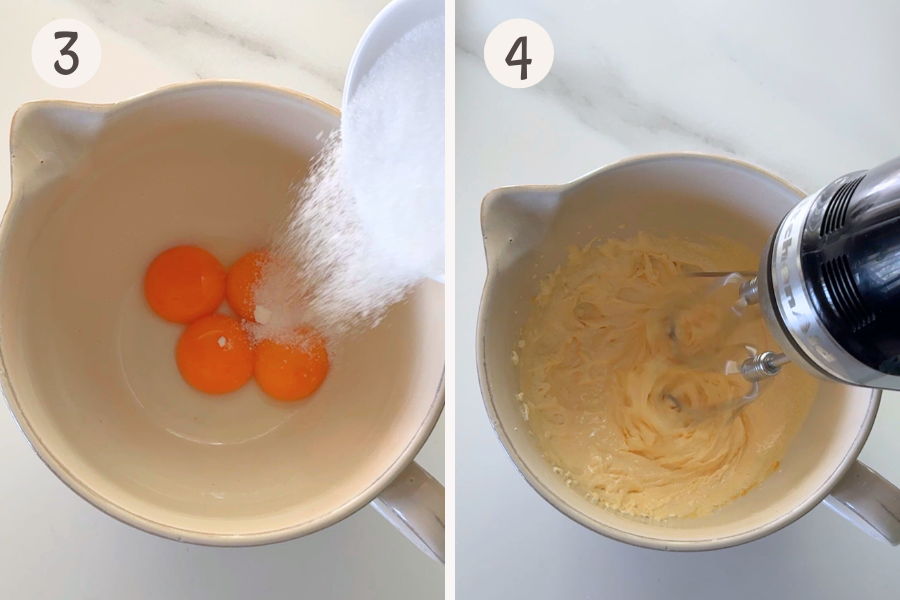
- In another bowl, add the yolks and sugar.
- Beat until the mixture is pale and thick (about 2-3 minutes on medium high speed)
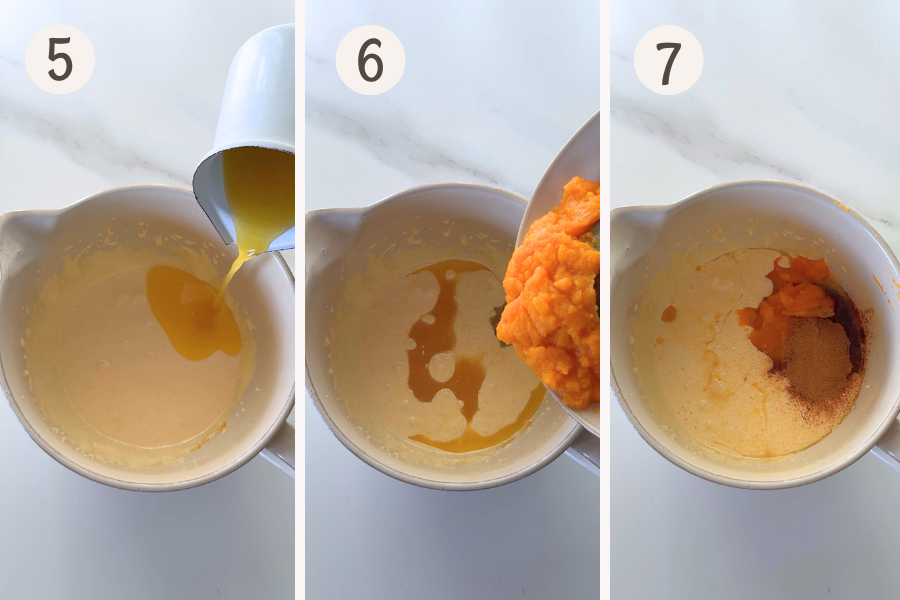
- Pour in the cooled melted butter
- Add the pumpkin purée.
- And pumpkin pie spice (or ground cinnamon) and vanilla extract and beat on medium speed for 1 minute until combined.
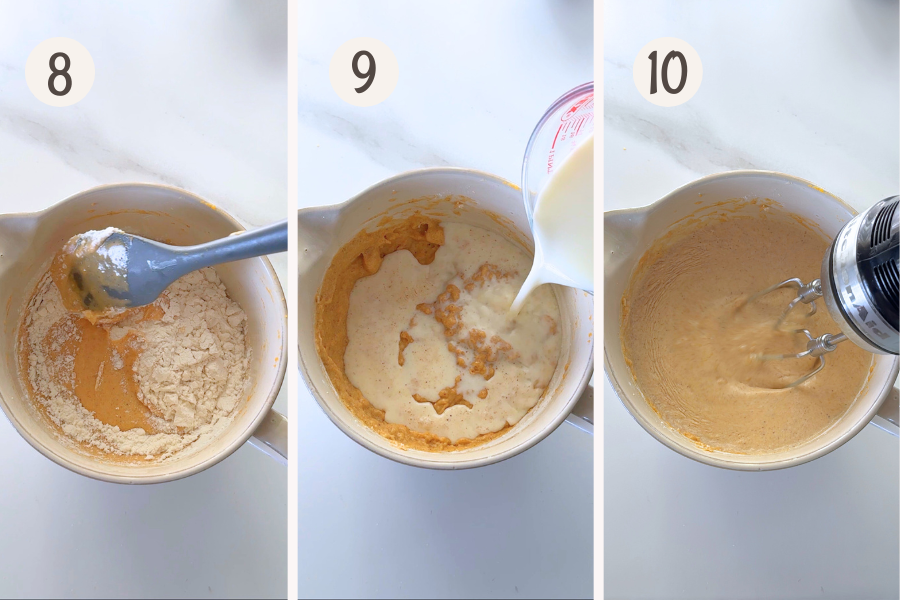
- Sift in the flour and stir gently.
- Pour in in the milk.
- Mix until the batter is thin and smooth about 1-2 minutes on low speed. The batter will look quite runny, that’s exactly what allows it to separate into layers as it bakes.
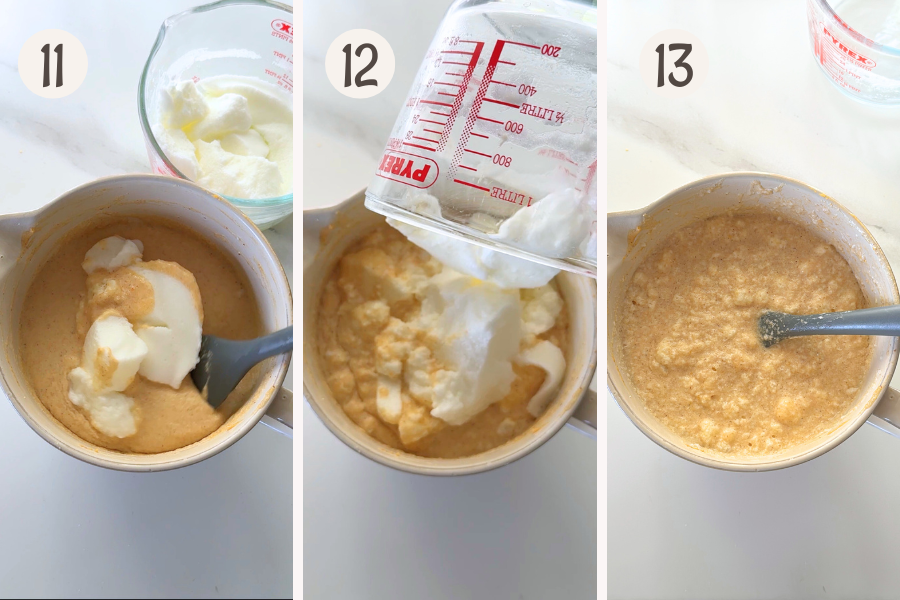
- Add the whipped egg whites in two additions. Stir the first half into the batter to loosen it.
- Then gently fold in the remaining whites using a spatula.
- Mix or fold until mostly combined. The batter will still look uneven and slightly lumpy, and that’s exactly how it should be. Don’t try to make it smooth, if you do, the layers won’t form properly during baking.
From Lumpy Batter to Layered Beauty
This is where the magic happens, this bubbly batter bakes into three perfect layers

- Pour the batter gently into your lined prepared pan
- The batter will look liquid, airy, and a bit lumpy from the whipped egg whites floating on top. That’s exactly how it should be. This texture helps the layers form beautifully as it bakes.
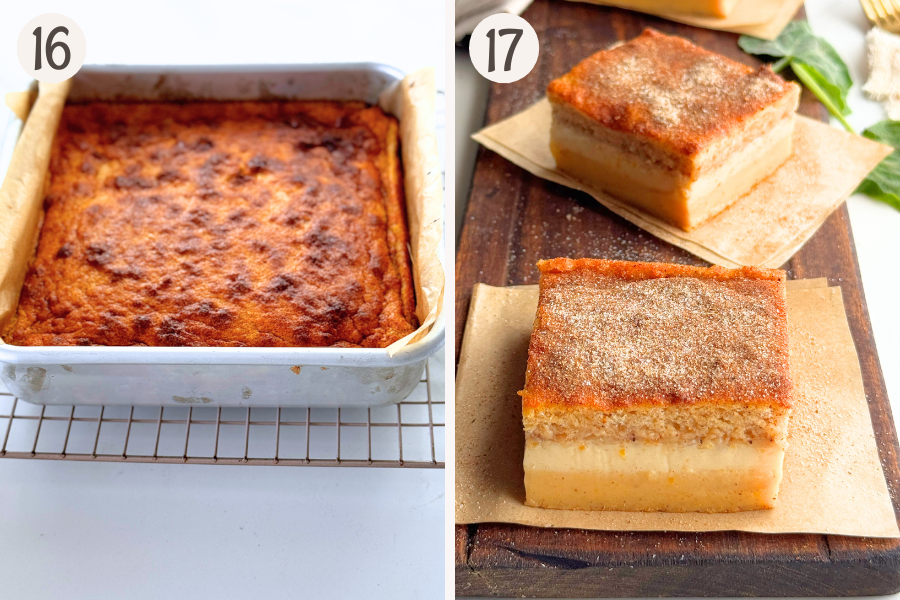
- Bake for 40–45 minutes, until the top is golden and a toothpick inserted in the center comes out clean.
Don’t worry if the top isn’t perfectly smooth. Those little toasted spots are just the baked egg white bubbles peeking through.
The cake will shrink slightly as it cools, that’s normal and helps the layers set neatly.
- Let the cake cool in the pan for 1 hour, then refrigerate for at least 4–6 hours, or overnight. This helps the layers set cleanly. Once completely cooled, slice to reveal the sponge top, custard middle, and soft base.
How to tell when it's baked
Bake 40–45 minutes at 160°C/325°F (150°C fan), or until the top is golden and firm to the touch.
Gently shake the pan — the center should feel set, with no movement underneath.
If it still looks slightly wet, cover loosely with foil and bake a few minutes longer.
Removing from the pan
Use a regular solid pan, not a springform pan. The batter is very thin and will leak through the base if the pan isn’t fully sealed.
Line your baking pan with parchment and leave a small overhang on two sides. Once cooled, use the overhang to lift the cake from the pan easily before slicing.
Cooling and chilling
Let the cake cool in the pan for 1 hour, then refrigerate for at least 4–6 hours, or overnight. This helps the layers set cleanly.
How to serve Pumpkin Custard Cake
- Cut the cake into slices while it’s cold — it slices easily and holds its layers best this way.
- You can serve it cold, or let the slices come to room temperature before serving if you prefer a softer texture.
- When cold, it’s firm with clean, defined layers.
- At room temperature, it becomes slightly softer and creamier, but it won’t melt or fall apart — the layers stay beautifully set.
Dust the top with cinnamon sugar or pumpkin spice sugar (as pictured), or serve with a little whipped cream for a cozy touch.
Watch how to make Pumpkin Custard Cake

Recipe
Pumpkin Custard Cake
- 4 large eggs, separated
- 1 Tablespoon (12 g) white granulated sugar — for egg whites
- ⅔ cup (133 g) white granulated sugar — for yolks
- ½ cup (115 g) unsalted butter, melted and cooled
- ⅔ cup (150 g) thick pumpkin or butternut purée — homemade or 100% pure canned (not pie filling)
- 1 teaspoon pumpkin pie spice (or 1 teaspoon ground cinnamon)
- 1 teaspoon vanilla extract
- ¾ cup (95 g) all-purpose flour (plain flour)
- 1¼ cups (420 ml) milk (Not cold. Microwave for 10 seconds or measure and leave out while prepping)
- ½ teaspoon salt (use ¼ teaspoon salt if using salted butter)
Before you start
- This is an easy recipe, but I’ve added a few details to help you get the best result. Watch the video above or see the step by step photos above before baking, and feel free to comment if you have any questions.
Prepare the pan and oven
- Preheat the oven to 325°F (160°C) or 300°F (150°C convection/fan) about 5–8 minutes before baking, so it’s ready and evenly heated by the time the batter is mixed.
- Line an 8-inch (20 cm) square baking pan with parchment, leaving some overhang for easy lifting later.Use a regular solid pan, not a springform pan. The batter is very thin and will leak through the base if the pan isn’t fully sealed.
Separate and prep the eggs
- Separate the eggs while cold (easier to handle) — whites in one bowl, yolks in another.
- Let both sit 15–20 minutes to reach room temperature.
Whip the egg whites
- Beat the egg whites on medium speed for 2 minutes until foamy.
- Add the 1 Tablespoon sugar and continue beating for 3–4 minutes until stiff, glossy peaks form.
- When you lift the beaters, the peaks should stand straight without drooping.
- Stop beating at this point. If you go further, the whites will start to look dry or clumpy, making them harder to fold in and affecting the cake’s texture.
- Set aside while you make the yolk mixture
Make the yolk mixture
- Beat the yolks with ⅔ cup sugar until pale and thick (2–3 minutes on medium-high speed).
- Pour in the cooled melted butter. Add the pumpkin purée, pumpkin pie spice (or ground cinnamon) and vanilla extract. Beat on medium speed for 1 minute until fully combined and smooth.
Add the flour and milk
- Stir in the flour and salt mixing gently with a spatula until just combined.
- Pour in the lukewarm milk and mix on low speed for 1–2 minutes. The batter will look thin and smooth — that’s completely normal.
Fold in the egg whites
- Add the whipped egg whites in two parts — stir the first half in to loosen the batter, then gently fold in the rest.The batter will still look uneven and slightly lumpy, and that’s exactly how it should be. Don’t try to make it smooth, if you do, the layers won’t form properly during baking.
Bake the cake
- Pour the batter gently into your lined pan. It will look thin and foamy from the whipped egg whites floating on top — don’t worry, that’s what creates those beautiful layers as it bakes.
- Bake for 40–45 minutes at 160°C/325°F (150°C fan) until the top is golden and firm to the touch.
- If the top starts browning too quickly during the last 10 -15 minutes of baking, cover it loosely with foil shaped like a dome (so it doesn’t touch the batter).
- To check if it’s baked, gently shake the pan, the center should feel set, not wobbly underneath. You can also insert a toothpick into the center, it should come out mostly clean, with just a few crumbs attached (not liquid batter).
Cool and set
- Remove the cake from the oven. Don’t worry if the top isn’t perfectly smooth. Those little toasted spots are just the baked egg white bubbles peeking through.
- Cool in the pan for 1 hour, then refrigerate for 4–6 hours or overnight to help the layers set neatly.
- The cake may sink slightly at the edges as it cools, that’s completely normal and helps the layers settle neatly.
Slice and serve
- Lift out using the parchment. Slice while cold for neat, even layers
- Serve cold for a firm texture, or let slices come to room temperature for a softer, creamier custard, it won’t melt or collapse.
- Optional: Sprinkle with pumpkin spice or cinnamon mixed with sugar.
Storage
- Store covered in the refrigerator for up to 5 days. Loosely dome the foil or cover lightly, leaving a small gap for air circulation. This prevents condensation from forming and keeps the top from turning soggy.
- Freezing isn’t recommended, the custard layer can turn watery and separate once thawed
The milk shouldn’t be cold. You can either leave it out while you prep the batter (about 15–20 minutes) or warm it in the microwave for about 10 seconds — just enough to take off the chill, not to make it warm. Check bake time: All ovens differ. If the center still looks slightly wet, tent loosely with foil and bake a few more minutes. See post above for step-by-step photos and tips.
Hungry for more?
Sign up for my free newsletter to get emails about new recipes .And don't forget to follow me on YouTube, Facebook, Pinterest, and Instagram for all the latest deliciousness


Leave a Reply