Ready in under an hour, these Garlic Butter Potato Stacks bake right in a muffin tin until golden, crisp, and tender in the middle. They’re simple to make with any kind of potato, no special variety needed.
Easy Potato Stacks
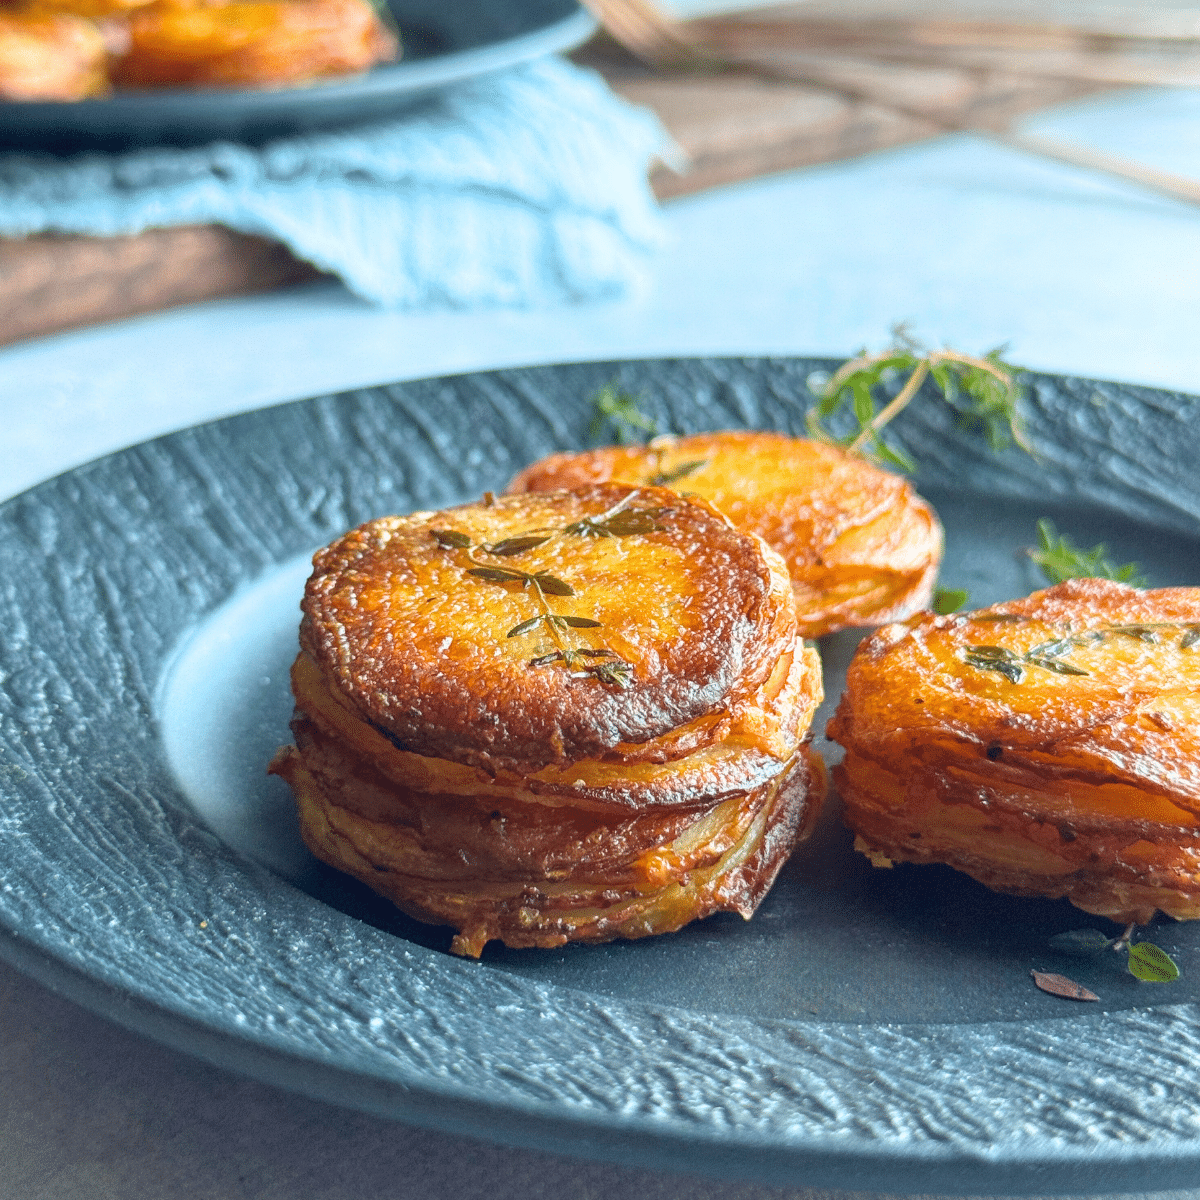
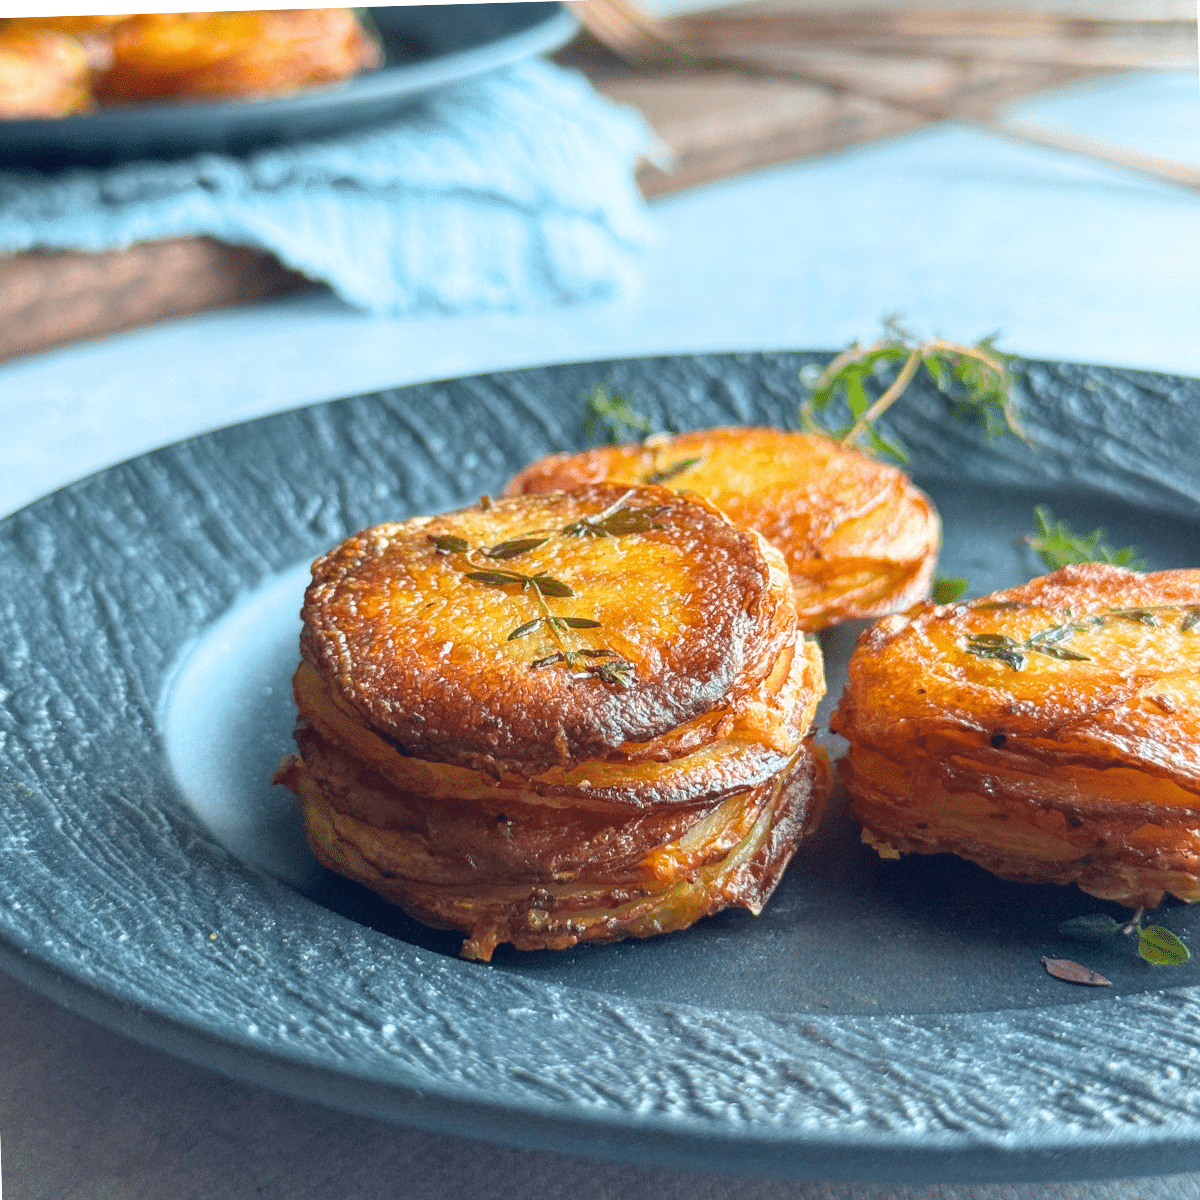
Golden, buttery and crisp around the edges, these potato stacks feel a bit fancy, but honestly they’re so simple. Just slice your potatoes, toss them with melted butter, garlic, a little olive oil, and some grated cheese, then stack everything in a muffin tin.
No peeling, no boiling, and no need to worry about what kind of potatoes you’re using.
Easy enough for a weeknight, pretty enough for company 😉
Visual Instructions
Here are step by step pictures so you can see what each stage should look like.
The full printable recipe with amounts and instructions are at the end of this post.
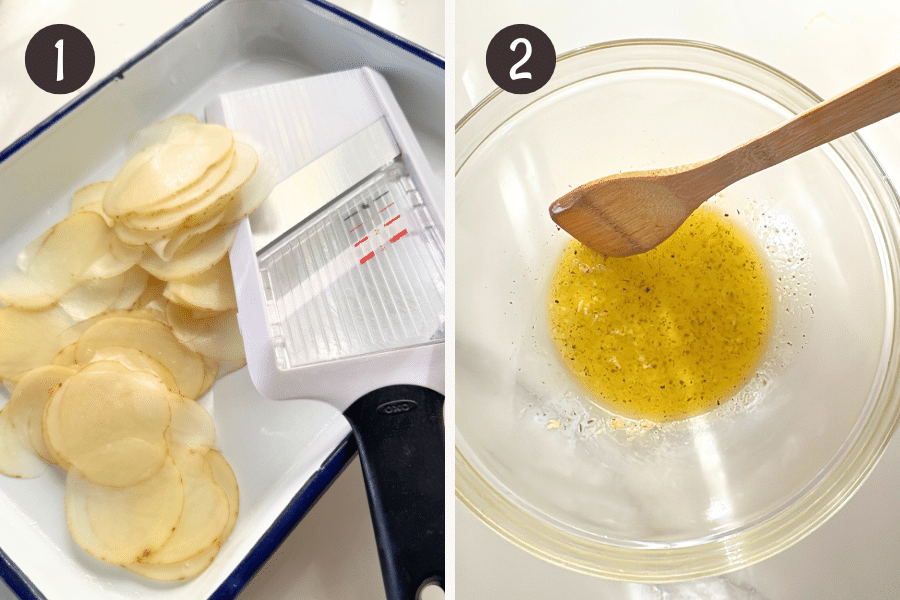
- Use a mandoline, food processor, or sharp knife to slice the potatoes about ⅛ inch (2–3 mm) thick. Try to keep the slices even so they cook evenly and stack neatly. No need to peel unless you want to.
- Melt the butter and stir in the garlic. Give it 2–3 minutes to take on the garlic flavour, then strain out the bits using a small sieve or tea strainer. Stir in olive oil, salt, and pepper.
Straining out the garlic bits gives you the flavour without the risk of burnt spots between the layers as it bakes. It’s a tiny step, but it makes the butter smoother and gives you better flavor and texture all the way through.
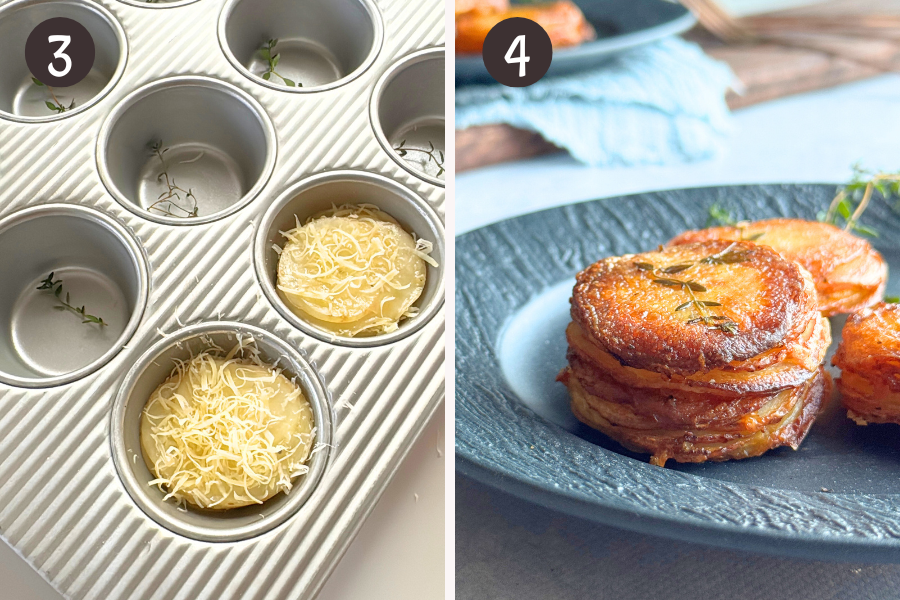
- Grease each muffin cup with a little butter or spray, then add a small thyme sprig at the bottom. It adds flavour as it bakes and becomes a pretty top when you flip the stacks out after baking.
No thyme? You can use small sprigs of rosemary, oregano, or sage instead. Or skip the herbs, the stacks will still be delicious.
- Bake at 400°F (200°C) for 30–35 minutes, until the stacks look golden and crispy at the edges.
To check if they’re done: Stick a toothpick or small knife into the middle of a stack. If it goes in easily, they’re ready. If it feels firm, bake a little longer.
Cool in the tin for 5 minutes, then lift out each stack with a spoon and flip it over. The thyme (or any herbs if used) ends up on top, and the cheese forms a crispy base.
Storage
These are best eaten the same day. The edges are crispiest right after baking.
- But if you have leftovers, let them cool completely, then store in an airtight container in the fridge for up to 3 days.
- Reheat in the oven or air fryer at 350°F (180°C) until warmed through and the edges crisp back up.
- They won’t be quite as crisp as fresh, but the flavor still holds up beautifully.

Tips
- Medium potatoes are easiest to work with. If your slices are too big to fit into the muffin tin, just trim them slightly so they sit flat. Smaller potatoes work too, you’ll just need more slices to fill each cup.
- Use a standard 12-cup muffin tray. A non-stick pan or just a bit of butter or spray makes it much easier to get the stacks out in one piece.
- Don’t fill the cups too high, the stacks should be just below the top so they cook evenly and come out easily.
- If the edges are browning too fast but the centres still feel firm, cover the tray loosely with foil for the last 10 minutes or so.
Make Ahead tips
You can slice the potatoes a day ahead: store them in cold water in the fridge to keep them from browning.
- Before using, drain out the cold water and cover the slices with warm (not hot) water for about 10 minutes.
- Soaking the slices in warm water makes a big difference. If they’re too cold straight from the fridge, the melted butter can firm up and clump instead of coating them evenly.
Drain again and pat dry before tossing with the butter.
You can also prep the garlic butter a day ahead. Melt the butter, stir in the garlic, and let it rest for a few minutes to develop flavor.
- Strain out the garlic bits using a small sieve or tea strainer, then store the butter in the fridge.
- Before using, warm it just enough to melt again, then stir in the oil, salt, and pepper.
Type of cheese to use
Use a firm, hard cheese that melts well without turning overly soft or greasy.
- Grated Parmesan or mature cheddar are great options.
- Parmesan crisps up beautifully and helps the stacks stay in place, while cheddar melts more and adds a richer flavor.
Avoid soft, stretchy cheeses like mozzarella or gouda. They can make the slices slide apart and won’t give you that golden, crispy finish. Save those for pizza night.
Recipe
Garlic Butter Stacked Potatoes
- 4 to 5 medium potatoes (500–600 g / about 1 to 1¼ lbs, thinly sliced)
- 3 Tablespoons (45 g) butter
- 2 cloves garlic, finely grated or minced
- 1 Tablespoon olive oil (or vegetable/canola oil)
- ½ teaspoon salt
- ¼ teaspoon black pepper
- ¼ cup (25 g) grated Parmesan or mature cheddar, divided
Optional
- 12 small sprigs fresh thyme (rosemary, oregano, sage instead, or skip the herbs, still great)
- ¼ teaspoon dried Italian herbs (or any dried herbs)
- Preheat your oven to 350°F (180°C) or 160°C fan. Lightly grease all 12 cups of a muffin tin with a little butter or cooking spray
- Place a small thyme sprig at the bottom of each muffin cup. This will become the top once flipped after baking.
- Melt the butter and stir in the garlic. Give it 2–3 minutes to take on the garlic flavor, then strain out the garlic bits using a small sieve or tea strainer.
- Stir in olive oil, salt, pepper and dried Italian herbs (if using)
- Toss the potato slices in the garlic butter mixture until coated.
- Stack 8–10 slices in each muffin cup, adding a pinch of cheese every 2–3 layers. Finish with a little cheese on top. It becomes the crispy base once flipped.
- Bake for 30–35 minutes, or until golden and crisp at the edges and a toothpick slides easily through the center.
- Remove from the oven but leave for 5 minutes in the tin, then lift out each stack with a spoon and flip over onto a plate or board so the thyme is on top.
- Serve warm, garnished with more herbs or flaky salt if you like
- Any variety of potato works. Just slice them evenly for neat stacks.
- Butter adds flavor and golden color, while the oil helps crisp the edges.
- Use hard cheese like Parmesan or cheddar. Parmesan gives a crisp finish. Cheddar melts more and adds richness. Avoid soft or stretchy cheeses like mozzarella or gouda.


Leave a Reply