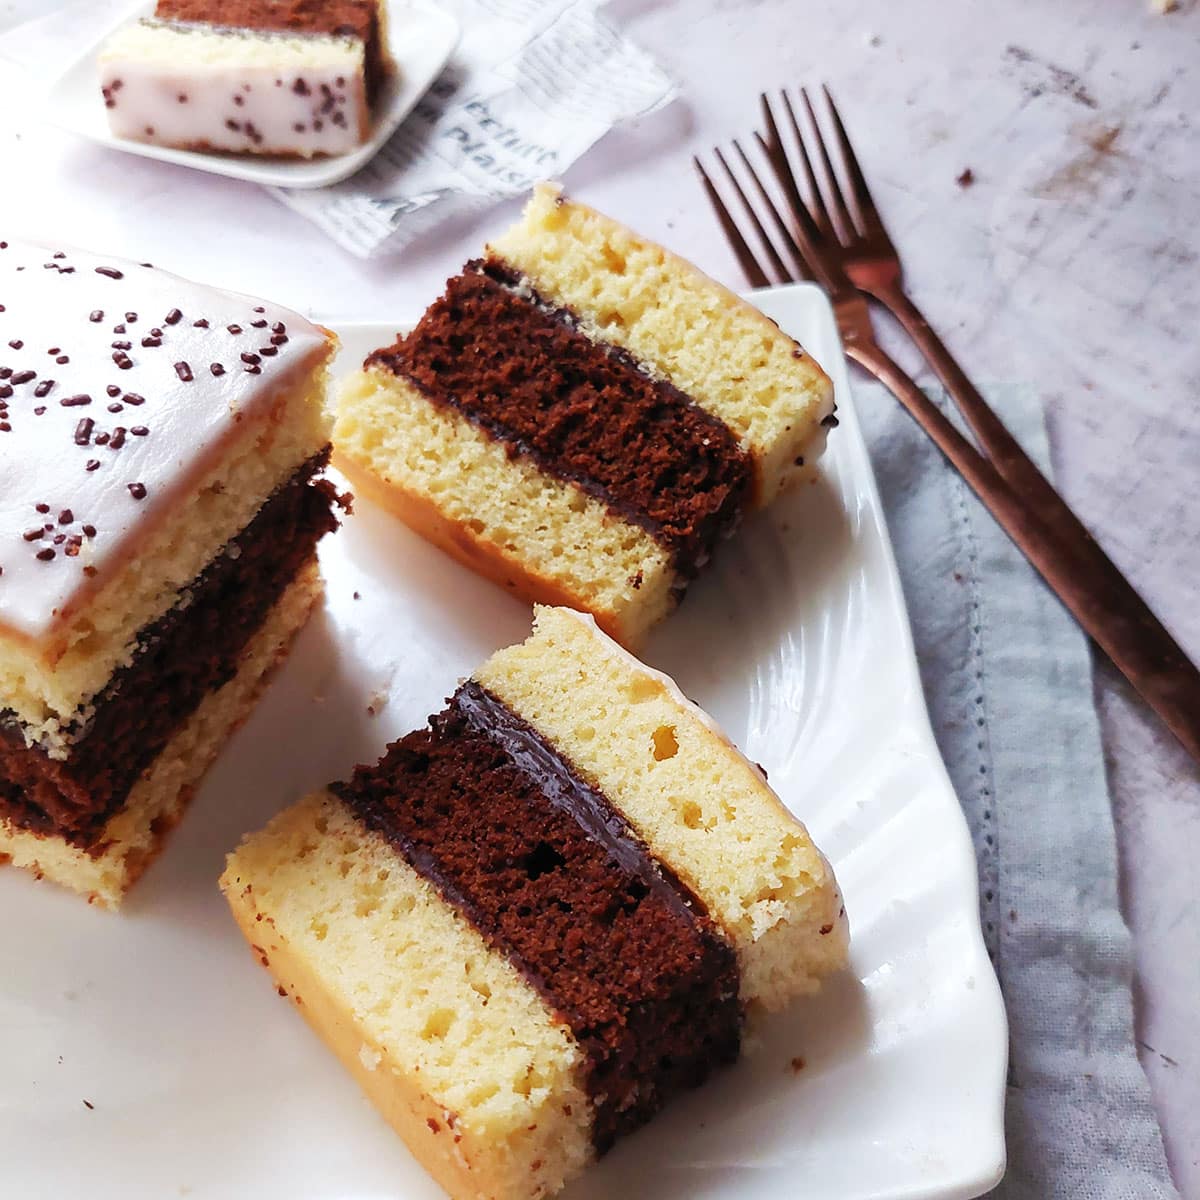
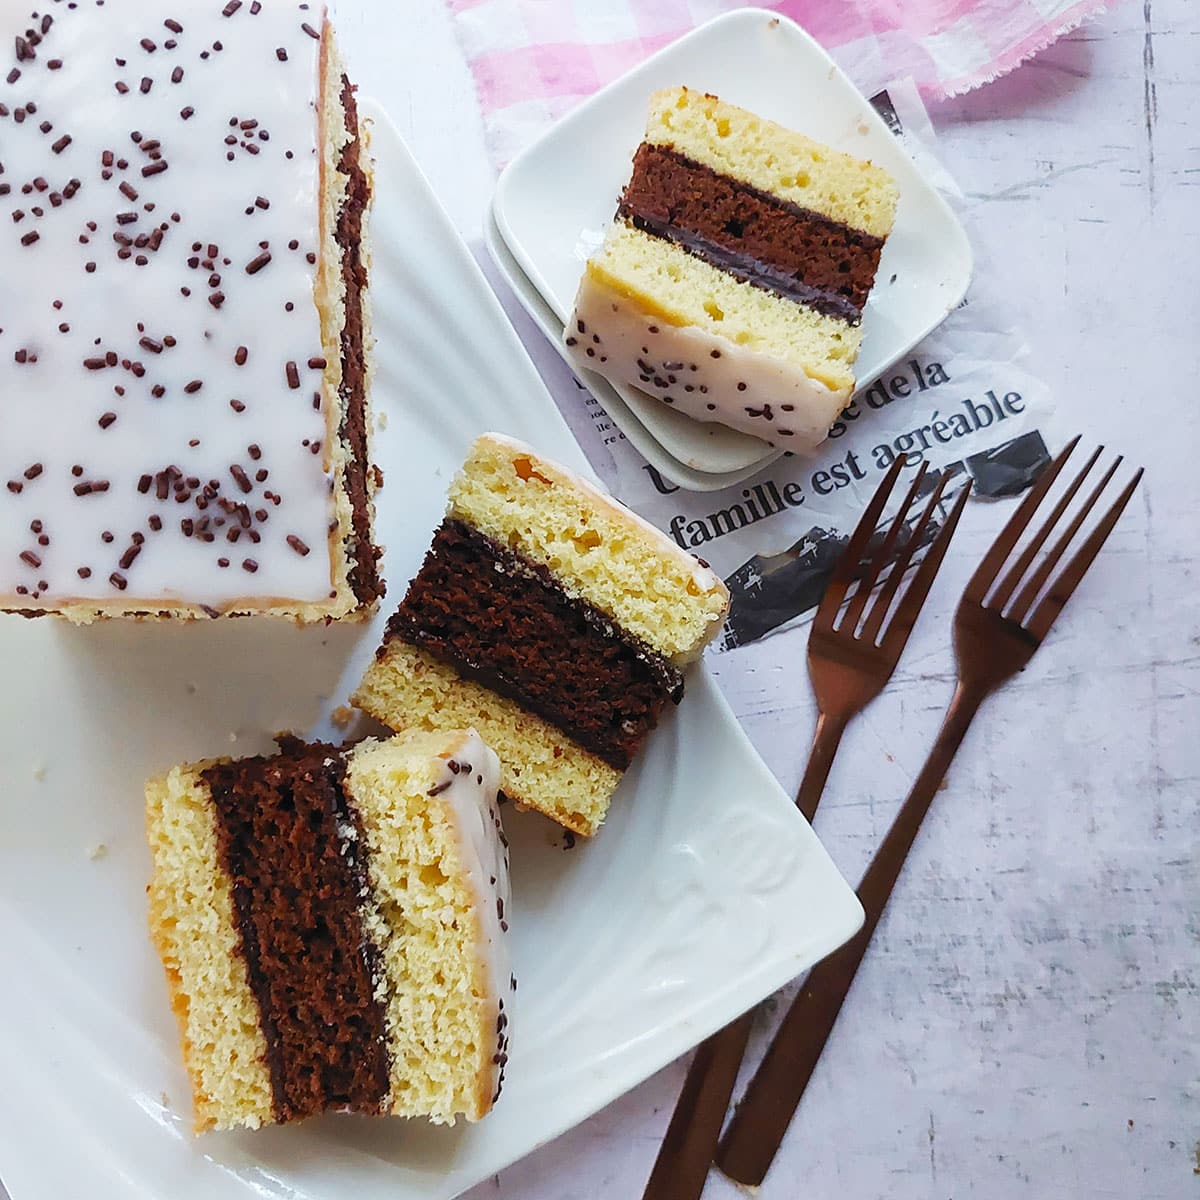
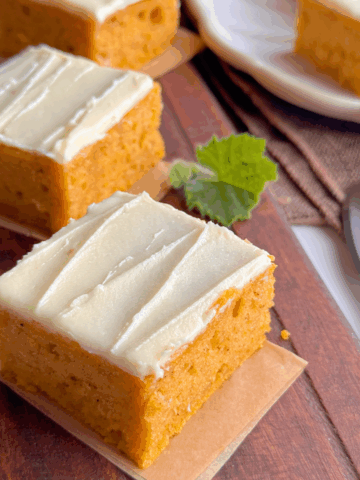
Indulgence takes on a whole new meaning with this Classic Chocolate and Vanilla Neapolitan cake. This delightful dessert is both impressive and decadent.
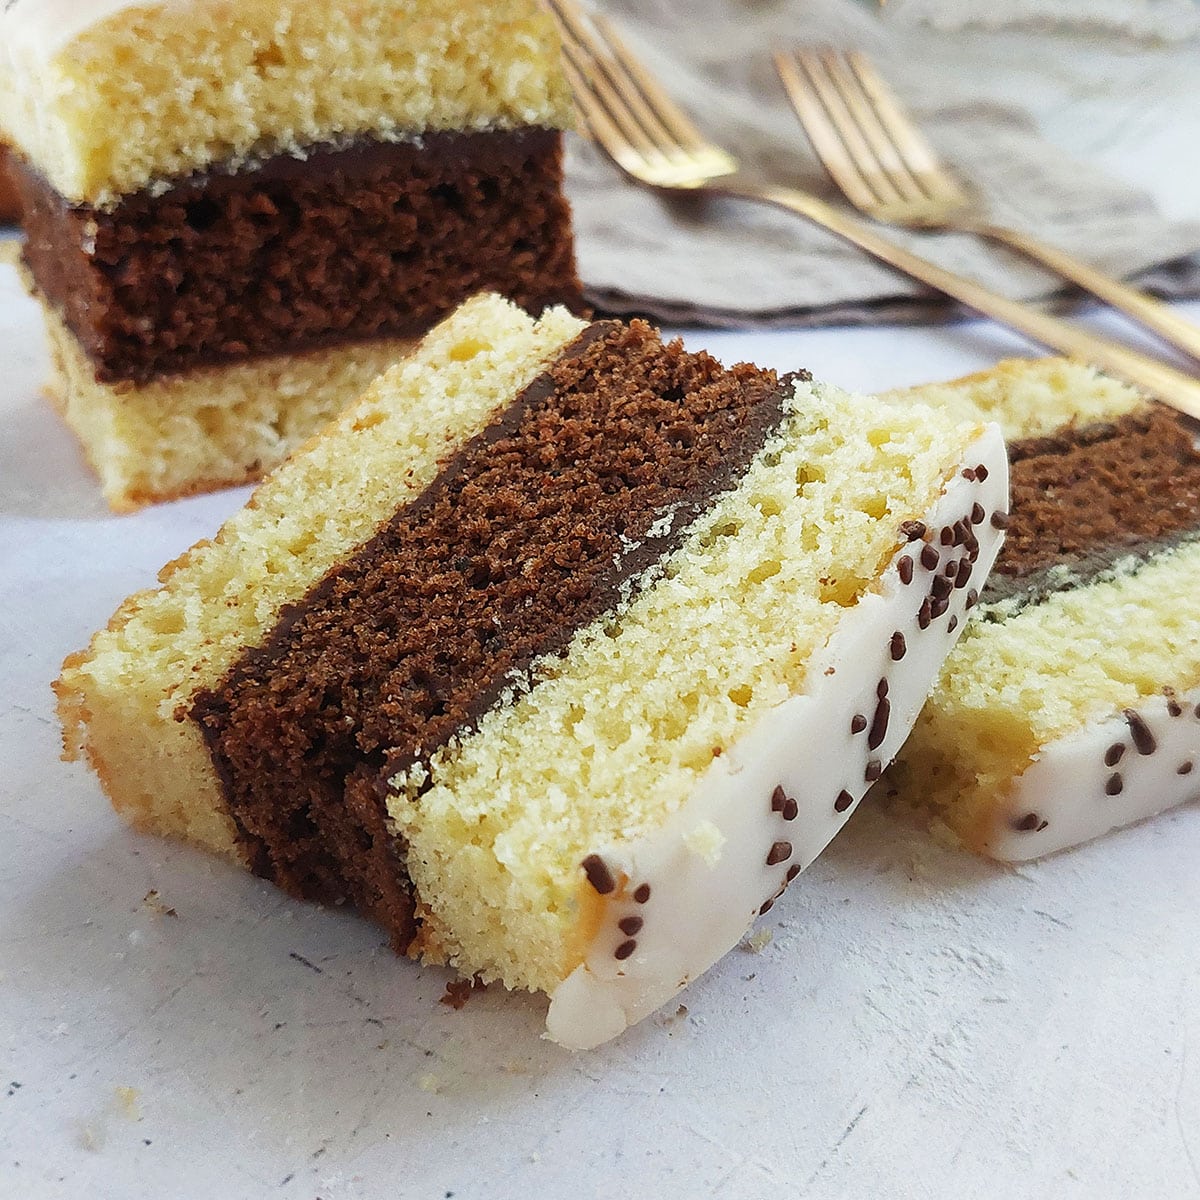
Consisting of layers of soft, fluffy vanilla and rich chocolate sponge cake, its filled with chocolate ganache, and finished with a sweet glaze on top.
Despite its impressive appearance, This cake doesn't require any fancy equipment or ingredients. It's incredibly simple to prepare using a single batter, which is then divided into three portions.
Two of these portions will create the top and bottom layers of a classic vanilla sponge cake. The remaining portion which will form the middle layer is transformed into a rich chocolate sponge simply by adding cocoa powder.
Visual Instructions
- Here are step by step pictures so you can see what the batter at each stage should look like.
The full printable recipe with amounts and instructions are at the end of this post.
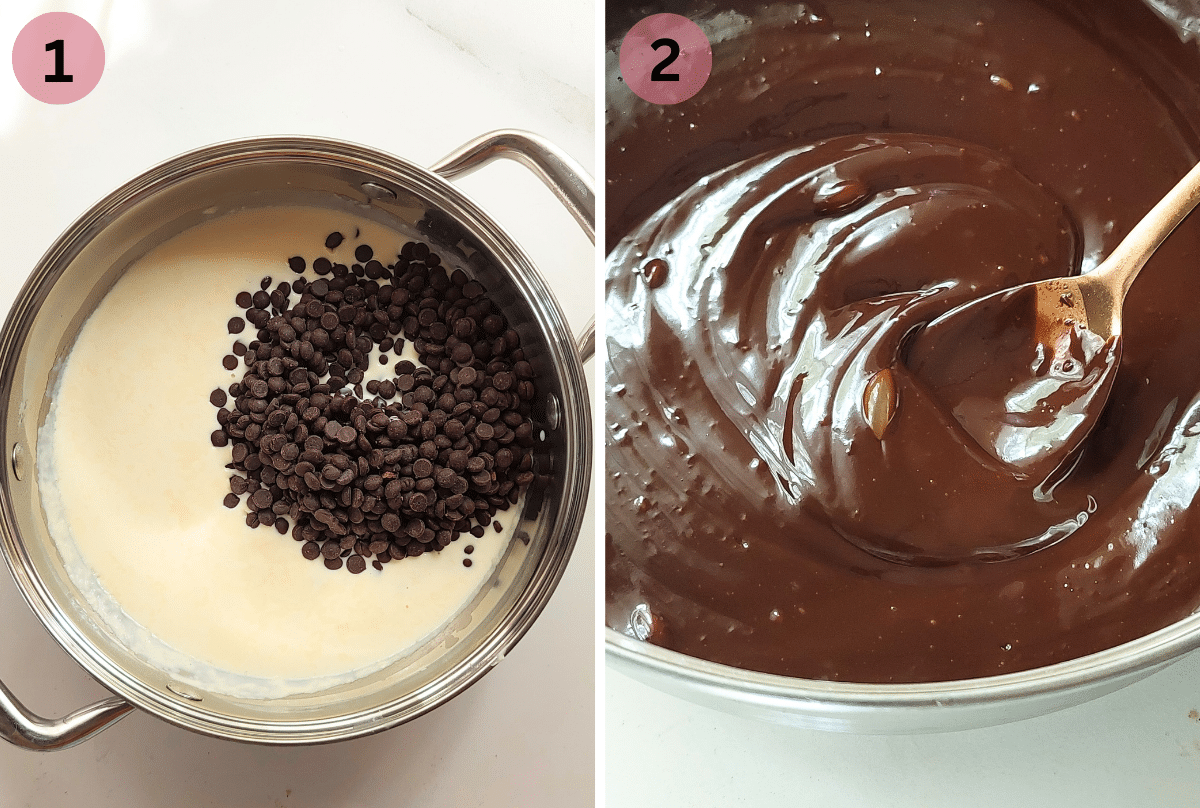
Prepare the chocolate ganache
- Place ⅔ cup (150ml) heavy cream (whipping cream) in a small saucepan over heat or in a heatproof jug to microwave. Heat until hot but DO NOT let it boil – it might cause the chocolate to split or go grainy. Turn off the heat and take the pot off the stove.
- Add 1 ¼ cup / 7 oz (200g) chopped dark chocolate or chocolate chips to the saucepan. Leave the chocolate in the hot cream to soften for about 3 minutes.
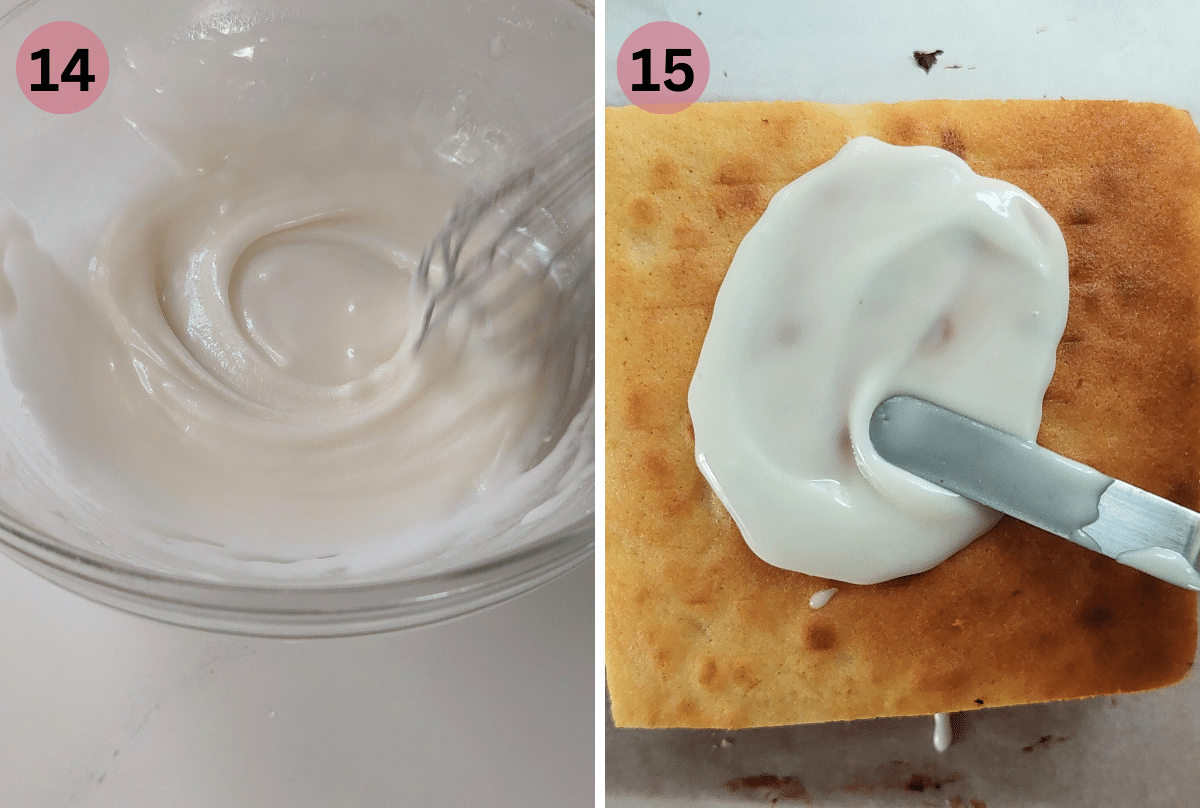
- Stir the ganache until it becomes smooth, then allow it to cool on the counter without covering it (at room temperature). Set it aside to cool while you get the cake batter ready and bake the cake. During this time, the ganache will cool and thicken, making it suitable for spreading.
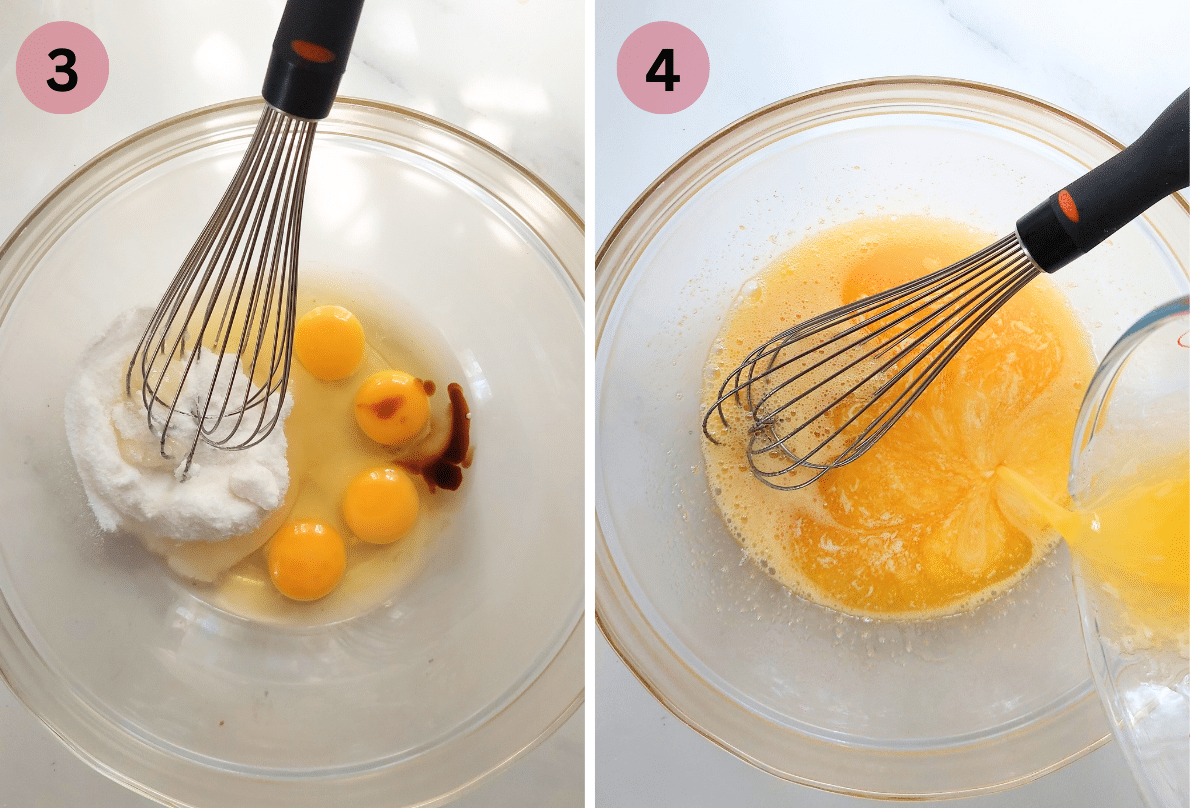
- In a large bowl, beat 4 large eggs, ¾ cup (170g) caster or white granulated sugar and 1 teaspoon vanilla extract.
- Add 1 cup (200g) melted butter and whisk until incorporated.
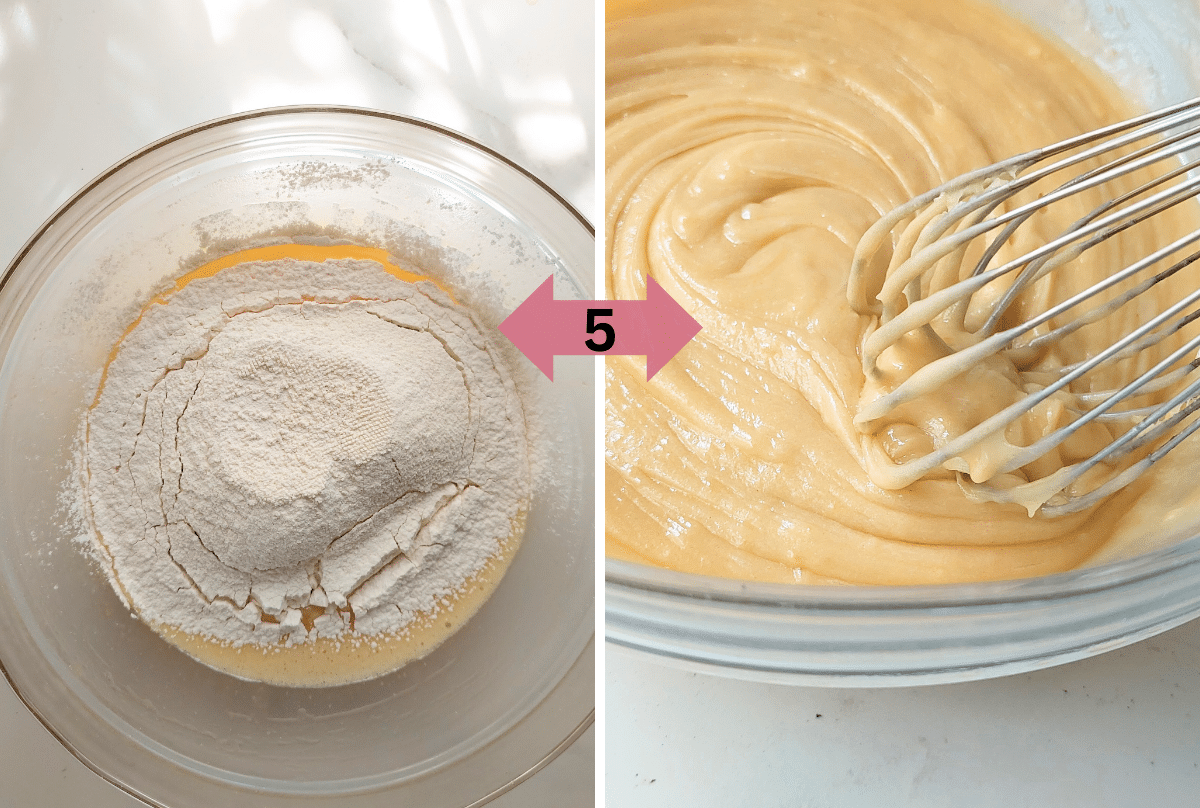
- Sift in 2 cups (250g) all purpose flour and 2 teaspoons of baking powder. Whisk well to get a smooth batter.
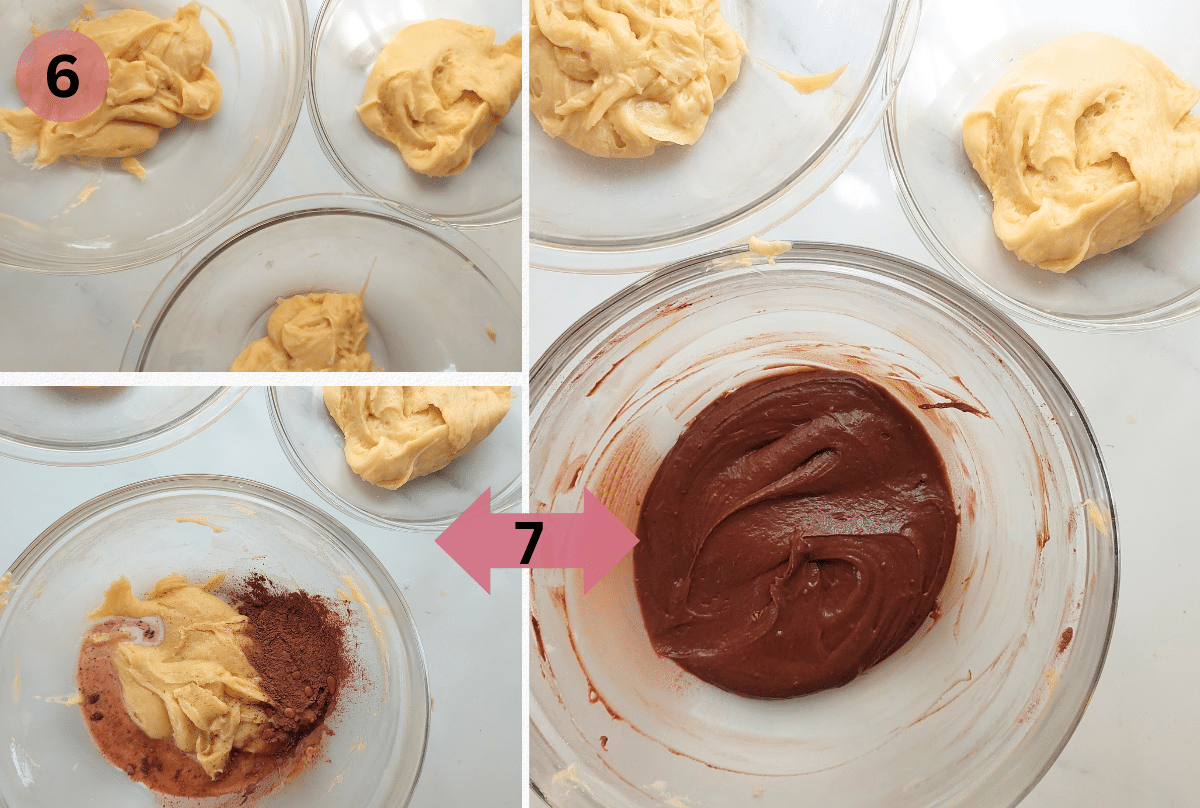
- Divide the batter into 3 equal portions. (I weighed to be sure of equal amounts)
- Add 2 Tablespoons (15g) unsweetened cocoa powder and 2 - 3 Tablespoons of milk to one of the portions. Whisk well to combine.
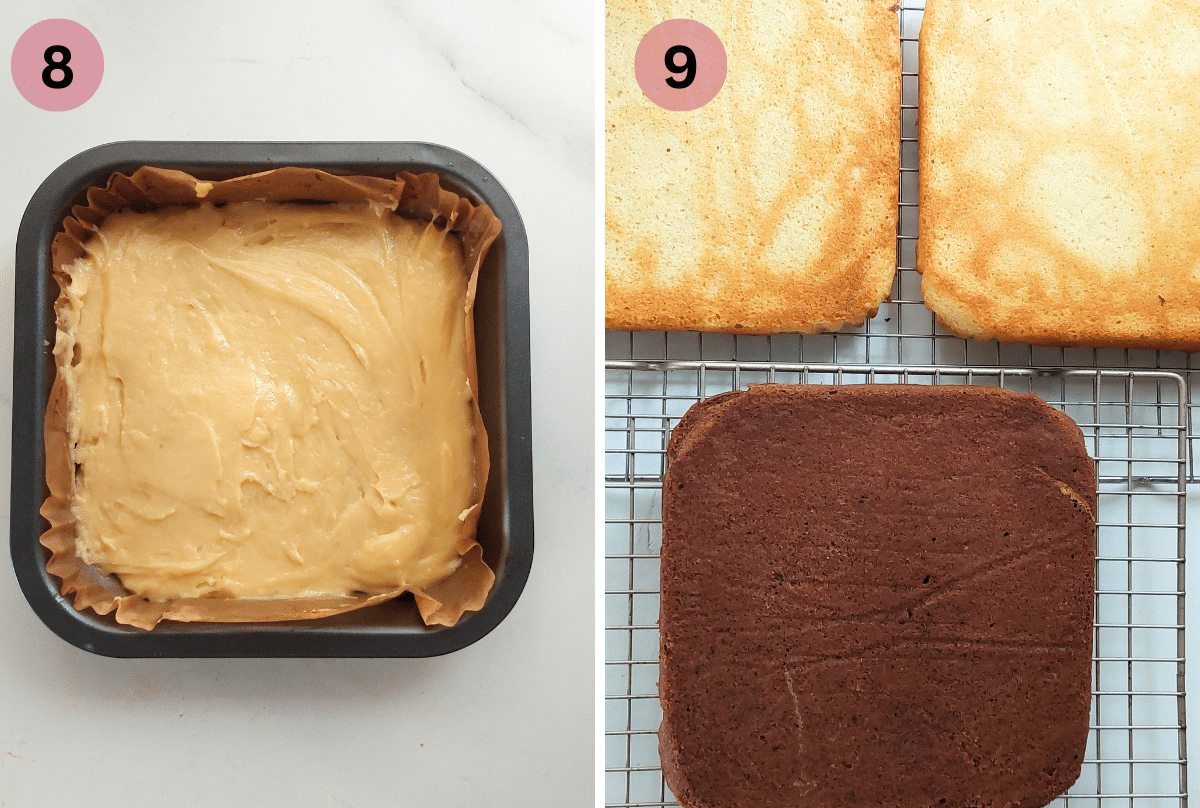
- Grease and line three 8×8-inch (20x20cm) baking pans with parchment paper. To get the best results, make sure you're using a pan that's 8 inches (20 cm) or smaller. If you go bigger, the cakes will turn out too thin.
- Distribute each portion of the batter among the prepared baking pans. (If you only have one 8×8-inch (20x20cm) baking pan, bake each portion of batter one after the other.) I used the same pan and baked the cakes in 3 batches.
- Bake at 325°F / 170°C (or 150°C for fan-assisted ovens) for 15 minutes. Let the cakes remain in the pans for 5 minutes, then transfer each cake to a cooling rack to cool completely.
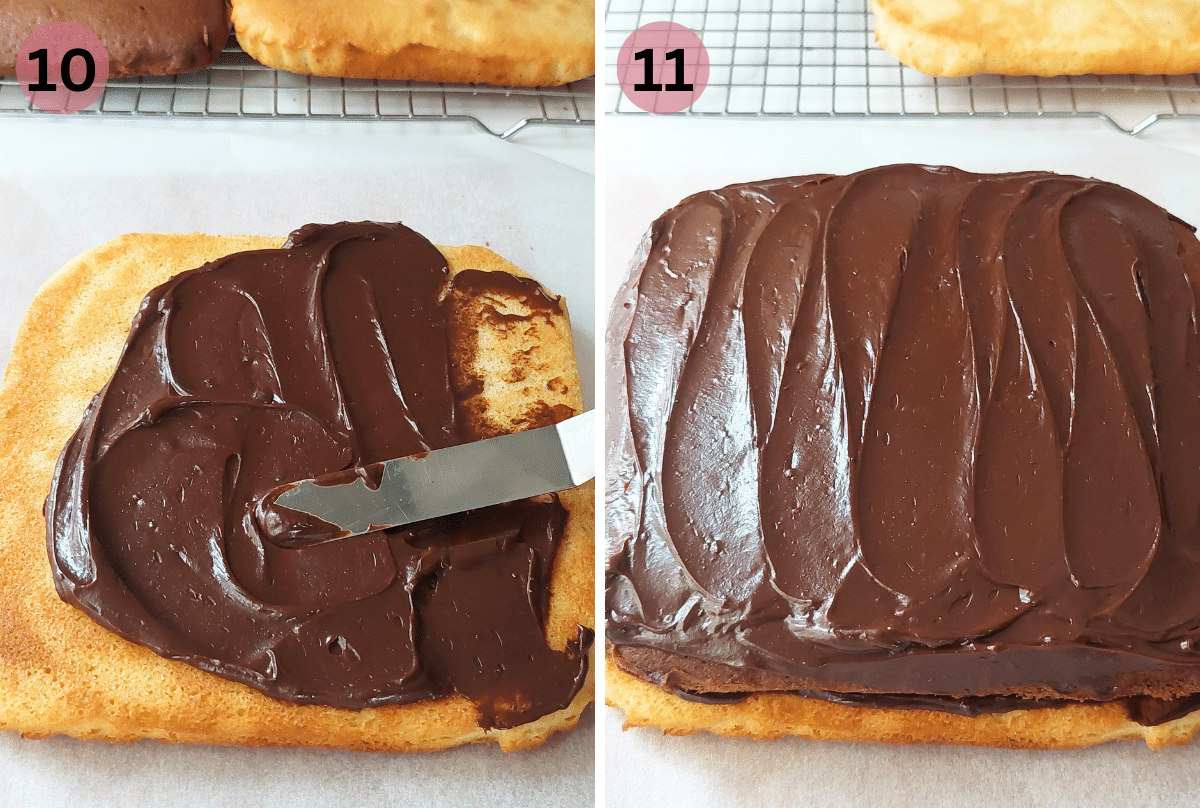
- Spread half of the chocolate ganache evenly on top of the first vanilla cake.
- Position the chocolate cake on top of the ganache-covered vanilla cake. Spread the remaining ganache over the chocolate cake.
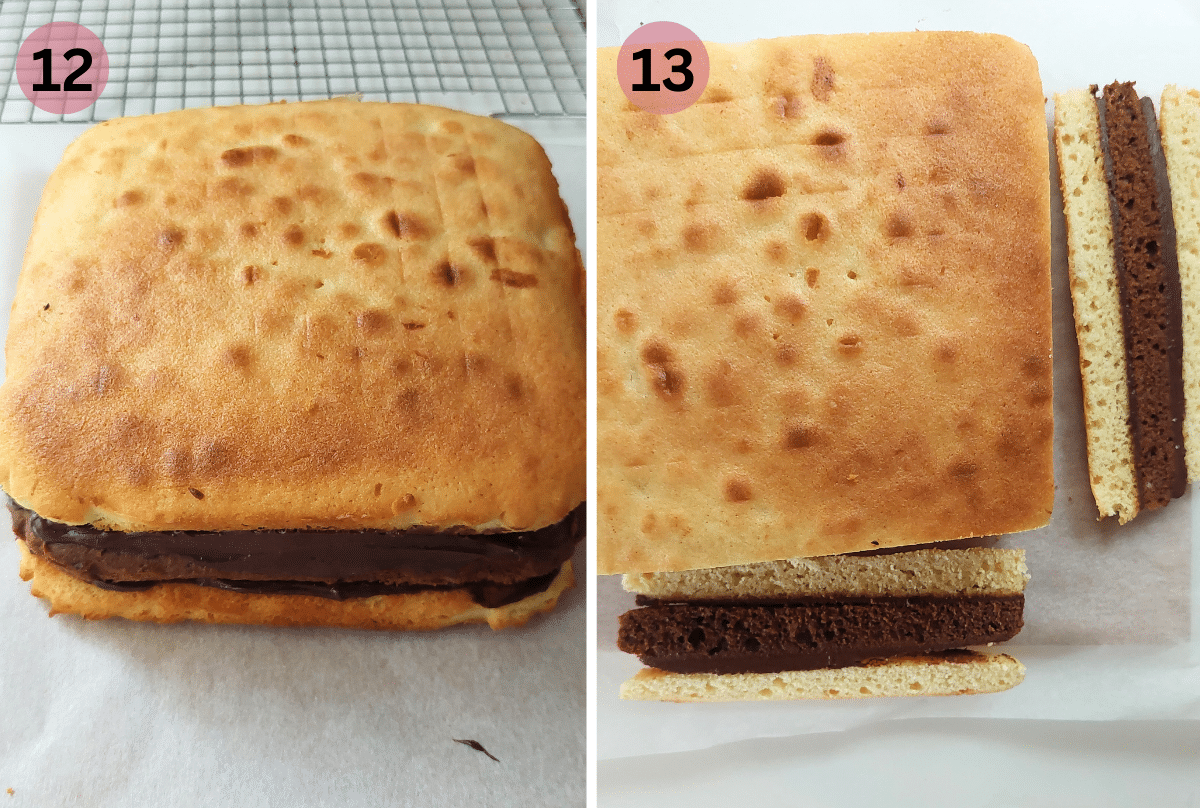
- Finally, place the second vanilla cake on top of the chocolate cake.
- Trim the edges of the cake to form a neat square.
- For the glaze topping: mix 1 ½ cups (150g)of powdered (icing) sugar and slowly add 2-4 tablespoons of warm milk or water until you've got a smooth, thick frosting. You want it spreadable, not drippy, just right for the cake's top without running down the sides.
- Use a spatula to spread the glaze over the entire top surface of the cake. Top with chocolate sprinkles if you like.
- Leave the glaze to set for about 30 minutes before slicing.
Serving
- You can choose to keep the cake as a square or create two rectangular cakes by splitting the cake in half to form two rectangle-shaped cakes.
- Slicing the square cake into two rectangles makes it easier to control portion sizes. This is especially helpful when you're baking for an event, celebration, party, or in professional settings like bakeries or restaurants where uniform portions is important.
Tips when preparing the cake
- To ensure you get equal amounts of batter for each separate layer, weigh the batter and divide it into thirds. Weighing with a kitchen scale is the most accurate way to get even layers.
- If you only have one 8×8-inch (20x20cm) baking pan, bake each portion of batter one after the other.) I used the same pan and baked the cakes in 3 batches.
- While in the oven, each cake layer will typically rise to around 1 inch (approximately 2.5 cm) in height.
Tips when preparing the ganache
- Use either Heavy Cream or Whipping Cream: Do not use half-and-half, whole milk, or any other liquid because the ganache won’t set up properly.
- The best chocolate for ganache is dark baking chocolate. If using chocolate chips, ensure that is a good quality, that is suited for melting. For this recipe I used Guittard 48% Semisweet Dark Chocolate Chips. You can use milk baking chocolate as well. If you are using milk baking chocolate, then add 2 oz (50g) extra chocolate to the cream to achieve the correct ganache consistency.
- Remember to get baking or cooking chocolate, not regular eating chocolate for your ganache. Regular eating chocolate contains other ingredients like fillers or shortening. This can create a grainy effect and interfere with the setting of the ganache.
- It's important to leave the chocolate ganache uncovered at room temperature. If you cover the ganache while still hot, little drops of condensation will drip from the lid and on to the ganache.
- If you really need to cover the ganache, make sure to do this only once it has cooled. Cover your ganache with plastic wrap, and be sure the wrap touches the surface of the chocolate.
Storage
At room temperature: in an airtight container for up to 3 days,
In the refrigerator: in an airtight container for up to for up to 5 days
In the freezer: If you plan to prepare the cake in advance, you can freeze it for up to three weeks without the ganache or glaze.
- Once the cake has finished baking, ensure it has completely cooled down. Then tightly wrap each cake individually using a double layer of plastic wrap (clingfilm) followed by a layer of aluminum foil.
- If you happen to have a large resealable bag, you can also place the wrapped cake inside it, seal it securely, and try to remove as much air as possible from the bag.
- To thaw cakes unwrap them and put them on a wire rack at room temperature. They should thaw out in 2 to 3 hours. Then assemble with ganache and top with glaze frosting.
Enjoy ♡
Recipe
Chocolate and Vanilla Neapolitan cake
For the chocolate ganache
- 1 ¼ cups roughly chopped dark baking chocolate or chocolate chips (200g)
- ⅔ cup heavy or whipping cream (150ml)
For the cake
- 4 large eggs
- ¾ cup castor or white granulated sugar (170g)
- 1 teaspoon vanilla extract
- 1 cup melted butter, lukewarm, not hot (200g)
- 2 cups all purpose (same as plain flour -UK OR cake flour) (250g)
- 2 teaspoons baking powder (10g)
- ¼ teaspoon salt
- 2 Tablespoons unsweetened cocoa powder (15g)
- 2 - 3 Tablespoons milk
For the glaze topping
- 1 ½ cups powdered (icing sugar) (150g)
- 2-4 tablespoons warm milk or water
- NOTE: The cooking time above is based on using all three baking pans in the oven at once. Otherwise, if you choose to use only one pan and bake in three separate batches, the cooking time will be 45 minutes.
Chocolate ganache
- Place heavy cream (whipping cream) in a small saucepan over heat or in a heatproof jug to microwave. Heat until hot but DO NOT let it boil – it might cause the chocolate to split or go grainy. Turn off the heat and take the pot off the stove.
- Add chopped dark chocolate or chocolate chips to the saucepan. Leave the chocolate in the hot cream to soften for about 3 minutes.
- Stir the ganache until it becomes smooth, then allow it to cool on the counter without covering it (at room temperature).
- Set it aside to cool while you get the cake batter ready and bake the cake. During this time, the ganache will cool and thicken, making it suitable for spreading.
Preheat the oven and prepare the baking pan.
- Preheat the oven now to 325°F / 170°C (150°C)if you are using a fan assisted oven)
- Grease and line three 8×8-inch (20x20cm) baking pans with parchment paper.
- If you only have one 8×8-inch (20x20cm) baking pan, bake each portion of batter one after the other.) I used the same pan and baked the cakes in 3 batches.
- To get the best results, make sure you're using a pan that's 8 inches (20 cm) or smaller. If you go bigger, the cakes will turn out too thin.
Prepare the batter
- In a large bowl, beat the eggs, caster or white granulated sugar and vanilla extract.
- Add melted butter and whisk until incorporated.
- Sift in all purpose flour, baking powder and salt. Whisk well to get a smooth batter.
Divide the batter
- Divide the batter into 3 equal portions. (I weighed to be sure of equal amounts)
- Add unsweetened cocoa powder and 2 - 3 Tablespoons of milk to one of the portions. Whisk well to combine.
Bake
- Transfer the batter evenly between the three prepared baking pans, or, if you're using a single pan, bake the cakes in three separate batches.
- Bake at 325°F / 170°C (or 150°C for fan-assisted ovens) for 15 minutes.
- While in the oven, each cake layer will typically rise to around 1 inch (approximately 2.5 cm) in height.
- Let the cakes remain in the pans for 5 minutes, then transfer each cake to a cooling rack to cool completely.
Assemble
- Spread half of the chocolate ganache evenly on top of the first vanilla cake.
- Position the chocolate cake on top of the ganache-covered vanilla cake.
- Spread the remaining ganache over the chocolate cake.
- Finally, place the second vanilla cake on top of the chocolate cake.
- Trim the edges of the cake to form a neat square.
The glaze topping
- Mix powdered (icing) sugar and slowly add 2-4 tablespoons of warm milk or water until you've got a smooth, thick frosting.
- You want it spreadable, not drippy, just right for the cake's top without running down the sides.
- Use a spatula to spread the glaze over the entire top surface of the cake.
- Top with chocolate sprinkles if you like.
- Leave the glaze to set for about 30 minutes before slicing.
Serving
- You can choose to keep the cake as a square or create two rectangular cakes by splitting the cake in half to form two rectangle-shaped cakes.
- Slicing the square cake into two rectangles makes it easier to control portion sizes. This is especially helpful when you're baking for an event, celebration, party, or in professional settings like bakeries or restaurants where uniform portions are important
Storage
- At room temperature: in an airtight container for up to 3 days,
- In the refrigerator: in an airtight container for up to for up to 5 days.
- Please refer to the post for guidance on how to store the plain cakes in the freezer.
- For this recipe I used Guittard 48% Semisweet Dark Chocolate Chips. You can use milk baking chocolate as well.
- If you are using milk baking chocolate, then add 2 oz (50g) extra chocolate to the cream to achieve the correct ganache consistency.
- Remember to get baking or cooking chocolate, not regular eating chocolate for your ganache. Regular eating chocolate contains other ingredients like fillers or shortening. This can create a grainy effect and interfere with the setting of the ganache.
Want even more delicious recipes? Subscribe free to receive new post notifications emailed to you. Or follow along on Facebook, Pinterest, and Instagram. If you love sharing recipes please come and join my All about cooking and baking Facebook group or Subscribe to my YouTube channel

Patricia says
How do you keep the cake from being so dry? I followed your recipe exactly. Is it supposed to be dry.
The Gardening Foodie says
Hi Patricia, Thank you so much for trying the recipe and for your comment. I really appreciate you taking the time to share your experience. I’m so sorry to hear the cake turned out dry, that’s definitely not how it’s meant to be.
Since the layers are quite thin, a few small things can make a big difference. Here are some tips that might help if you decide to try it again:
If baking one layer at a time, the oven can stay extra hot between batches, which can dry out the cakes. Try lowering the temperature slightly (by 5–10°F) and start checking for doneness a couple minutes early. The layers are done when they spring back lightly in the center, even just a minute or two too long can make them dry.
Flour measurements can also affect the texture — too much flour will dry the batter. Weighing it is ideal, but if you're using measuring cups, the spoon-and-level method works best to avoid packing in extra.
After baking, let the cakes rest in the pans for just five minutes, then move them to a wire rack. Leaving them in the pan too long can cause them to dry from the residual heat.
I hope this helps, and I really appreciate you giving the recipe a try