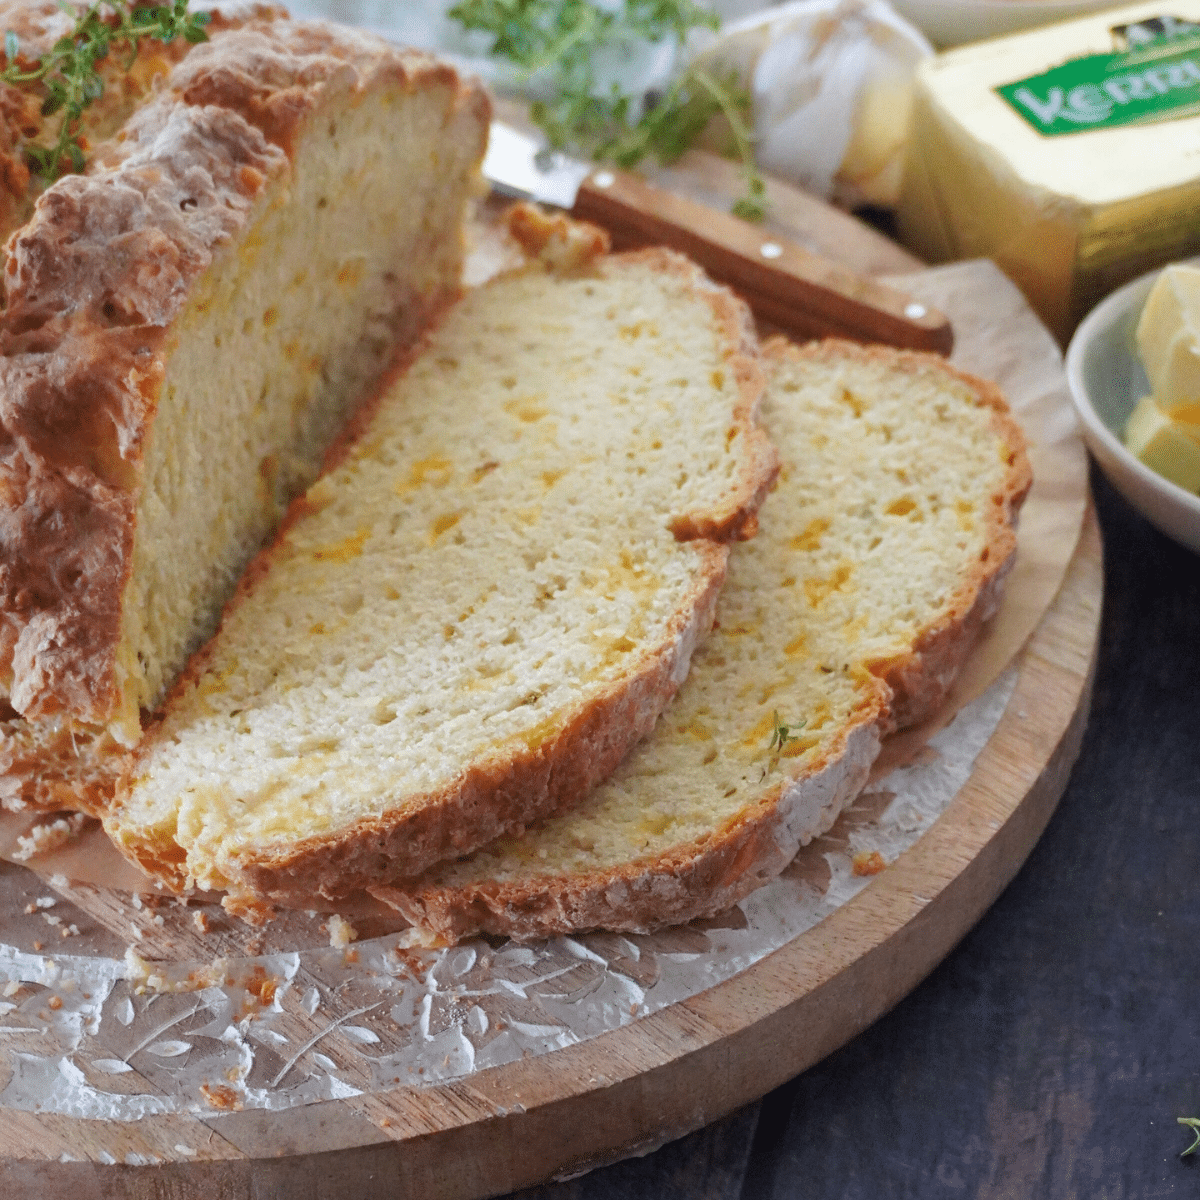
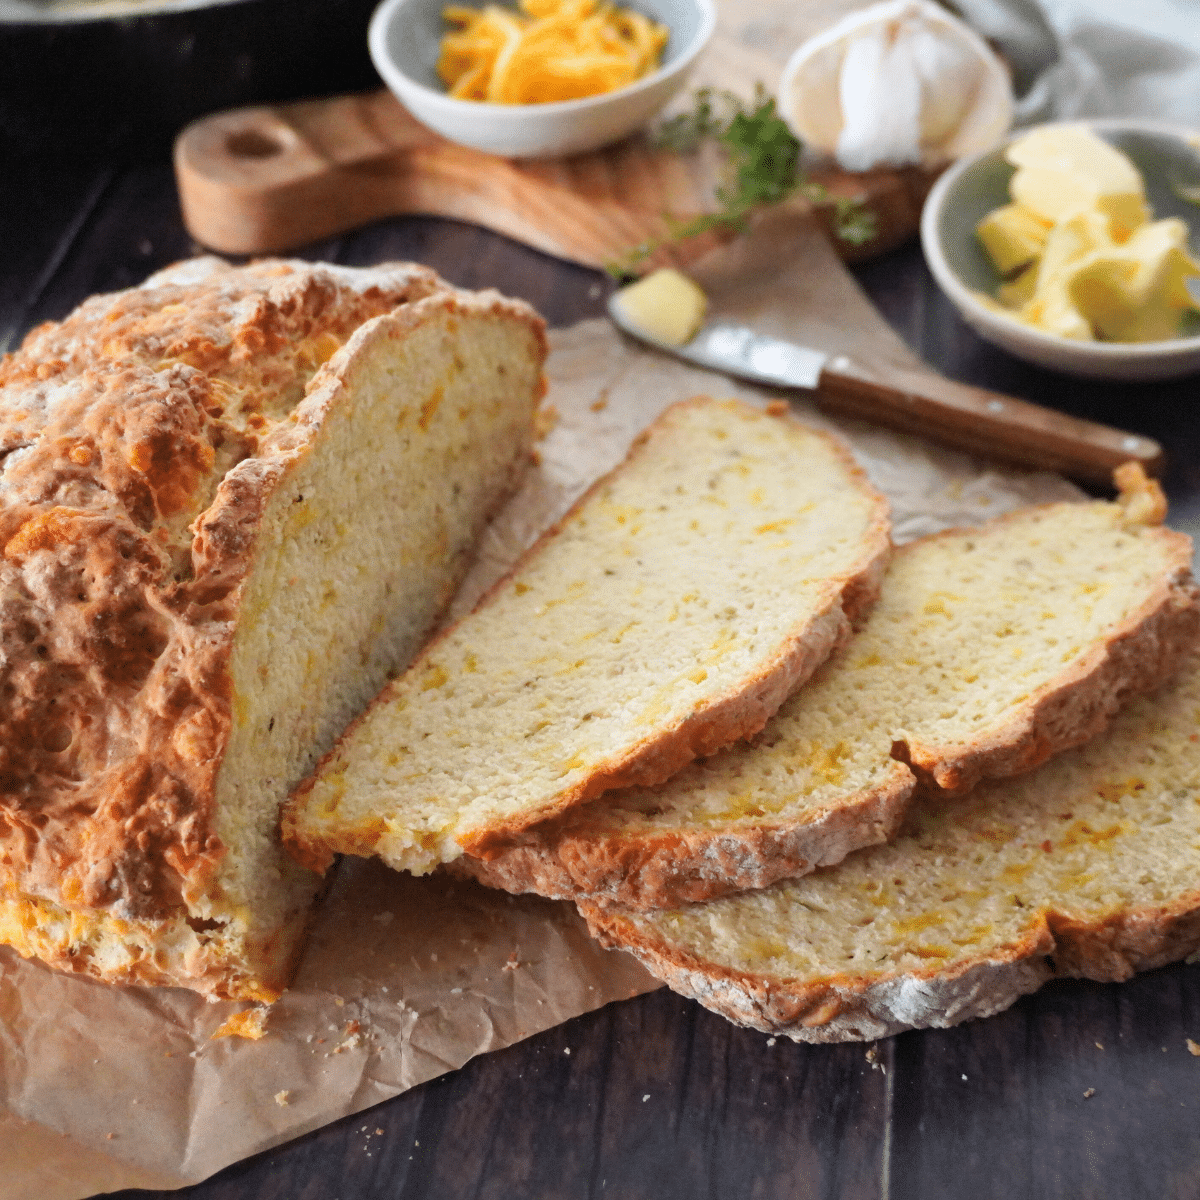
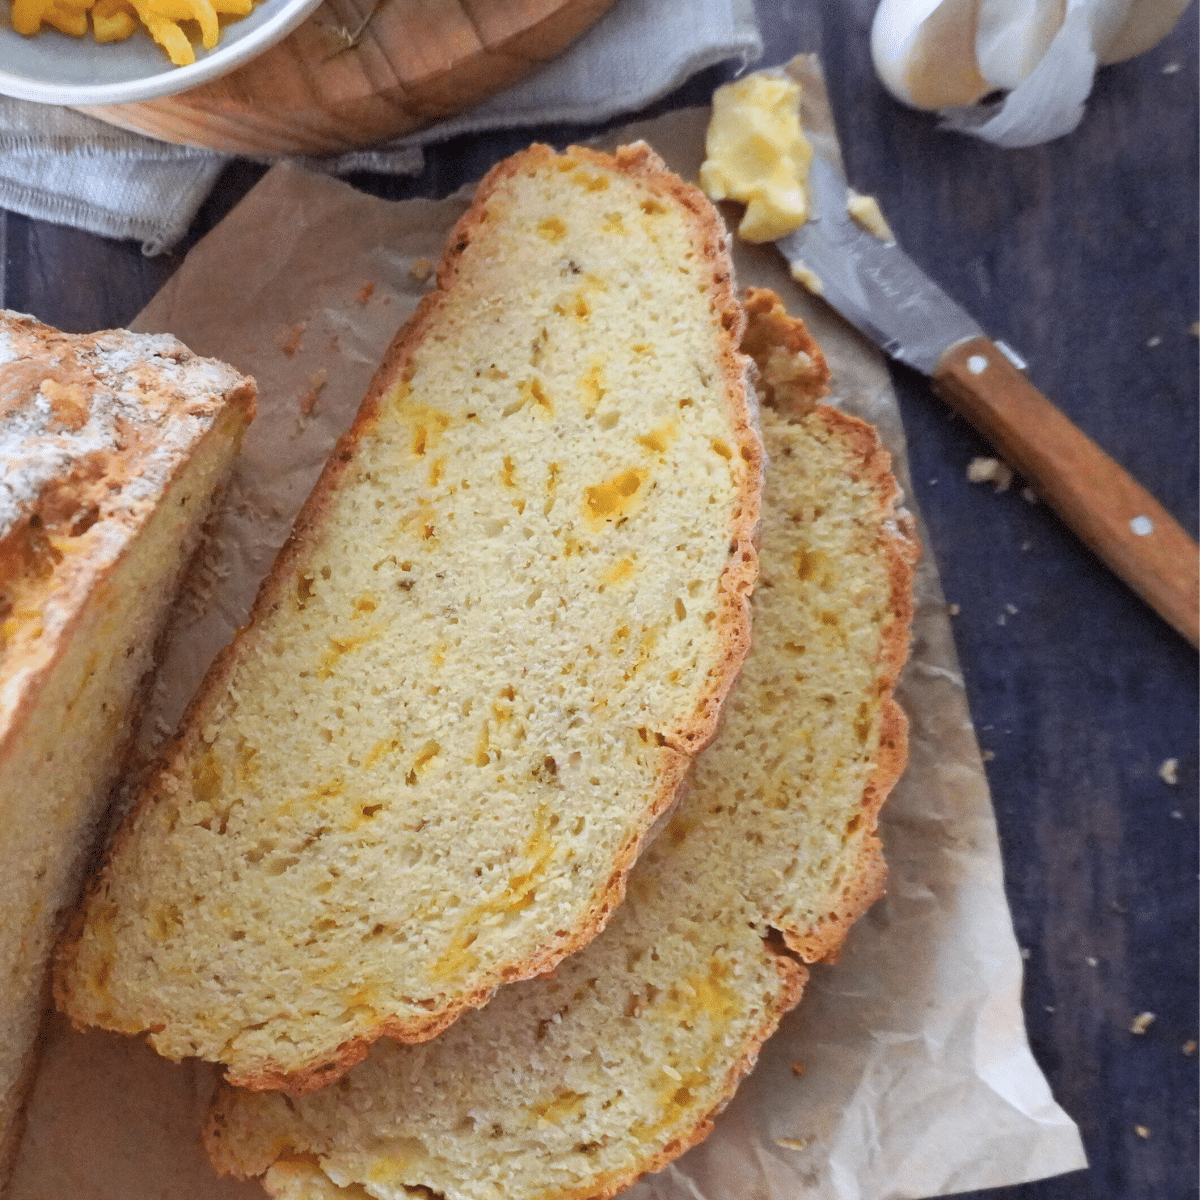
This Cheese and Garlic Irish Soda Bread is the perfect quick bread for when you're looking for something hearty and savory but don’t want to deal with yeast or kneading. Made with just a few simple ingredients, it combines the comforting flavors of cheese and garlic.
And the result - Rustic flavour, great crust, keeps well for days. Enjoy with soups, salads, or on its own slathered with butter. Plus, it's super easy, no fuss, no waiting, just bake and enjoy 😋
Visual Instructions
Here are step by step pictures so you can see what the mixture at each stage should look like.
The full printable recipe with amounts and instructions are at the end of this post.
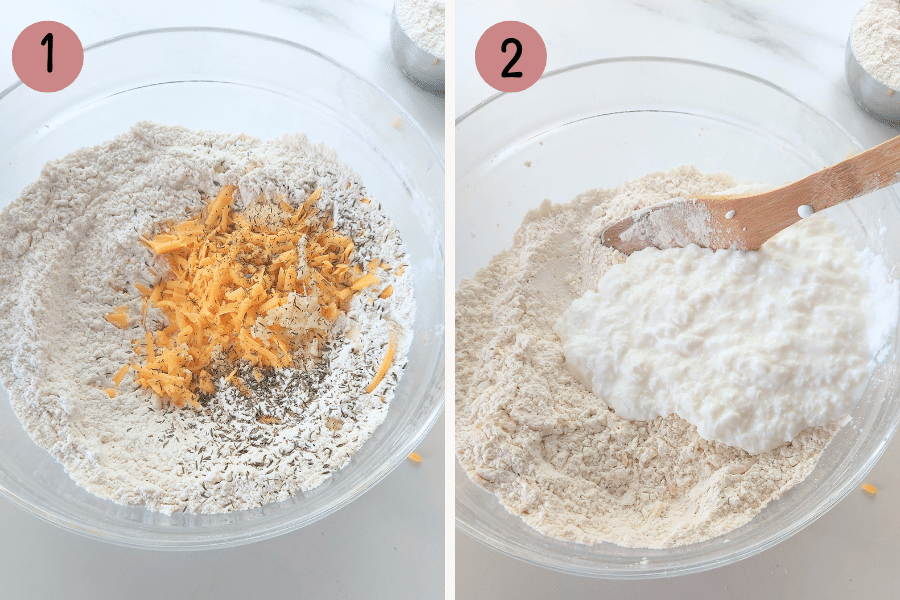
Steps 1 and 2: In a large bowl, whisk together all purpose (plain) flour, salt baking soda (bicarbonate of soda)shredded cheese, mixed herbs and crushed garlic. Then pour in the buttermilk.
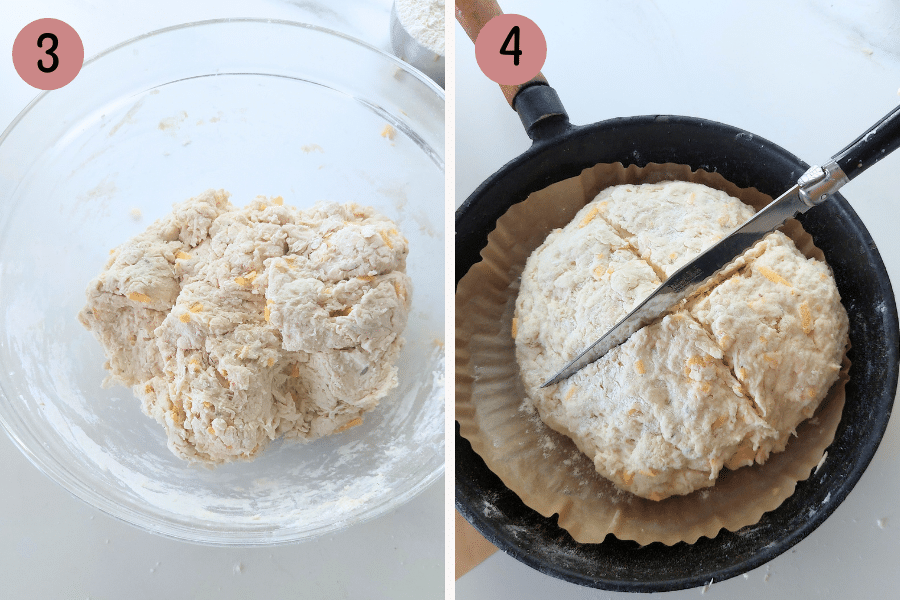
Step 3: Use a wooden spoon or your hands to mix the dough gently just until it forms a ball.
Step 4: Place the dough in a cast iron skillet, cookie sheet or 8 inch (20cm) round baking pan. Use a sharp knife to cut a large X into the top of the dough.
- Bake for 35-40 minutes or until the base sounds hollow when tapped in the middle.If the top starts to brown too quickly, cover it loosely with aluminum foil.
- Transfer to a rack and cool for at least 30 minutes before slicing.
Recipe notes
Use Very Cold Butter: Make sure your butter is straight from the fridge. Cold butter helps create a firmer dough that’s easier to work with.
Baking Pan options: Here are some options for pans you can use to bake your bread
- Shape the dough and place it on a lined large baking sheet.
- Use a 9-inch (23cm) cast iron skillet.
- Or opt for a greased and lined 8-inch (20cm) cake pan.
Buttermilk: Buttermilk is important in Irish soda bread because it reacts with baking soda, helping the bread rise and keeping it soft. If you don’t have buttermilk, here’s an easy substitute:
- For 2 cups (500ml) of buttermilk: Mix 2 tablespoons of vinegar or lemon juice with about 1 ¾ cups (420ml) of cold milk. Let it sit for 5 minutes to thicken.
- Using less milk in the substitute helps maintain the right dough consistency; otherwise, the dough will be too sticky.
- Whether using buttermilk or this substitute, make sure it’s cold for the best results.
Baking Soda Freshness: Baking soda also called Bicarbonate of soda is crucial in this recipe to help the bread rise since there's no yeast.
- Always use level teaspoons of baking soda to ensure the right amount—too much can give the bread a bitter taste, and too little will affect its rise.
- If you'd like to test its freshness, mix about ½ teaspoon of baking soda with a few drops of vinegar. It should fizz vigorously, if not, it’s time for a new box.
- Do not use baking powder as it won't work the same way in this recipe.
Why a Sticky Dough is Good for Irish Soda Bread
Keep in mind that a slightly sticky dough is perfectly normal and actually a good sign when making Irish soda bread. Here’s why:
- Tender Texture: A bit of stickiness means you haven’t overmixed the dough, which helps keep the bread tender and light.
- Moisture: The moisture in a slightly sticky dough contributes to a softer crumb in the finished bread.
- Flour Adjustment: If the dough is too sticky to handle, you can sprinkle a little extra flour on your work surface and your hands, but be careful not to add too much. Just ensure it's manageable. Over-flouring can make the bread dense.
Storing tips
- Room Temperature: Store your Irish soda bread in an airtight container or wrapped in plastic wrap at room temperature for up to 3 days.
- Refrigerator: You can keep it in the fridge for up to a week. Just make sure it's well-wrapped or stored in an airtight container to prevent it from drying out.
- Freezer: For longer storage, freeze the bread. It's best to slice it before freezing and separate the slices with parchment paper, so you can easily grab a piece without defrosting the entire loaf. Place the sliced bread in an airtight container or freezer-safe bag. It can last for up to 3 months.
Recipe
Cheese and Garlic Irish Soda Bread
- 3 ¾ cups (450g) all-purpose (plain) flour
- 1 ½ teaspoons salt
- 1 ½ level teaspoons baking soda (bicarbonate of soda) (see note 1)
- ¾ cup (75g) shredded or grated cheese (I used cheddar)
- 2 cloves garlic, crushed
- 1 teaspoon dried mixed herbs (Use any herb or mix like thyme, rosemary or oregano, )
- 2 cups (480ml) buttermilk (see note 2)
- Line your baking pan with parchment paper (baking paper) - see note 3 for baking pan options
- Preheat the Oven: Place the oven rack in the middle and preheat to 356°F (180°C) or 160°C for fan ovens.
- In a large bowl, combine the all purpose flour, salt, baking soda, shredded cheese, dried herbs, and crushed garlic.
- Pour in the buttermilk and mix gently with a wooden spoon or your hands until the dough forms a ball.
- Shape the Dough: Transfer the dough to a floured surface and pat it into a round shape about 6 inches (15 cm) in diameter and 1 ½ inches (4 cm) thick. It's okay if the dough feels a bit sticky (see note 4).
- Prepare for Baking: Place the dough in your prepared baking pan.Use a sharp serrated knife to cut a large X on the top of the dough.
- Bake: Bake for 40–45 minutes, or until the bottom sounds hollow when tapped. If the top browns too quickly, loosely cover it with aluminum foil.
- Cool and Slice: Let the bread cool on a rack for at least 30 minutes before slicing.
- Always use level teaspoons of baking soda to ensure the right amount—too much can give the bread a bitter taste, and too little will affect its rise.
- If you'd like to test its freshness, mix about 1 teaspoon of baking soda with a few drops of vinegar. It should fizz vigorously—if not, it’s time for a new box.
- Do not use baking powder as it won't work the same way in this recipe.
2) Buttermilk: Buttermilk is important in Irish soda bread because it reacts with baking soda, helping the bread rise and keeping it soft. If you don’t have buttermilk, here’s an easy substitute:
- For 2 cups (500ml) of buttermilk: Mix 2 tablespoons of vinegar or lemon juice with about 1 ¾ cups (420ml) of cold milk. Let it sit for 5 minutes to thicken.
- Using less milk in the substitute helps maintain the right dough consistency, otherwise, the dough will be too sticky. Whether using buttermilk or this substitute, make sure it’s cold for the best results.
3) Baking Pan Options: Here are some options for pans you can use to bake your bread:
- Shape the dough and place it on a lined large baking sheet.
- Use a 9-inch (23cm) cast iron skillet (pan).
- Or opt for a greased and lined 8-inch (20cm) cake pan.
4) Keep in Mind That a Slightly Sticky Dough is Perfectly Normal: This is actually a good sign when making Irish soda bread. Here’s why:
- Tender Texture: A bit of stickiness means you haven’t overmixed the dough, which helps keep the bread tender and light.
- Moisture: The moisture in a slightly sticky dough contributes to a softer crumb in the finished bread.
- Flour Adjustment: If the dough is too sticky to handle, you can sprinkle a little extra flour on your work surface and your hands, but be careful not to add too much. Just ensure it's manageable. Over-flouring can make the bread dense.
Scroll Up for the STEP by STEP Photos! Don't miss the process shots in the post above. Simply scroll up the post to find them. Those were created especially for you so that you can make the recipe perfectly every single time you try it.
Want even more delicious recipes? Subscribe free to receive new post notifications emailed to you. Or follow along on Facebook, Pinterest, and Instagram. If you love sharing recipes please come and join my All about cooking and baking Facebook group or Subscribe to my YouTube channel


Leave a Reply