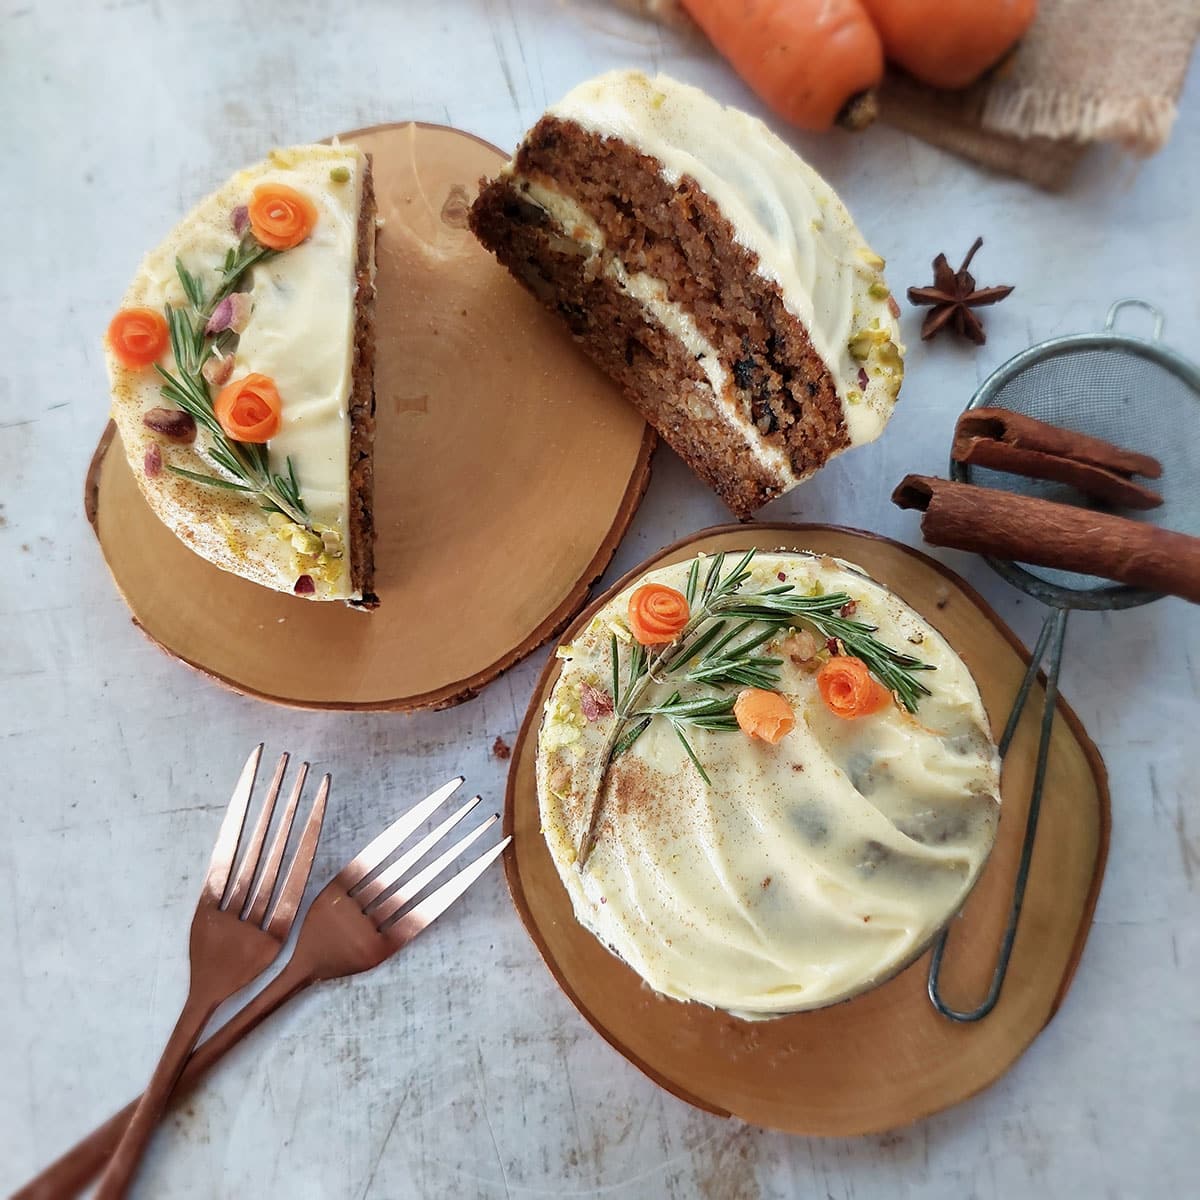
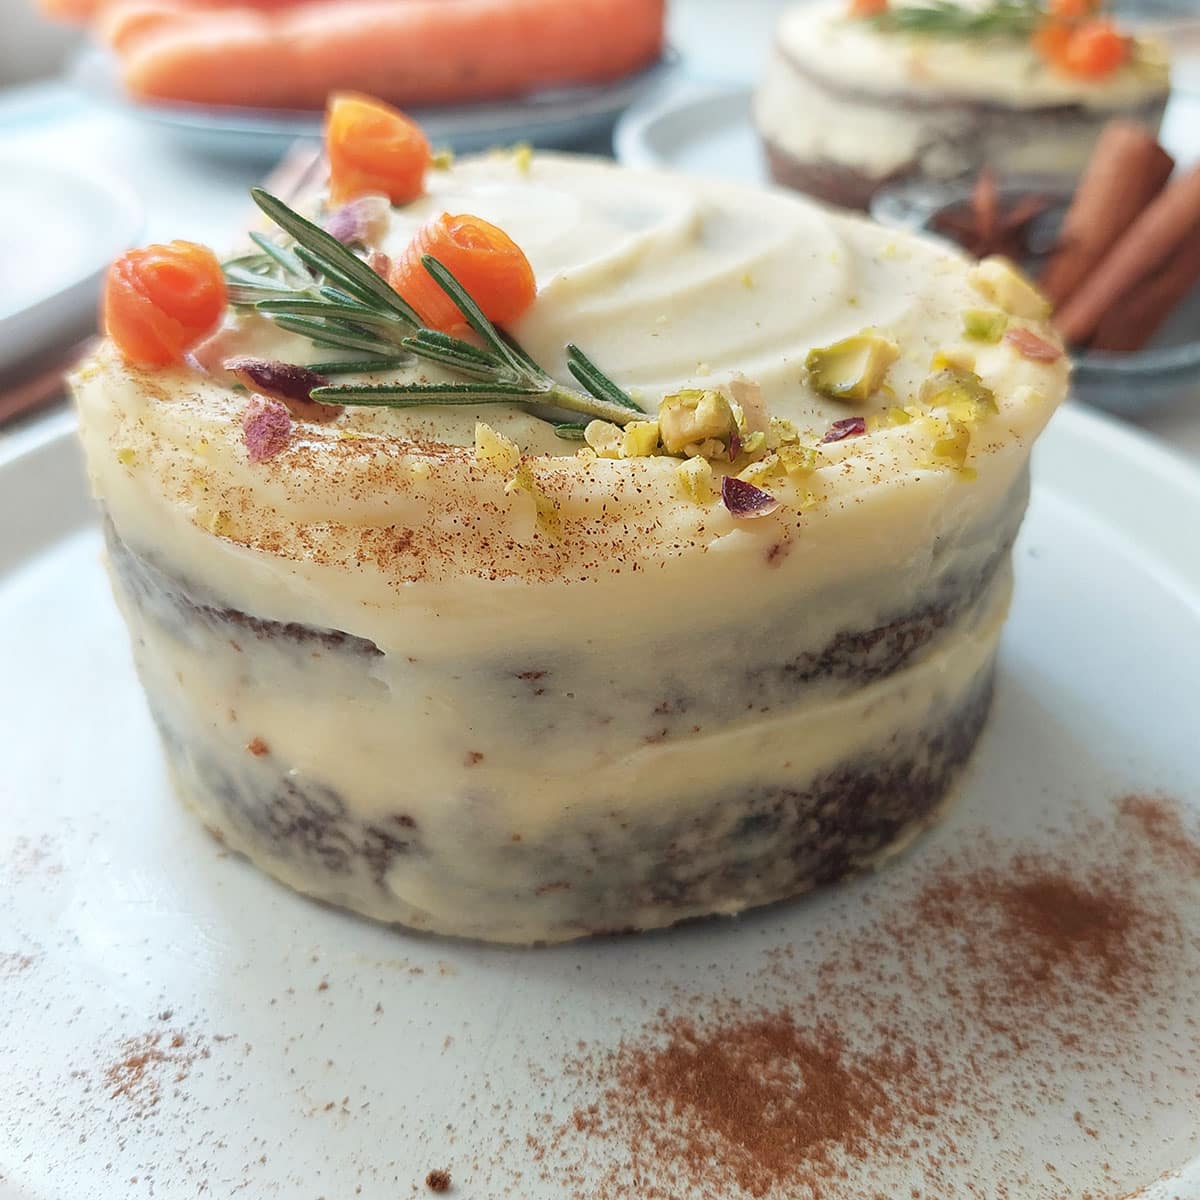
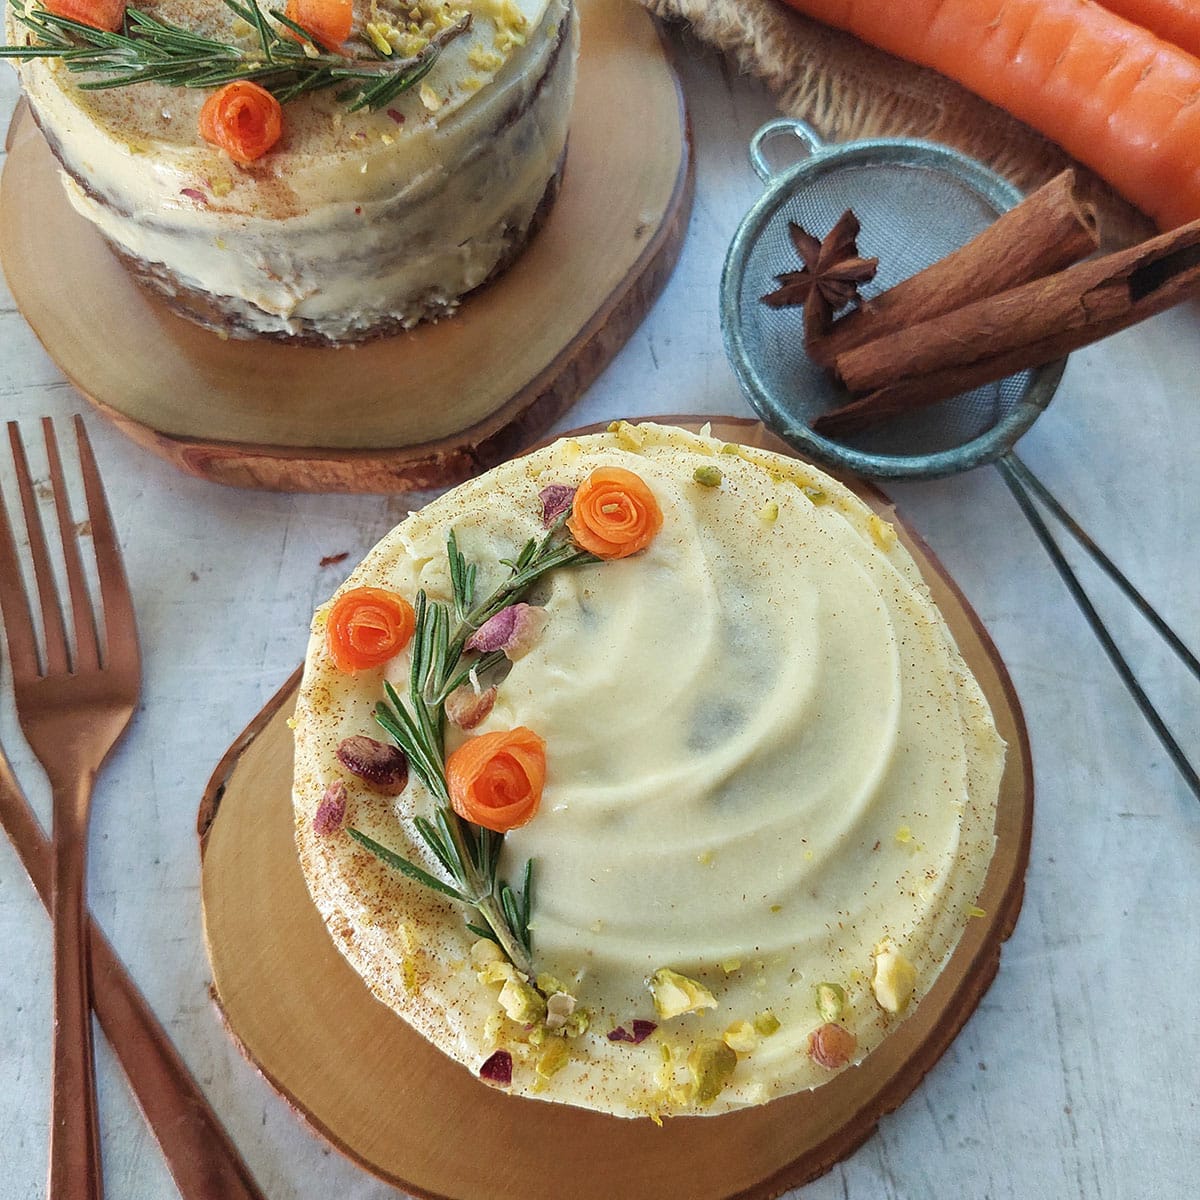
This Carrot Chai Cake is everything you love in a classic carrot cake - but with a twist. I've brewed chai tea bags in hot milk and whisked it into the batter to create a lusciously light and fluffy texture.
Topped with a delicious not-too-sweet cream cheese frosting, brings out the perfect combination of delectable flavors.
You will love this recipe especially...
If you'd like to give a carrot cake a try, but don't have any of the usual spices, then I've got the perfect solution with my delicious but simple Carrot Chai cake.
Most traditional Chai tea blends are a blend of black tea and strong spices, such as cinnamon, cardamom, cloves and ginger.
These are the staple ingredients used in Carrot cake. So to get that same great spice flavor, just brew a few tea bags in hot milk and add it to the batter!
Fragrant, soft and just so decadent, it's the perfect celebration cake, or anytime dessert.
How to make Carrot Chai Cake
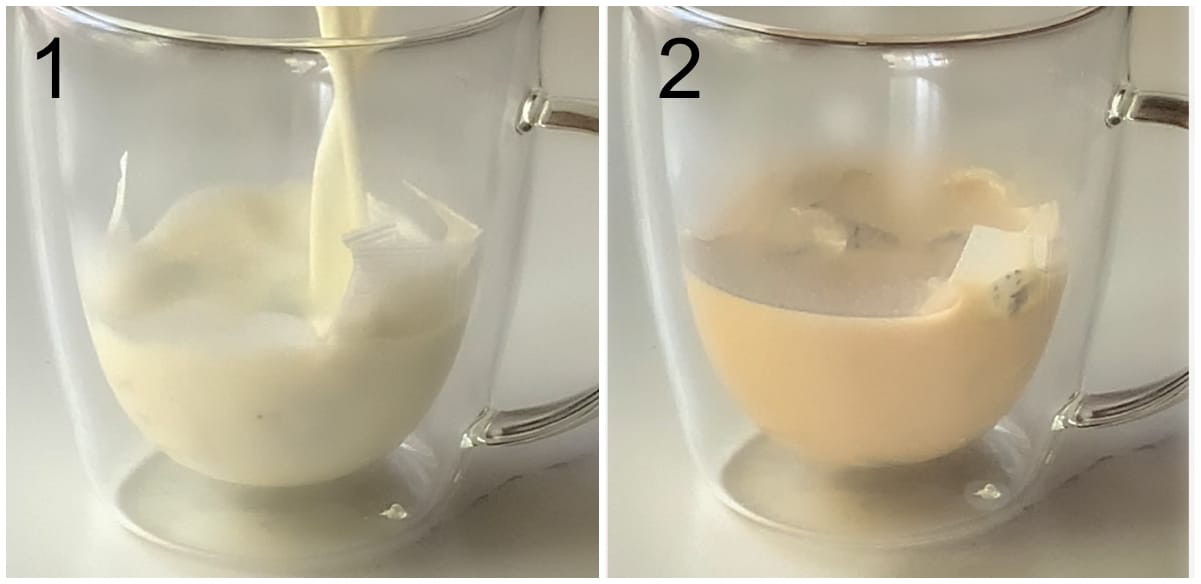
- Steep 3 Chai tea bags in hot milk.
- Leave to brew for 10 minutes, before discarding the tea bags.
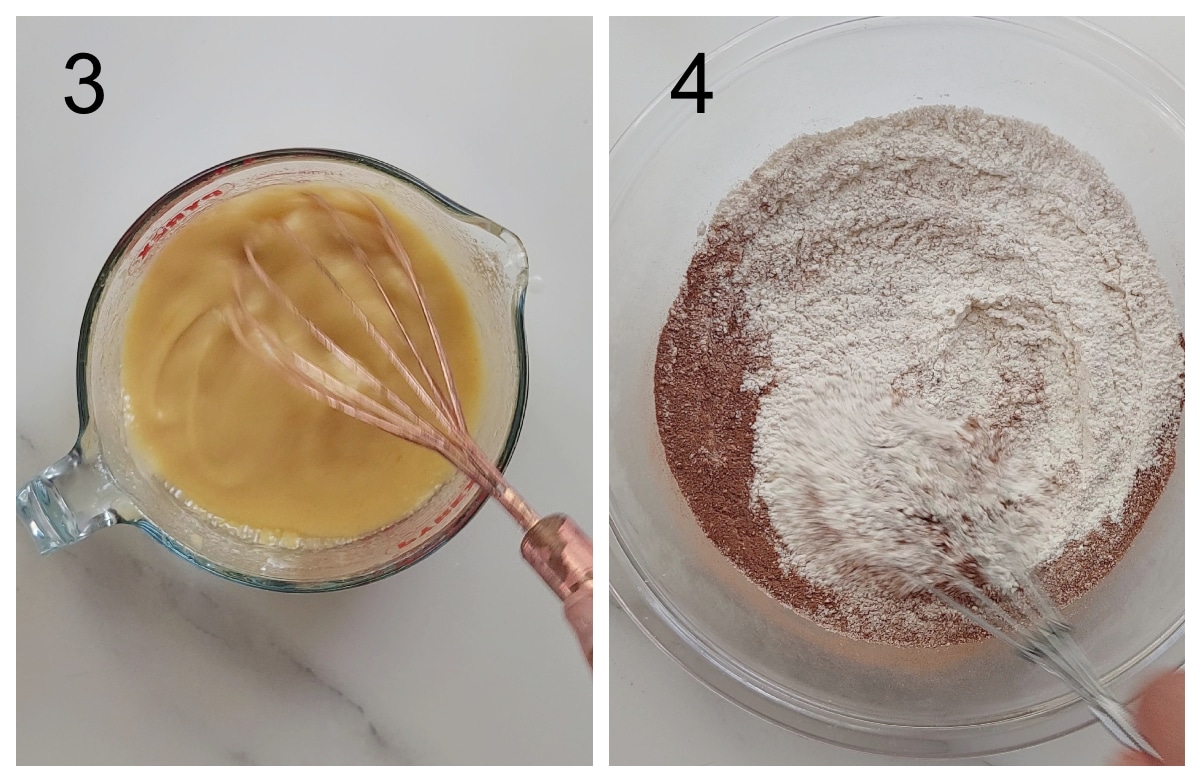
- Egg mixture: Combine the eggs, yogurt, brown sugar, vanilla extract and oil in a bowl.
- Flour mixture: In a separate bowl, whisk together the flour, baking soda, baking powder salt and ground cinnamon.
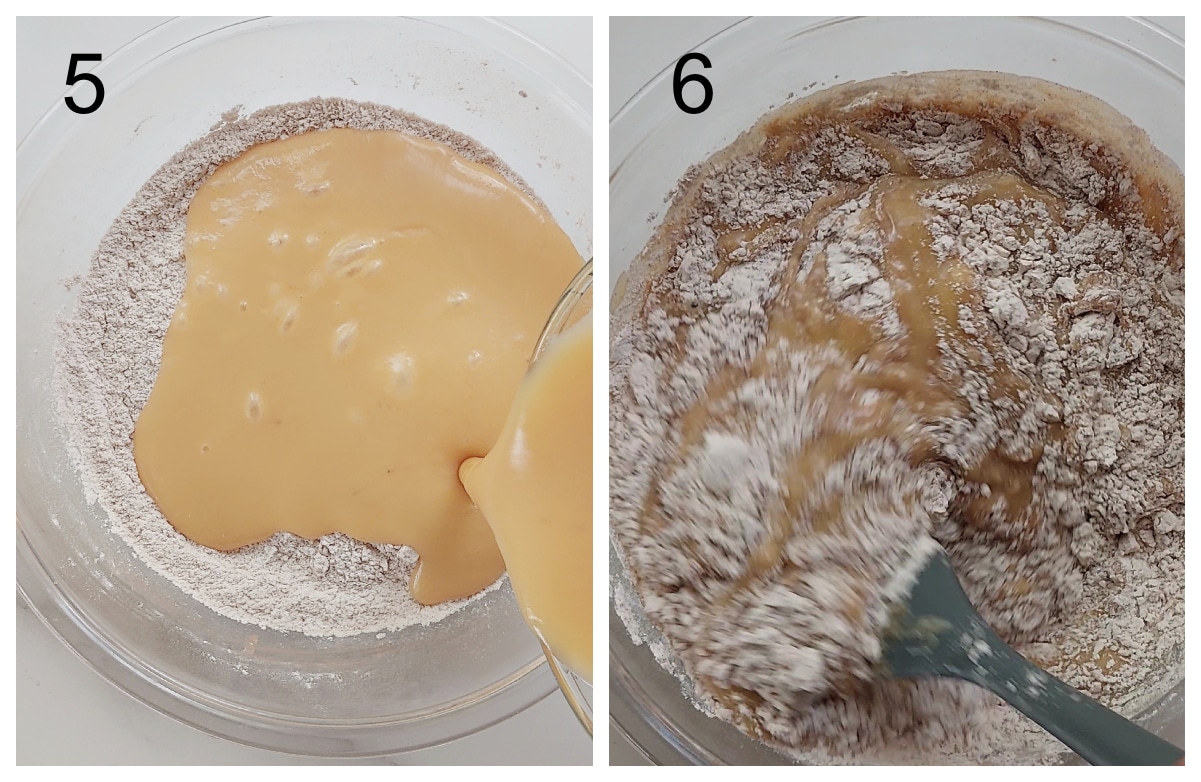
- Pour the egg mixture into the flour mixture.
- Mix until just combined or until no visible specks of flour in the batter.
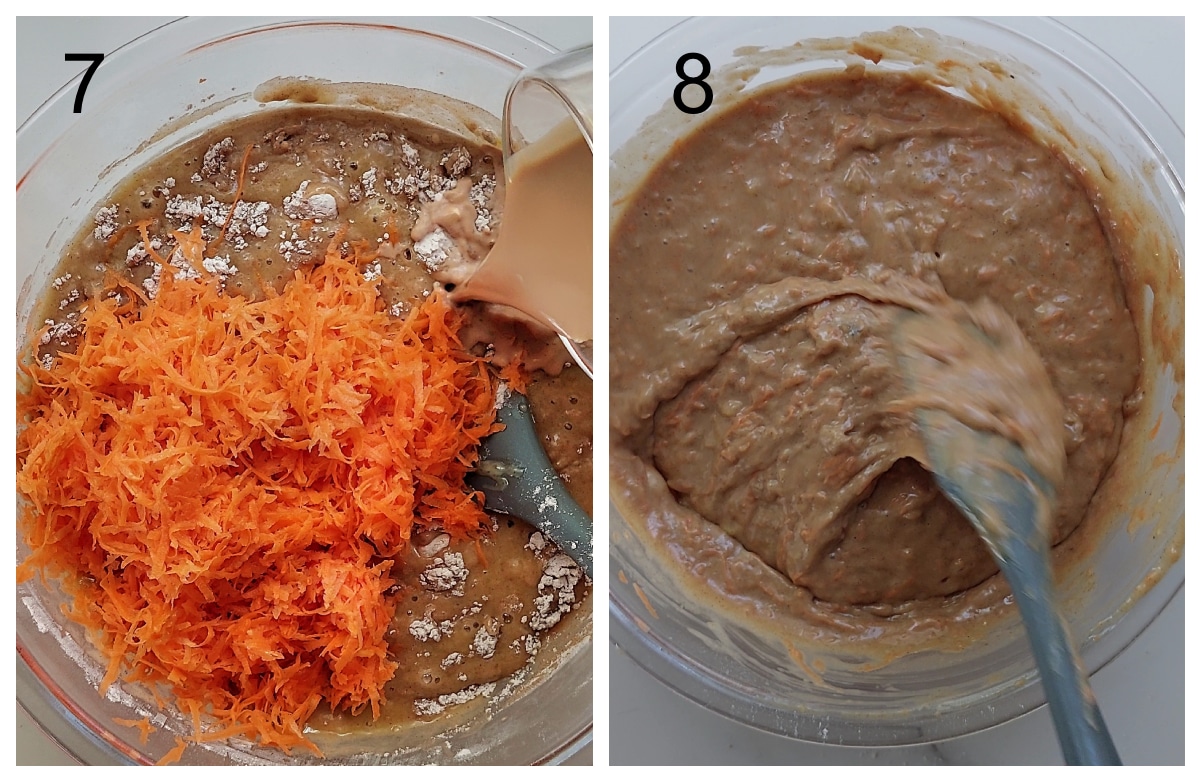
- Add the tea together with the shredded carrots, and walnuts (if using) to the batter.
- Fold in so they’re distributed evenly.
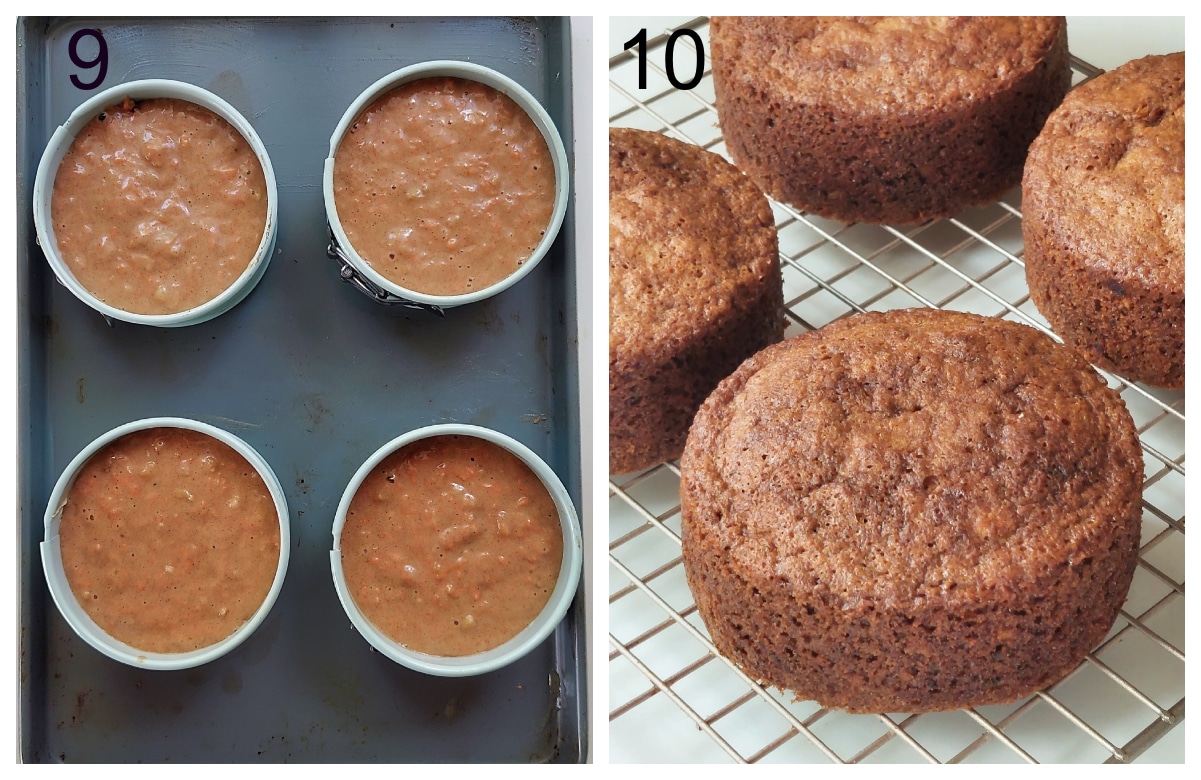
- Spoon the batter into greased and lined baking pans. (The recipe card below includes your preferred baking pan size together with the approximate baking time)
- Once baked, leave in the pan for 10 minutes, before turning out on to a rack to cool completely before frosting.
Make the cream cheese frosting
This cream cheese frosting has an amazingly creamy texture, with the perfect balance of tangy and sweet - pairing deliciously with this carrot chai cake.
Even though its made with much less powdered sugar than the regular cream cheese frosting, it has great stability - ideal for piping or spreading.
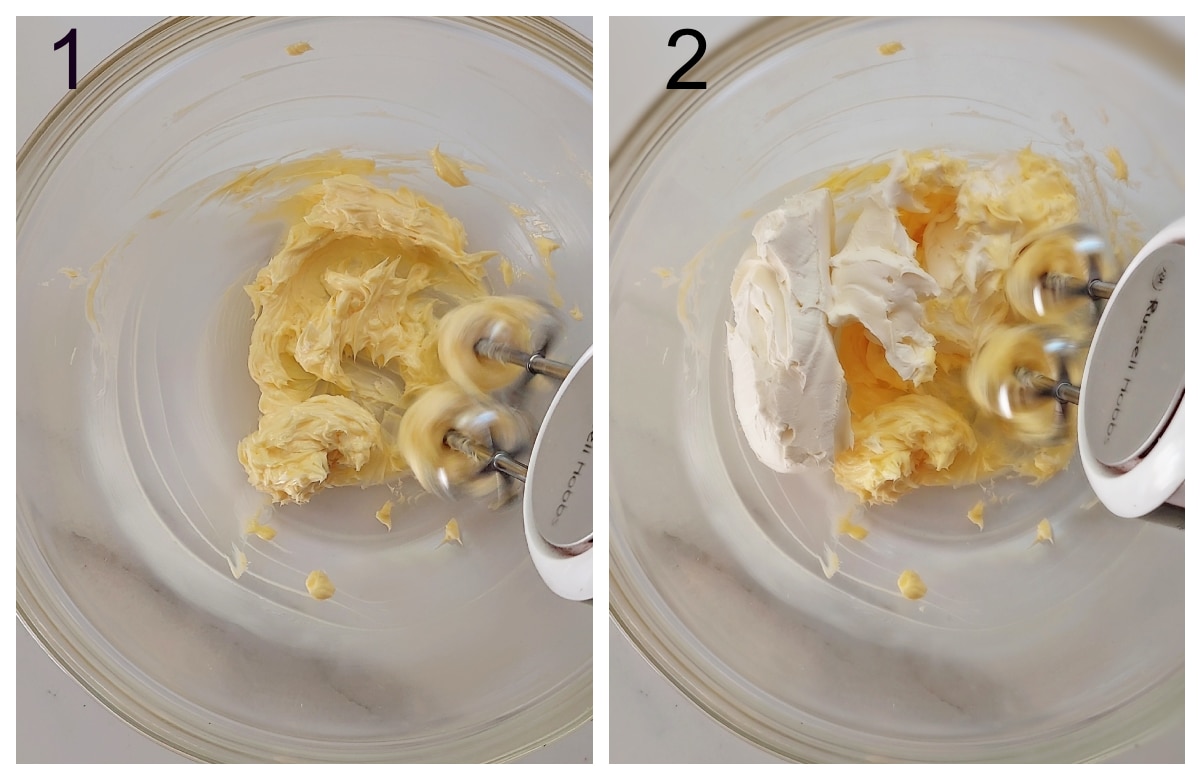
- Beat room temperature butter for about 30 seconds on in a bowl.
- Add cream cheese and beat for about a minute until smooth.

- Sift in the powdered sugar. (Sifting the powdered sugar gets rid of any tiny bits, making the frosting exceptionally creamy and smooth.)
- Beat on high speed for about 2 minutes for a smooth frosting. Chill the frosting for about 30 minutes so that it firms up. This makes it so much easier to work with, especially if you intend on piping the frosting

- Once cool, divide the cake in half (if preferred).
- Then fill, top, pipe and decorate to your heart's content.
Tips for making carrot chai cake
- I suggest using good quality Chai tea bags for this recipe. Read the ingredients listed on the packaging. It should contain a blend of black tea and spices, such as cinnamon, cardamom, cloves and ginger.
- I'd skip the tea bags labeled vanilla chai, since the vanilla taste tends to overpower the spices in the chai. it's better to add a bit of vanilla extract instead for the ideal balance.
- Adding nuts to this recipe is totally optional and can be omitted. However, if you prefer, pecans, walnuts or pistachio work well in this cake.
- If you can, go for the block of cream cheese instead of the tub. It's firmer, so you'll get a much more stable frosting.
- Refrigerate the prepared cream cheese frosting for about 30 minutes so that it firms up. This makes it so much easier to work with, especially if you intend on piping the frosting.
Cake pan sizes - General guide
Keep in mind that all ovens are different and the type of pan you use might affect how the heat is distributed.
For example, A dark metal pan absorbs and distributes heat more quickly than lighter-colored pans. So not only does the cake bake more quickly in a dark pan, its crust browns much faster.
| Baking pans -The batter is sufficient for the following: | Time to bake (350°F /180°C (160°C fan) |
|---|---|
| 6 x 4 inch (10cm) round mini pans | 25 to 30 minutes |
| 2 x 8 inch (20 cm) round baking pan | 25 to 30 minutes |
| 1x 9 inch (23cm) round pan | 30 to 35 minutes |
| 2 x 7 inch (18 cm) baking sheets (baked cake can be cut into rounds for mini cakes) | 20 to 25 minutes |
Enjoy ♡
Carrot Chai cake - (with not-too-sweet cream cheese frosting)
For the cake
- 3 chai tea bags
- ½ cup hot milk
- 2 cups cake or all purpose flour
- 2 level teaspoons baking soda (bicarbonate of soda)
- 2 level teaspoons baking powder
- ½ teaspoon salt
- 2 teaspoons cinnamon
- 4 large eggs
- ¾ cup plain unflavored yogurt or buttermilk
- 1 ¼ cups brown or white granulated sugar
- 1 teaspoon vanilla extract
- 1 cup vegetable or canola oil
- 2 cups shredded (grated) carrots
- 1 cup chopped nuts optional
For the cream cheese frosting
- ½ cup butter room temperature
- 8 oz cream cheese (taken out of the refrigerator 10 minutes before using)
- 1 cup powdered sugar sifted
For the cake
- Set the oven temperature to 350°F /180°C (160°C fan) five minutes before putting the cake into the oven.
- Line the cake pans with parchment paper. (I used six 4 inch (10cm) round mini pans) - see notes below or in post above for alternate baking pan sizes)
- Stir the Chai tea bags in hot milk.
- Leave to brew for 10 minutes, before discarding the tea bags.
- Flour mixture: Whisk together the flour, baking soda, baking powder, salt and cinnamon.
- Egg mixture: In a separate bowl, combine the eggs, plain unflavored yogurt, sugar, vanilla extract and oil.
- Pour the egg mixture into the flour mixture.
- Mix until just combined or until there are no visible specks of flour in the batter.
- Add the tea together with the shredded carrots, and nuts (if using) to the batter.
- Fold in so they’re distributed evenly.
- Divide the batter evenly into the prepared baking pans.
- Bake for about 25 to 30 minutes, or until a skewer inserted comes out clean.
- Leave in the pan for 10 minutes, before turning out on to a rack to cool completely before frosting.
For the cream cheese frosting
- Beat room temperature butter for about 30 seconds in a bowl.
- Add cream cheese and beat for about a minute until smooth.
- Sift in the powdered sugar. (Sifting the powdered sugar gets rid of any tiny bits, making the frosting exceptionally creamy and smooth.)
- Beat on high speed for about 2 minutes for a smooth frosting.
- Chill the frosting for about 30 minutes so that it firms up. This makes it so much easier to work with, especially if you intend on piping the frosting.
To assemble
- Once cool, divide the cake in half (if preferred).
- Spread the frosting to fill and pipe or spread around the cake.
- Decorate as you prefer.
Storage
- Because of the cream cheese frosting, it's always best to store the cake in the refrigerator until ready to serve. Leaving the frosted cake at room temperature for more than a day causes the cream cheese to melt or separate - Especially if your kitchen is warm
- The cake can be refrigerated in an airtight container for up to 3-4 days.
- Unfrosted, the cake can be frozen for up to 1 month.Defrost completely before using.
- 6 x 4 inch (10cm) round mini pans ( bake for 25 to 30 minutes)
- 2 x 8 inch (20 cm) round baking pan - ( bake for 25 to 30 minutes
- 1x 9 inch (23cm) round pan (bake for 30 to 35 minutes)
- 2 x 7 inch (18 cm) baking sheets (bake for 20 to 25 minutes - baked cake can be cut into rounds for mini cakes)
Carrot rose decoration
If you love these cute carrot rose decorations on the cake, it's super easy to make.
- Simply combine equal amounts of sugar and water. (I used ½ a cup of sugar and ½ cup water) Place it on the stove on medium heat for about 5 minutes to thicken and form a syrup.
- Take the pot of the stove and allow the syrup to cool for a bit. Then drop strips of carrot into the syrup. Leave to soften for 2 to 3 minutes. Drip out the excess syrup.
- Twirl one carrot strip at a time around a skewer sprayed with non stick cooking spray. Gently remove the twirled rose like carrot and leave to dry for a few minutes before placing on the cake.
- If you would like a bit more detail, let me know in the comments below. I'll be happy to make up a quick visual, guiding you through the steps. You'll be notified as soon as it's posted 🙂
Want even more delicious recipes? Subscribe free to receive new post notifications emailed to you. Or follow along on Facebook, Pinterest, and Instagram. If you love sharing recipes please come and join my All about cooking and baking Facebook group or Subscribe to my YouTube channel


Carolyn M Snyder says
Please send more details or tips for making carrot "roses".
The Gardening Foodie says
Hi Carolyn, sure here are a few tips for making the carrot roses.
Choose Your Carrots:
Select fresh carrots that are relatively straight and have a consistent thickness. This will make it easier to create uniform carrot strips.
Prepare the Carrots:
Wash and peel the carrots to remove any dirt or rough outer skin. You'll need the peeler to create long, thin strips from the carrots.
Create Carrot Strips:
Use the vegetable peeler to create thin, long strips from the carrots. Hold the carrot firmly and peel along its length. Aim for strips that are around 2-3 inches wide.
Blanch the Carrot Strips:
To make the carrot strips more pliable and easier to shape, blanch them quickly. Bring a pot of water to a boil, then carefully add the carrot strips for about 20-30 seconds. This will slightly soften them. Immediately transfer the blanched strips to a bowl of ice water to cool and stop the cooking process. Let them sit in the ice water for a minute, then drain them and pat them dry with paper towels.
Assemble the Carrot Roses:
Lay out a carrot strip horizontally on your work surface. Starting at one end, gently roll the strip in a spiral pattern to create the center of the rose. Keep rolling the strip around the center, gradually spiraling outward to create the petals of the rose. As you go, use your fingers to shape the petals and adjust the tightness of the roll. You can use a toothpick to secure the end of the strip in place.
Secure the Rose:
Once your rose is formed, use a toothpick to secure the end of the strip to the rose. Insert the toothpick through the base of the rose and into the carrot strip to hold it in place.
Repeat the Process:
Repeat the process to create as many carrot roses as you need.
Remember, creating carrot roses might take a bit of practice, so don't be discouraged if your first attempts aren't perfect.
I hope this helps
Happy baking 😊