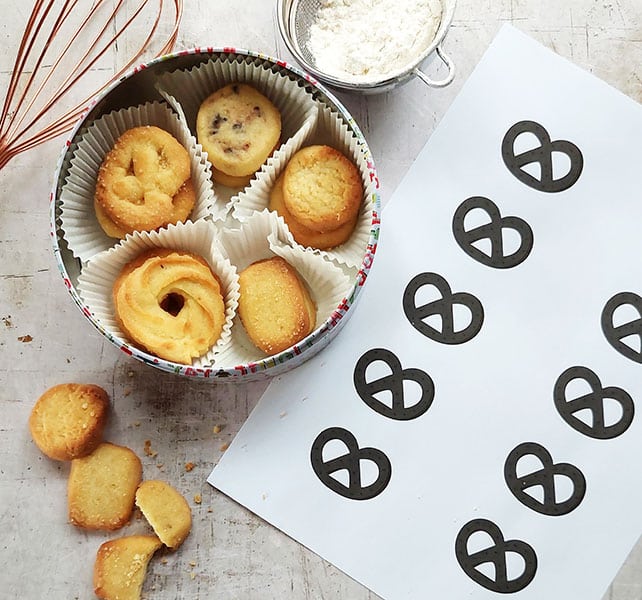
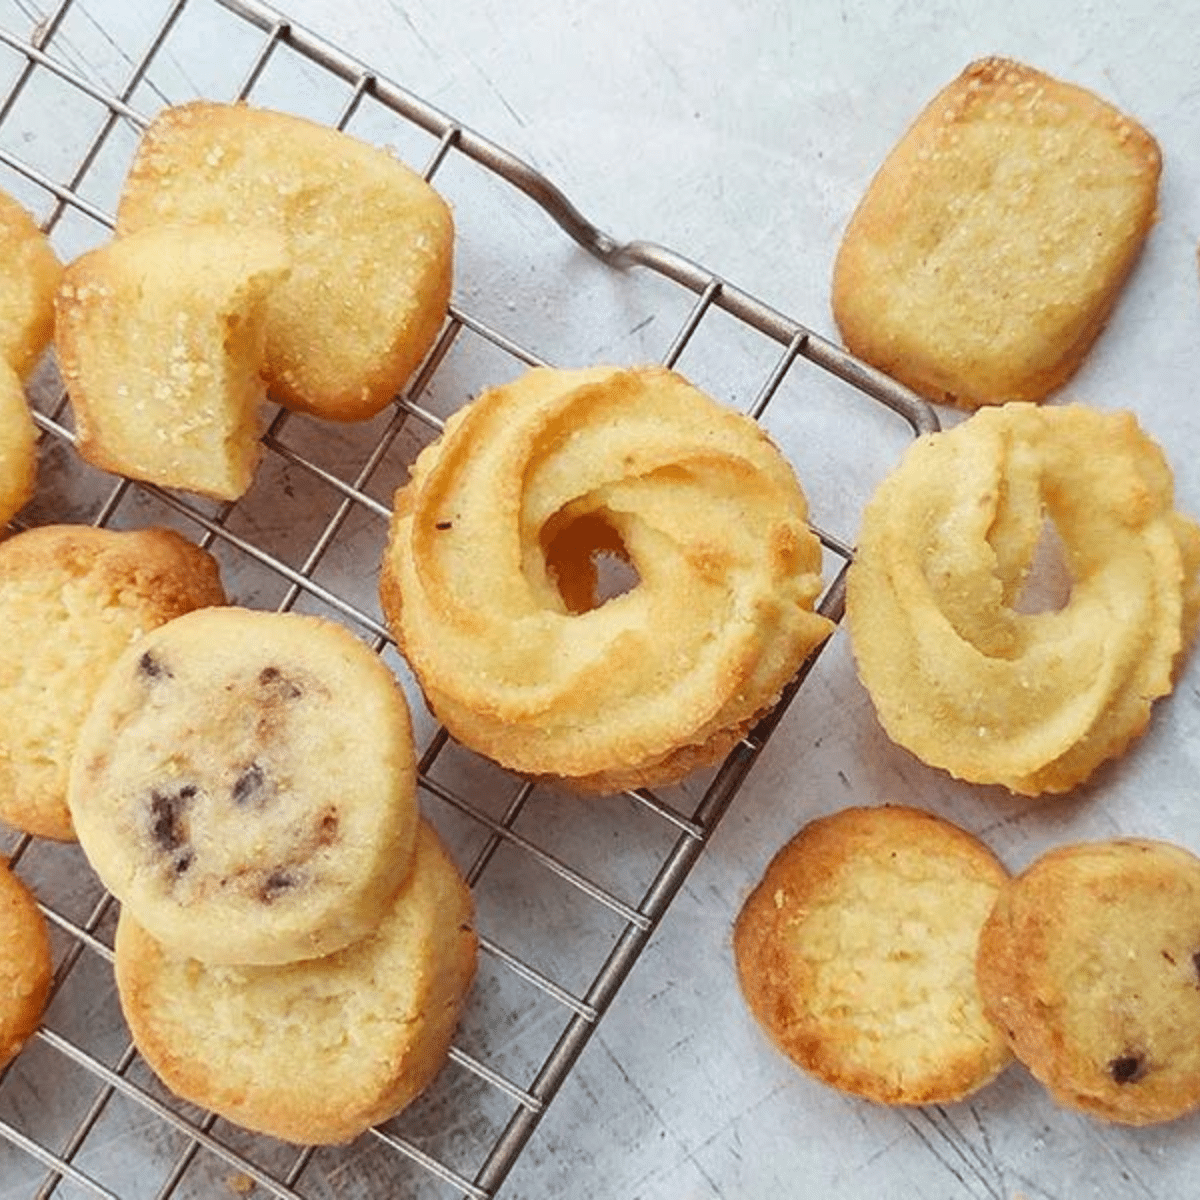
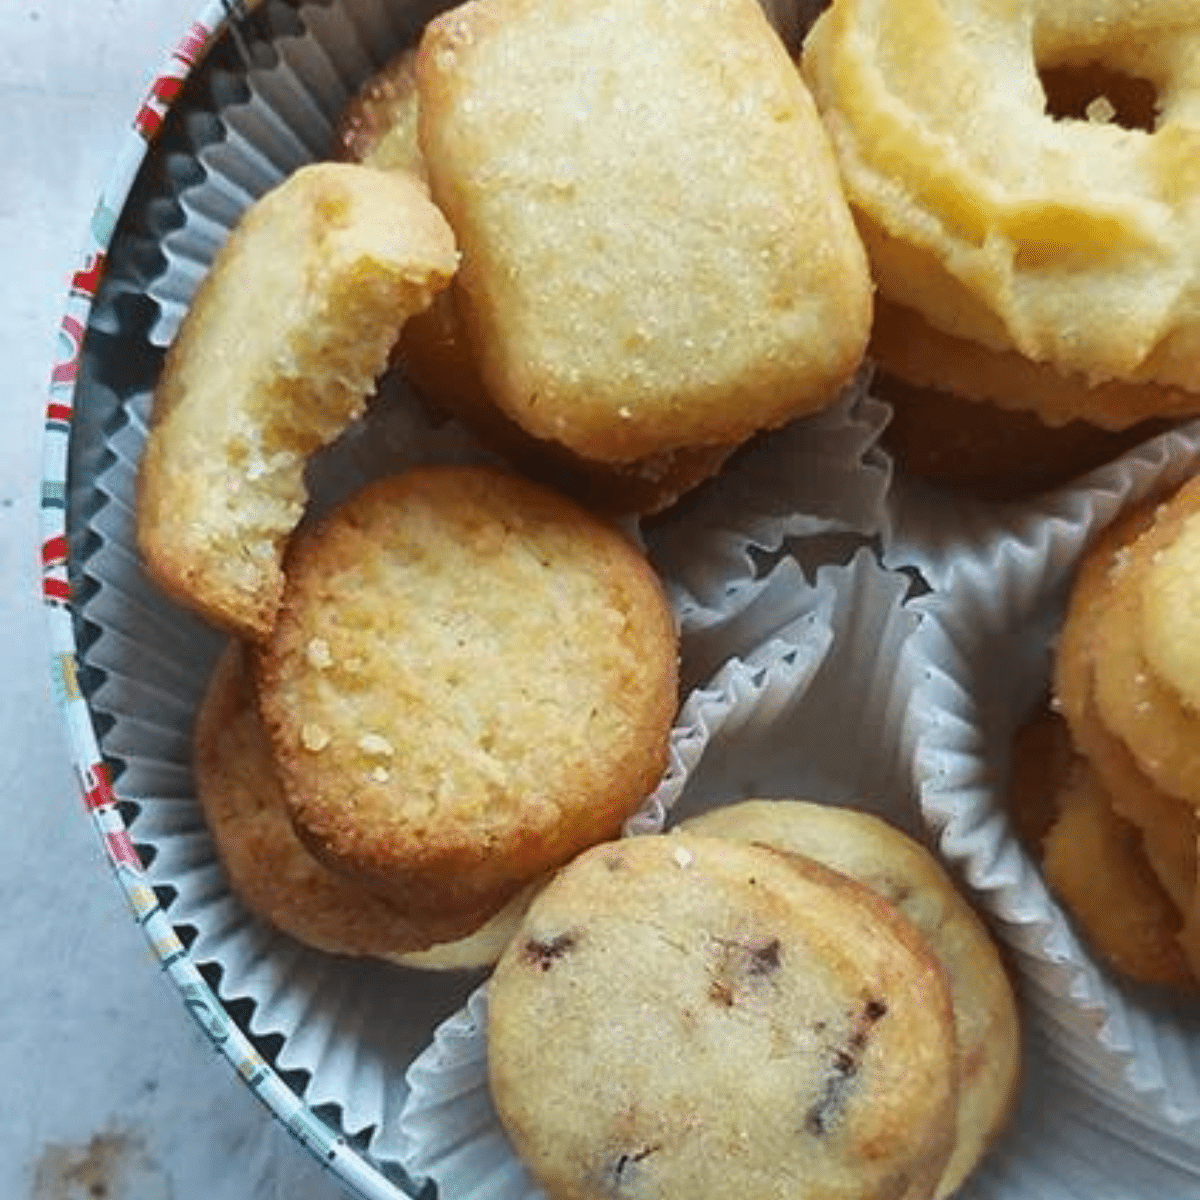
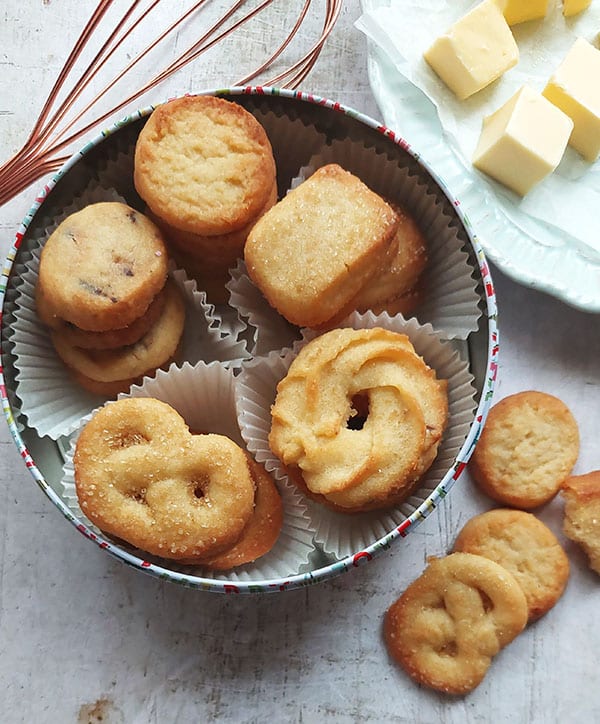
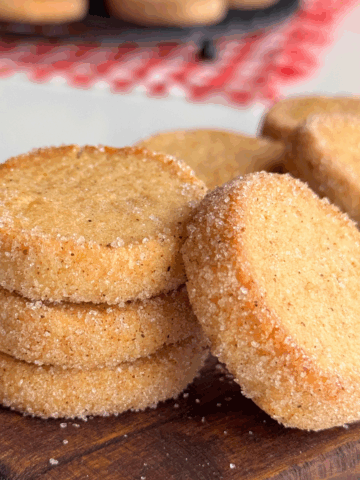
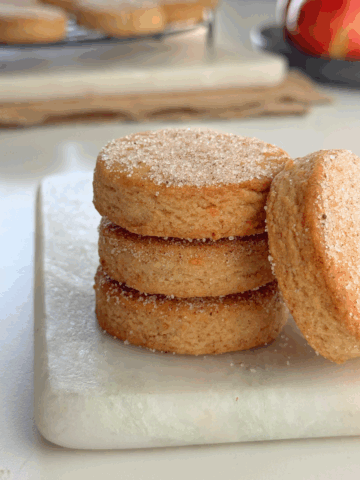
These assorted Danish Butter Cookies are made using one dough with 5 variations. Inspired by the classic Royal Danish butter cookie tins these include vanilla ring, the pretzel cookie, country style, coconut and rectangular sugar sprinkled cookie.
Whichever is your favourite, use this easy recipe to make them all in one batch of cookie dough.
Crisp, buttery and delicious, these cookies are egg free and super easy to make. Serve when entertaining guests, share as gifts or enjoy as an anytime, any day snack.
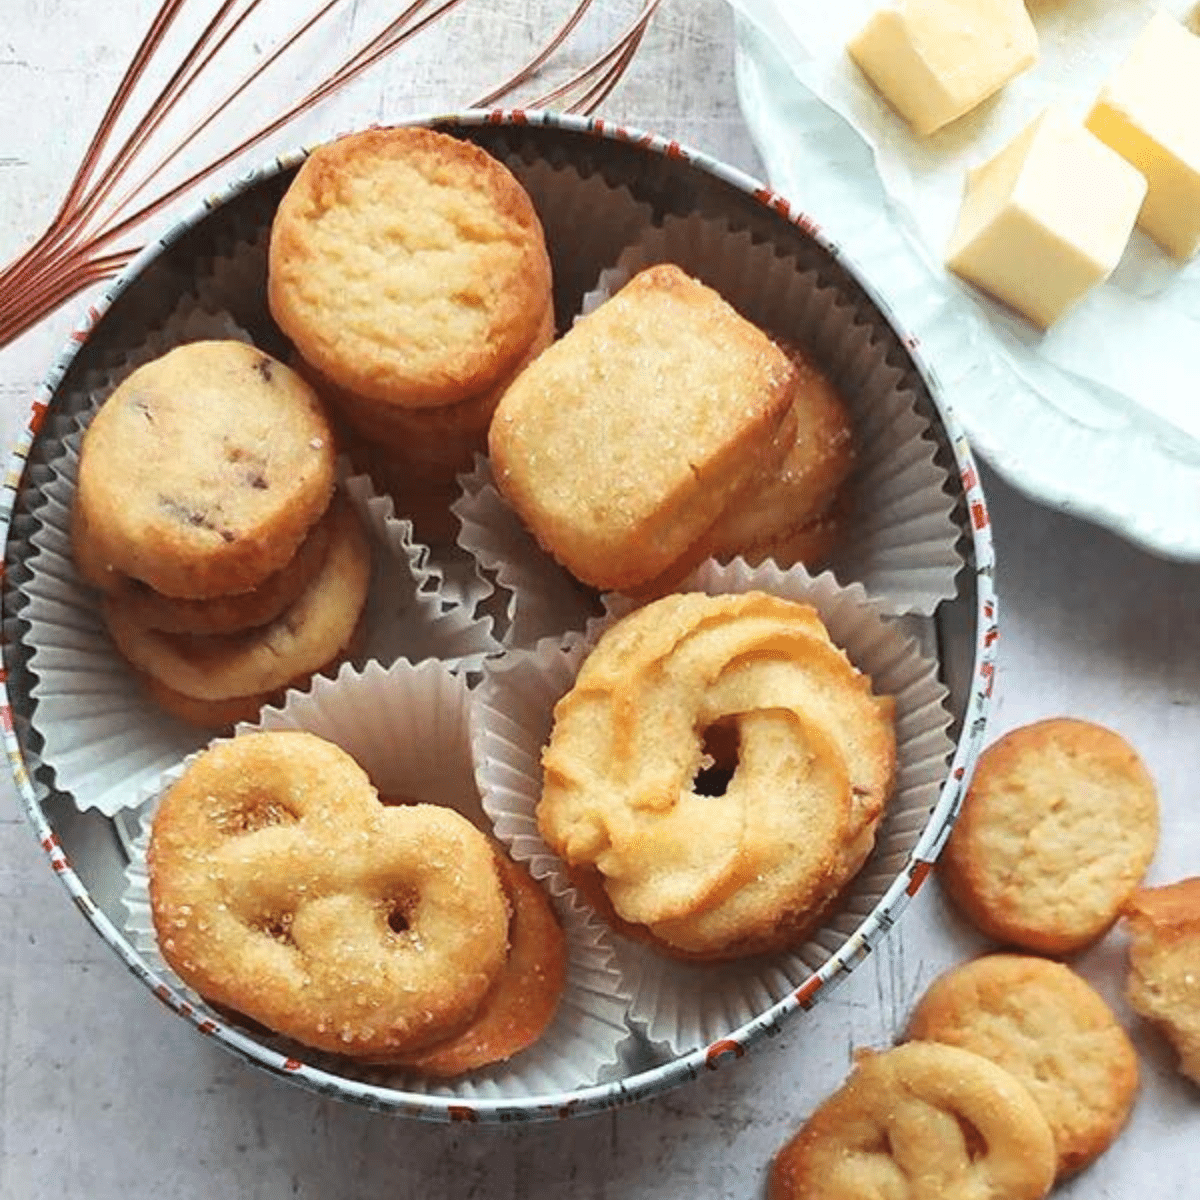
One dough - 5 variations
For this recipe, I used my Danish Butter cookie dough as a base to bake up the classic assortment of melt in your mouth deliciousness.
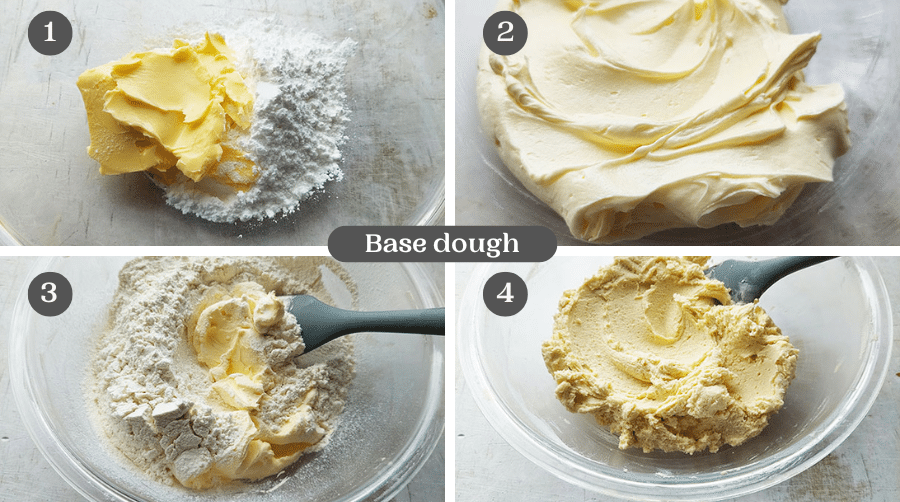
The base dough
NOTE: Visual guide only - full recipe with ingredient amounts and instructions at the end of this post
- Get the butter out of the refrigerator at least an hour before baking. It should be soft to the touch, but not melted.
- Cream the butter, sugar and vanilla extract with a handheld or stand mixer for 5 to 8 minutes. The creamed butter and sugar should be light in color and fluffy in texture.
- Sift the flour into the dough and fold it gently into the creamed butter mixture.
- Soft dough
Divide the base dough into 5 equal portions
If you do have a kitchen scale, you can weigh out all your dough and divide it into 5 equal portions. I weighed out my dough to get 5 portions each weighing 110 grams each.
Or you could estimate the size/amount of each portion without a kitchen scale. Place each portion in a separate bowl.
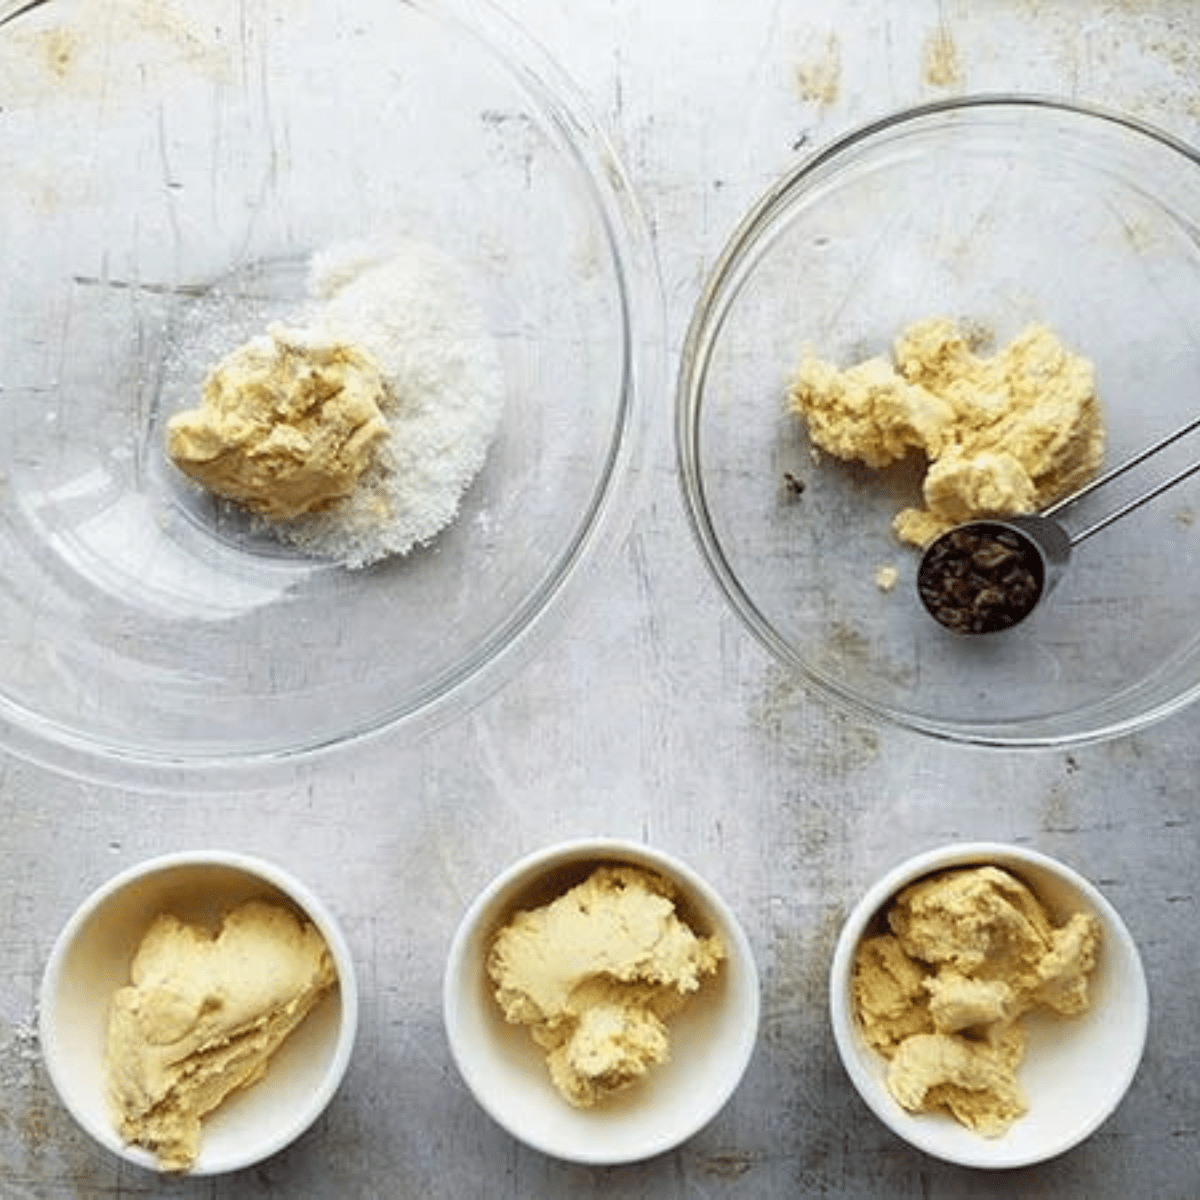
Flavoring and shaping
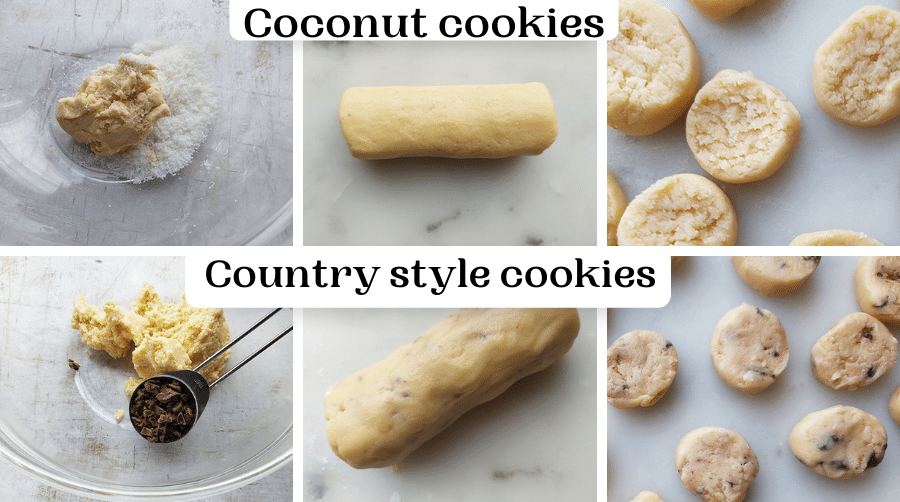
Coconut cookies and Country style cookies
NOTE: Visual guide only - full recipe with ingredient amounts and instructions at the end of this post
- Add 2 Tablespoons of fine, unsweetened shredded (desiccated) coconut to one portion of the dough and 1 Tablespoon chopped chocolate to another portion. Mix it in until evenly distributed.
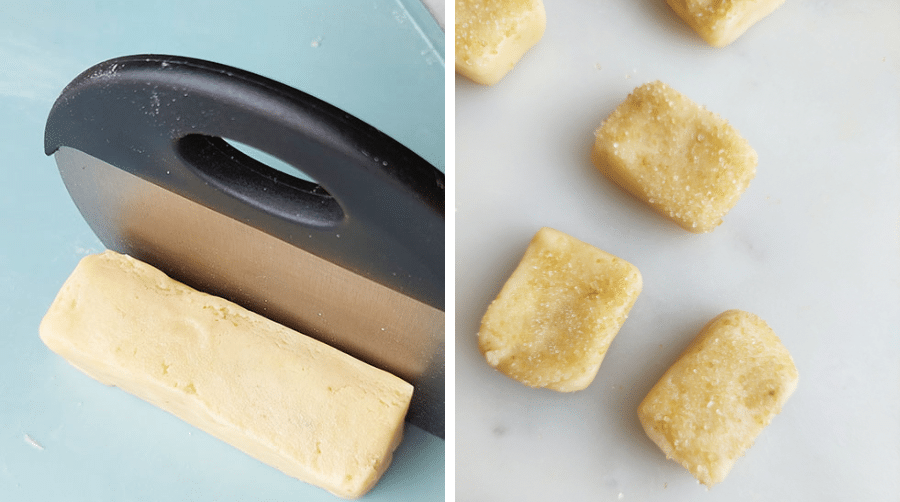
- Roll out each portion to form a log 4 inch (10cm)long and 1 ¼ inch (3cm thick)
- You can either wrap the log in plastic wrap or leave unwrapped on a baking sheet.
- Chill the shaped log for 30 minutes in the fridge.
- Once the dough is chilled solid, they can be sliced into 0.4 (⅖) inches (1 cm) thick disks, and place on baking sheet (makes approximately 10 to 11 slices with 1 portion of the dough)
- Bake immediately after slicing. The dough should still be very cold when placed in the oven. This will prevent it from spreading too much and losing its shape.
rectangular sugar sprinkled cookie
NOTE: Visual guide only - full recipe with ingredient amounts and instructions at the end of this post
- Roll the dough to form a log 4 inch (10cm)long and 1 ¼ inch (3cm thick)
- Using a dough scraper or something similar, push and shape the dough into a rectangular log shape. Alternately you can place the dough between 2 sheets of parchment paper or wax paper. Use a rolling pin to roll the dough to 3/16" inch (5mm) thickness. Cut the dough approximately 3cm long x 2cm wide forming rectangular cookies.
- Chill the shaped log/or cut out cookies for 30 minutes in the fridge.
- If you formed the dough in a rectangular log: Slice the chilled log into Slice into 0.4 (⅖) inches (1 cm) thick disks, and place on baking sheet. (makes approximately 10 to 11 slices with 1 portion of the dough)
- Bake immediately after slicing. The dough should still be very cold when placed in the oven. This will prevent it from spreading too much and losing its shape.
Vanilla ring
NOTE: Visual guide only - full recipe with ingredient amounts and instructions at the end of this post
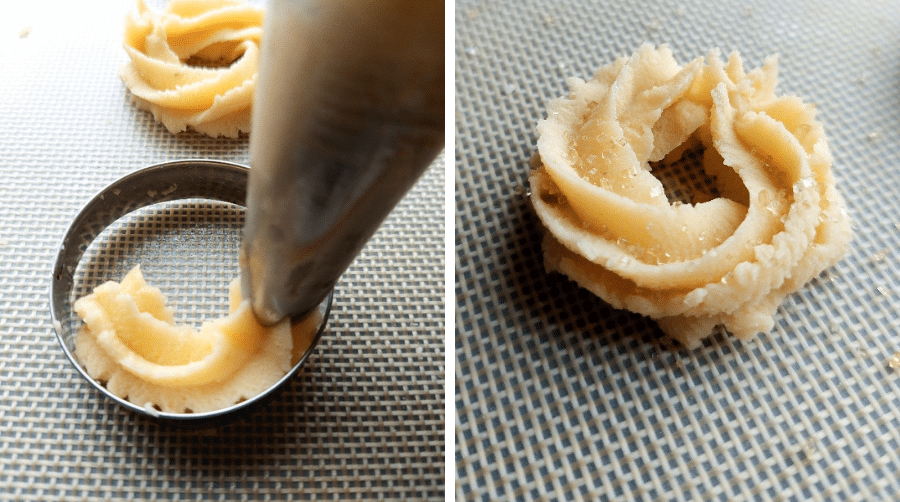
Place the dough in a piping bag fitted with a 1M nozzle
Pipe the dough on a baking pan lined with parchment (baking) paper. If you feel that the dough is too stiff or hard to pipe, then just add a teaspoon at a time of warm milk to the dough. This will make the dough softer and easier for you to pipe
Top tip: For even size cookies, pipe the dough around the inner ring of a 2 inch (5cm) round cookie cutter.Place the baking pan with the piped-out cookies in the fridge for 30 minutes.
Once chilled, transfer the lined baking pan with the shaped cookies directly from the fridge to the preheated oven.
The piped cookie dough should still be very cold when placed in the oven. This will prevent it from spreading too much and losing its shape.
Pretzel shaped cookies
NOTE: Visual guide only - full recipe with ingredient amounts and instructions at the end of this post
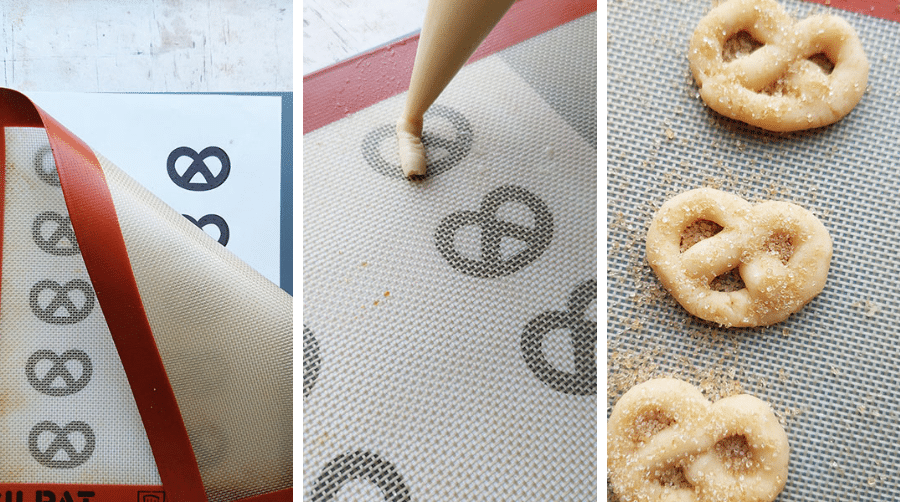
Place the dough in a piping bag.
Cut ⅜ inch (10mm) opening at the end of the piping bag.
If you are using my free printable pretzel template then simply place on a baking pan, under your baking paper or silicone baking mat and pipe your dough, tracing along the shape. This will give you the perfect spacing on your baking pan and consistent pretzel cookie shapes.
If you feel that the dough is too stiff or hard to pipe, then just add a teaspoon at a time of warm milk to the dough. This will make the dough softer and easier for you to pipe
Place the baking pan with the piped-out cookies in the fridge for 30 minutes.
Once chilled, transfer the lined baking pan with the shaped cookies directly from the fridge to the preheated oven.
The piped cookie dough should still be very cold when placed in the oven. This will prevent it from spreading too much and losing its shape.
Free Printable Cookie Template
Frequently asked questions
The butter should be at room temperature before baking. It should be soft enough that your finger will easily make an imprint but not so warm that the butter looks shiny or greasy.
Referring to the country style and coconut cookies: Sometimes when slicing the chilled cookie log, you will find the bottom flattens. So you get somewhat of a half circle with a flattened bottom.
Easy fix: Place your chilled cut out cookie into larger round cookie cutter. Hold on to the cookie cutter swirling it around gently. As you swirl, you will see the cookie taking on a perfectly rounded shape. 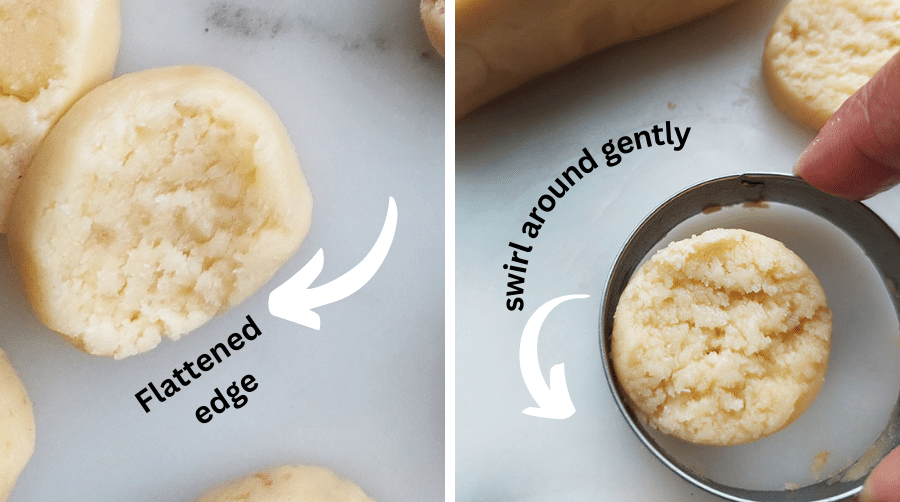
For these cookies, you want to decorate with large sugar crystals instead of castor or powdered sugar.
I used light brown sugar, because the granules are much larger compared to white granulated sugar.
The sugar is sprinkled onto the cookies shapes before baking.
Use my free printable pretzel template then simply place on a baking pan, under your baking paper or silicone baking mat and pipe your dough, tracing along the shape. This will give you the perfect spacing on your baking pan and consistent pretzel cookie shapes.
Once the cookie dough has chilled, transfer the lined baking pan with the shaped cookies directly from the fridge to the preheated oven.
The piped or sliced cookie shaped dough should still be very cold when placed in the oven. This will prevent it from spreading too much and losing its shape.Yes, The piped or shaped dough can be frozen overnight or up to 1 month before baking. The cookies can be baked from frozen, but might just require an extra 5 minutes of baking time.
Enjoy ♥
If you like this recipe, be sure to check out my other amazing cookie and slice recipes
Still hungry for more?
Follow on Facebook, Pinterest, and Instagram, or Subscribe for the latest recipe updates.
This post may contain affiliate links. Please read my disclosure policy.
Recipe
Assorted Danish Butter Cookies (one dough 5 variations)
For the base dough
- 1 cup butter, at room temperature
- 1 cup Powdered sugar (icing sugar)
- 2 teaspoons vanilla extract
- 2 cup cake flour OR all-purpose flour
METHOD: Divide the base dough into 5 equal portions and with each dough make 5 different cookies
For the vanilla ring
- 1 portion base dough
- 1 -2 teaspoons warm milk (optional, see note)
For the pretzel shape cookies
- 1 portion base dough
- 1 -2 teaspoons warm milk (optional, see note)
- Brown sugar to sprinkle see note
For the rectangular shape cookies
- 1 portion base dough
- Brown sugar to sprinkle (see notes)
For the coconut cookies
- 1 portion base dough
- 2 Tablespoons fine unsweetened shredded (desiccated coconut)
For the country style cookies
- 1 portion base dough
- 1 Tablespoon chocolate, chopped into small pieces (see note for alternative)
Make the base dough
- Get the butter out of the refrigerator at least an hour before baking. It should be soft to the touch, but not melted.
- Cream the butter, powdered sugar and vanilla extract with a handheld or stand mixer for 5 to 8 minutes. The creamed butter and sugar should be light in color and fluffy in texture.
- Use a spatula to scrape the dough off the side of the bowl. Sift the flour into the dough and fold it gently into the creamed butter mixture.
Make the Vanilla Ring
- Place the dough in a piping bag fitted with a 1M nozzle
- Pipe the dough at least 2 inches (5 cm) apart on a baking pan lined with parchment (baking) paper. If you feel that the dough is too stiff or hard to pipe, then just add a teaspoon at a time of warm milk to the dough. This will make the dough softer and easier for you to pipe
- Top tip: For even size cookies, pipe the dough around the inner ring of a 2 inch (5cm) round cookie cutter.
- Place the baking pan with the piped-out cookies in the fridge for 30 minutes.
Make the Pretzel shaped cookies
- Place the dough in a piping bag.
- Cut ⅜ inch (10mm) opening at the end of the piping bag.
- If you are using my free printable pretzel template then simply place it on a baking pan, under your baking paper or silicone baking mat and pipe your dough, tracing along the shape. This will give you the perfect spacing on your baking pan and consistent pretzel cookie shapes.
- If you feel that the dough is too stiff or hard to pipe, then just add a teaspoon at a time of warm milk to the dough. This will make the dough softer and easier for you to pipe
- Place the baking pan with the piped-out cookies in the fridge for 30 minutes.
Make the Country style cookies
- Add 1 Tablespoon of chopped chocolate pieces to the portion of your base dough
- Mix it in until evenly distributed.
- Roll the dough to form a log 4 inch (10cm)long and 1 ¼ inch (3cm thick)
- You can either wrap the log in plastic wrap or leave unwrapped on a baking sheet.
- Chill the shaped log for 30 minutes in the fridge.
Make the coconut cookies
- Add 2 Tablespoons of fine, unsweetened shredded (dessiccated) coconut to a portion of the base dough. Mix it in until evenly distributed.
- Roll the dough to form a log 4 inch (10cm)long and 1 ¼ inch (3cm thick) see note when handling the dough
- You can either wrap the log in plastic wrap or leave unwrapped on a baking sheet.
- Chill the shaped log for 30 minutes in the fridge.
Make the rectangular shaped cookies
- Roll the dough to form a log 4 inch (10cm)long and 1 ¼ inch (3cm thick)
- Using a dough scraper or something similar, push and shape the dough into a rectangular log shape. Chill the shaped log for 30 minutes in the fridge.
Baking (see note)
- After the cookies have chilled, preheat the oven to 300°F/ 150°C (148°C fan)
Bake the piped out cookies (Pretzel shaped cookies and vanilla ring)
- Transfer the lined baking pan with the piped cookies directly from the fridge to the preheated oven.
- The piped cookie dough should still be very cold when placed in the oven. This will prevent it from spreading.
- Bake for 10 to 12 minutes until the edges begin to turn a golden color.
Slice the chilled log shaped cookies and bake (Country style cookies, rectangular shaped cookies and coconut cookies)
- Once the dough logs are chilled solid, they can be sliced into ⅜ of an inch (1 cm) thick disks, and place on baking sheet (makes approximately 10 to 11 slices with each portion of the dough)
- Place the slices at least 2 inches (5 cm) apart on a baking pan lined with parchment (baking) paper.
- The dough should still be very cold when placed in the oven. This will prevent it from spreading too much and losing its shape.
- Place in a preheated oven of 300°F/ 150°C (148°C fan) immediately after slicing.
- Bake for 10 to 12 minutes until the edges begin to turn a golden color.
- Remove from the oven and leave the cookies on the baking sheet to cool for 10 minutes see note
- Once completely cooled, store in an airtight container.
I used light brown sugar, because the granules are much larger compared to white granulated sugar.
The sugar is sprinkled onto the cookies shapes before baking. Chocolate alternative: Currants can be used as an alternative to chocolate. Baking: Do not overbake the cookies. They will be soft after baking straight out of the oven, but will crisp and get firm as it cools. Cool the cookies after baking: Remove the tray from the oven but leave the cookies on the baking tray for 10 minutes. The baked cookies will be soft when you take it out of the oven but crisp as they cool.
After 10 minutes on the baking tray, the cookies will be firm and crisp enough to transfer to a cooling rack. Storing: Once completely cool, store the cookies in an airtight jar for up to 5 days.


betty says
Hi, could i freeze the biscuits before baking? as it would be more convient for me. If so how long would I bake them for?
Thank you
The Gardening Foodie says
Hi Betty, Yes, you can absolutely freeze the cookies before baking. Once you’ve shaped the dough (either piped or in log form), place them on a baking tray and freeze until solid. Then, transfer them to a freezer-safe container or bag for storage. They can be frozen for up to 2 months.
When ready to bake, no need to thaw! Bake them straight from frozen in a preheated oven at 300°F/150°C (148°C fan). You may need to add an extra 3-4 minutes to the baking time (approximately 15-18 minutes total) and until the edges turn a golden color.
Happy baking 😊
Lisa says
Absolutely delish. Made vanilla ones as solid piped cookie & love it. Can't see these lasting long. Huge thankyou!!!
The Gardening Foodie says
Hi Lisa, that’s absolutely wonderful to hear, and you’re very welcome.
And cookies lasting long, is that even a thing? 😁