This 3 Ingredient Baked Yogurt dessert is super easy to make and prepared within minutes. The creamy, silky, cheesecake-like texture makes it perfect for topping with seasonal fruit and nuts, or even just eating plain.
Taking just 3 simple ingredients: Sweetened condensed milk, cream, and plain yogurt this is an excellent make-ahead dessert for an elegant dinner party, yet simple enough to whip up for dessert tonight.
You have a choice of baking it in the airfryer for 15 minutes or oven for 30 minutes. Then chill the baked dessert in the fridge for about 30 minutes and enjoy.

Visual Instructions
Here are step by step pictures so you can see what the batter at each stage should look like.
The full printable recipe with amounts and instructions are at the end of this post.
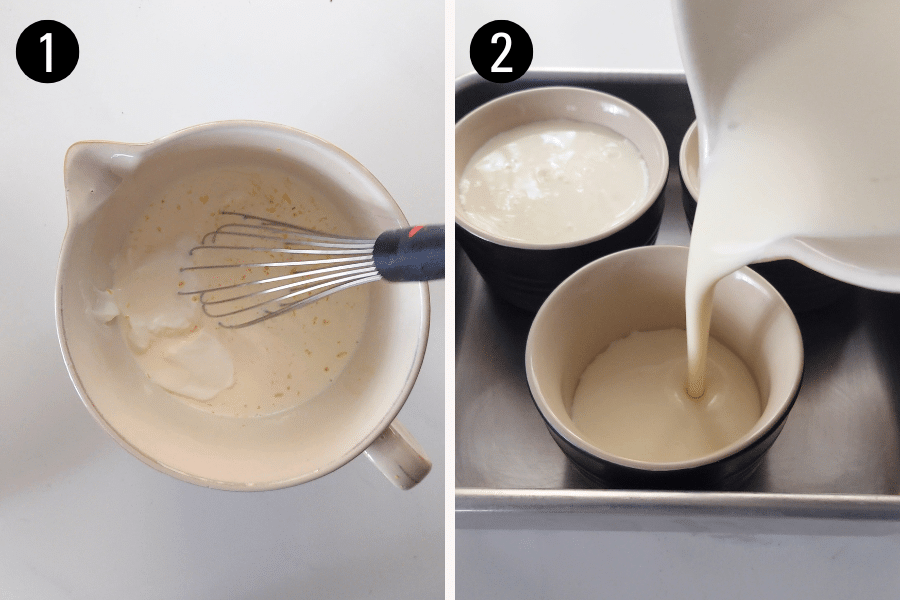
- Mix together the heavy cream (whipping cream), sweetened condensed milk and plain yogurt in a bowl. I recommend sticking with regular full-fat yogurt for the best results.
- Place the ramekins in a baking pan. Divide the mixture evenly among them, filling each ramekin up to ¾ full. The mixture won’t overflow during baking.
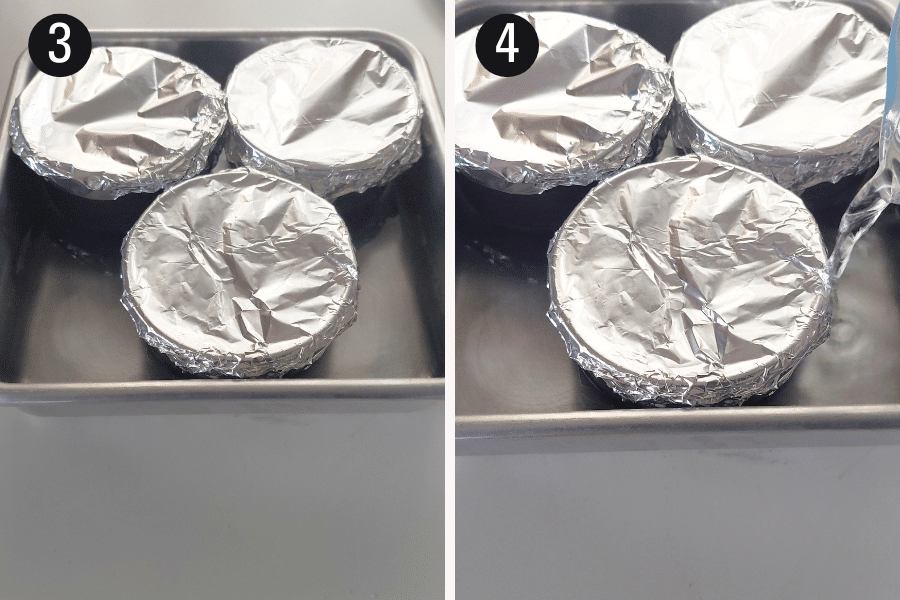
- Cover each ramekin tightly with aluminum foil, making sure the foil doesn’t touch the mixture.
- Pour room temperature water into the pan until it reaches halfway up the sides of the ramekins. This water bath heats gently around the ramekins, helping them bake evenly and preventing cracks on the surface of the baked yogurt.
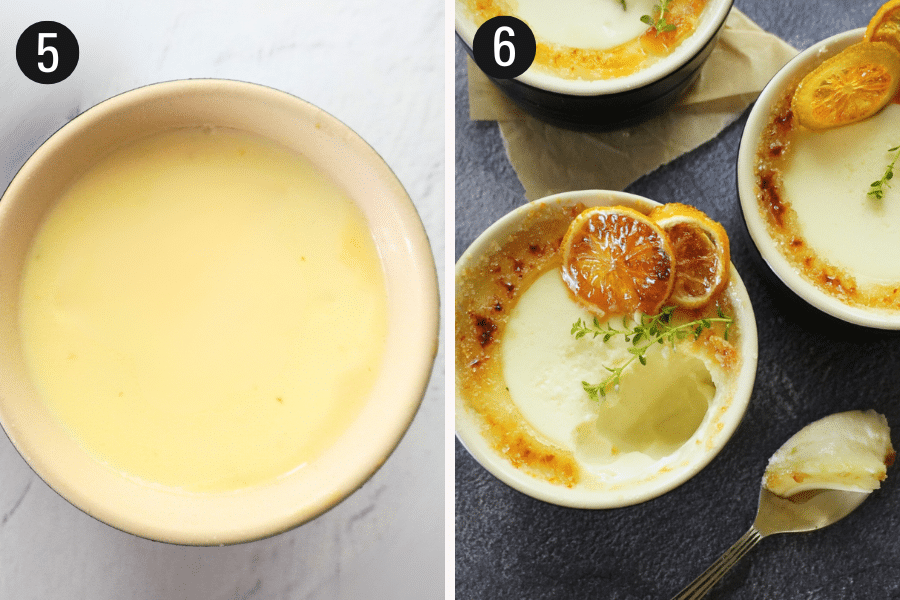
5 and 6: Bake in the airfryer or oven. Serve as is or decorate as you prefer.
Baking in the air fryer
- Place the pan with the ramekins into the air fryer. If your air fryer is small, you might need to do this in batches.
Baking time based on ramekin size
- Bake at 300°F (150°C) - no need to preheat the airfryer
- For larger 8 oz (240 ml) ramekins bake for 15 - 18 minutes
- For smaller 4 oz (120 ml) ramekins - bake for 10- 12 minutes
To check if baked
- Bake until it is set but still has a slight wobble when you gently shake the ramekin.
- Remove the ramekins from the water and let them cool.
Refrigerate until set
- Refrigerate for at least 30 minutes to an hour to let them firm up completely.
Baking in the oven
- Preheat the oven to 325° F / 170°C (150°C if you are using a fan assisted oven) and set a rack in the middle position
- Place the water filled pan with the ramekins into the oven
Baking time based on ramekin size
- Bake - For larger 8 oz (240 ml) ramekins, bake for 30 minutes
- For smaller 4 oz (120 ml) ramekins, bake for 25 - 28 minutes
To check if baked
- Bake until it is set but still has a slight wobble when you gently shake the ramekin.
- Remove the ramekins from the water and let them cool for about 15 minutes
Refrigerate
- Refrigerate for at least 30 minutes to an hour to let them firm up completely.
Using large or small ramekins
The mixture makes about 2 ½ cups (600 ml)
For this recipe, I used 3 ramekins, each with a 8 oz (240 ml) capacity and filled each with about ¾ cup (200 ml) of the mixture.
For more servings or smaller portions: use ramekins with a 4 oz (120 ml) capacity, you’ll get 5-6 ramekins, each filled with about ½ cup (120 ml)
Decorating and Serving Ideas
You can enjoy this dessert plain, top with berries, any fruit or nuts, I guarantee they're absolutely delicious!
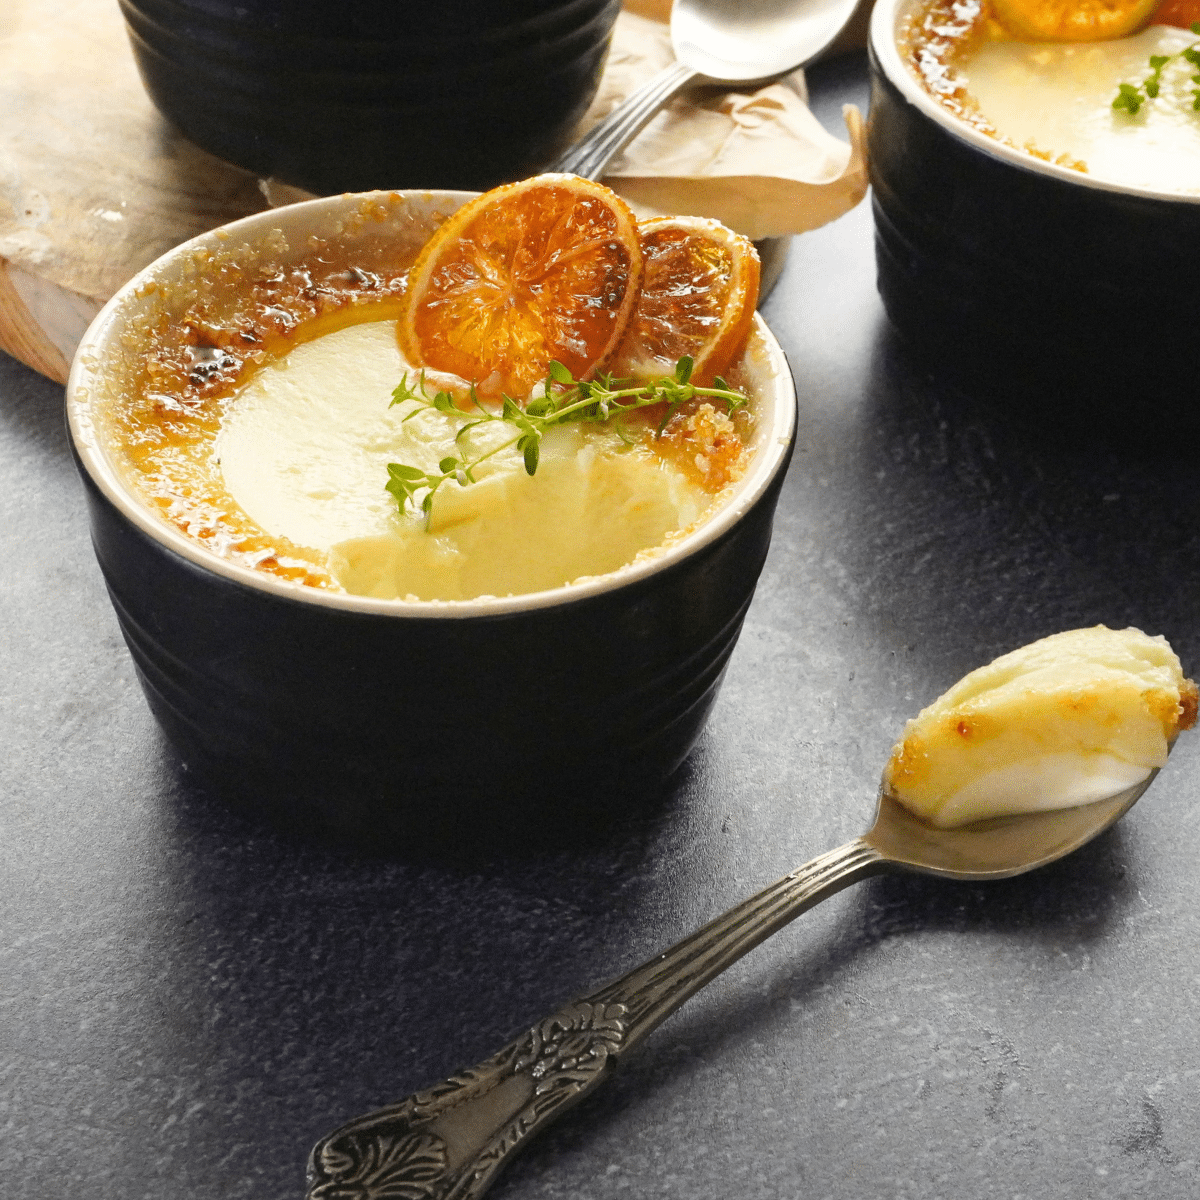
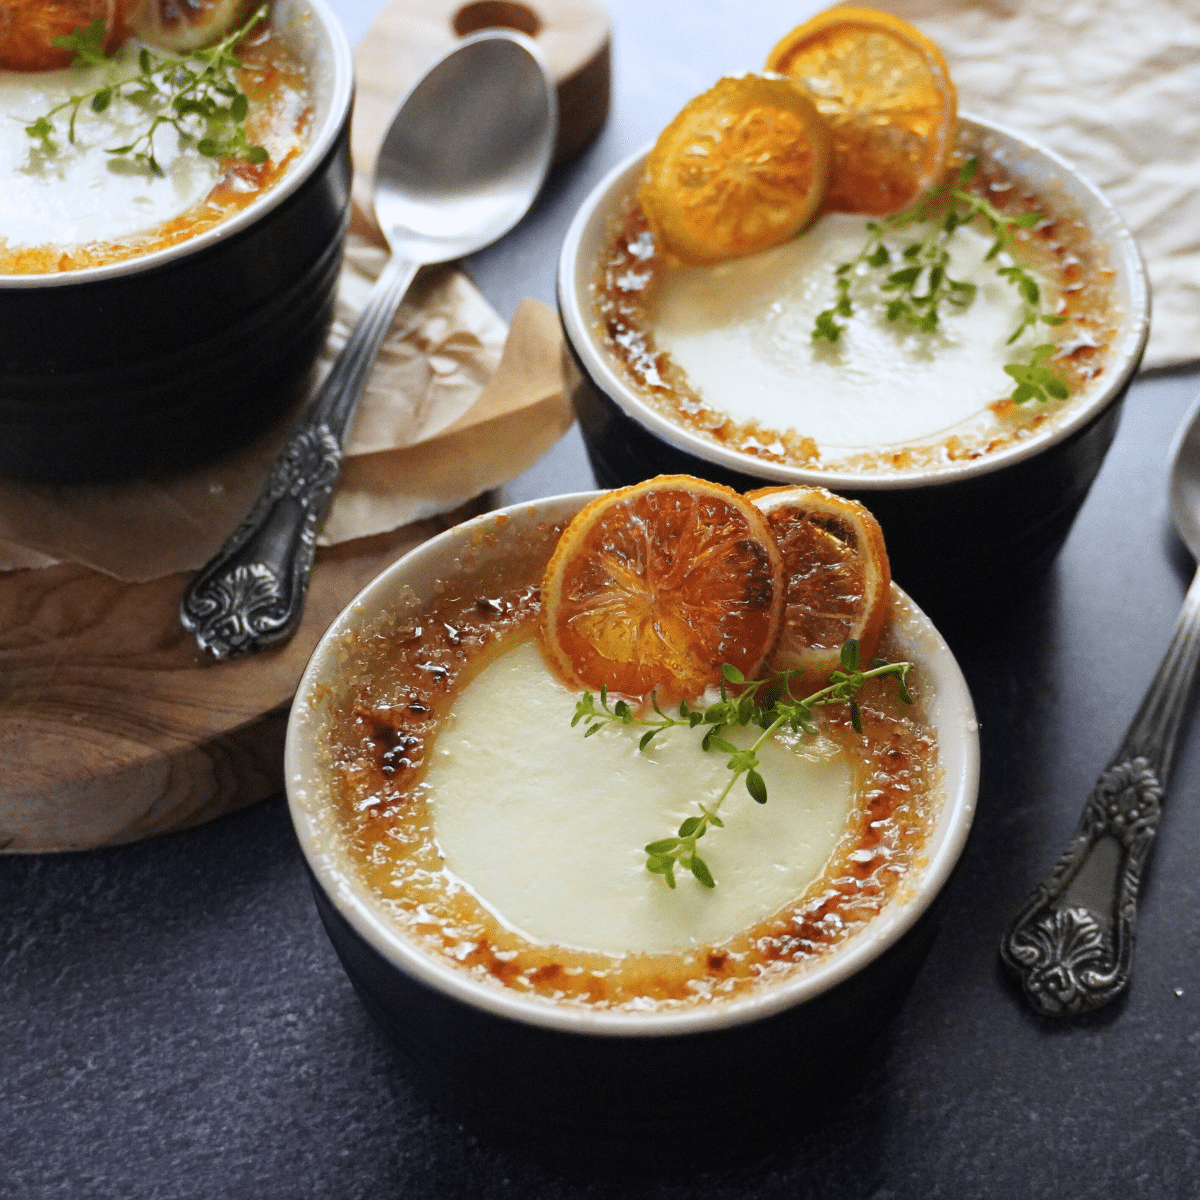
But if you're curious about how I decorated mine in the pictures, here's what I did.
- Bake and chill for an hour.
- Use a smaller cookie cutter to mark the center.
- Sprinkle sugar around the outer edges of the cookie cutter.
- Caramelize the sugar with a kitchen torch (blow torch).
- To finish, I added sprigs of thyme and candied lemons.
- You can find how to make the candied lemon in this post, where I also used them to decorate cupcakes.

Flavor Variations
Extracts: Whisk in ¼ teaspoon almond extract or 1 teaspoon vanilla or caramel extract.
Fruit zest: Add a teaspoon of lemon or orange zest to the mixture. Avoid using the juice, as it can curdle the mixture.
Spices: like ground cinnamon powder, be added to the yoghurt mixture.
Recipe
3 Ingredient Baked Yogurt
- ¾ cup (200 ml) heavy cream (can use double cream or whipping cream)
- ¾ cup 200 ml cup sweetened condensed milk
- ¾ cup 200 ml plain yogurt (I recommend regular full-fat yogurt)
- Mix together the heavy cream (whipping cream), sweetened condensed milk and plain yogurt in a bowl.
- Place the ramekins in a baking pan with high sides. (See note 1)
- Divide the mixture evenly among the ramekins, filling each up to ¾ full. The mixture won’t overflow during baking.
- Cover each ramekin tightly with aluminum foil, making sure the foil doesn’t touch the mixture.
- Pour tap water into the baking pan until it reaches halfway up the sides of the ramekins. This water bath heats gently around the ramekins, helping them bake evenly and preventing cracks on the surface of the baked yogurt.
Baking in the air fryer
- Place the pan with the ramekins into the air fryer. If your air fryer is small, you might need to do this in batches.
- Bake at 300°F (150°C) - no need to preheat the airfryer
- For larger 8 oz (240 ml) ramekins bake for 15 - 18 minutes
- For smaller 4 oz (120 ml) ramekins - bake for 10- 12 minutes
- Bake until it is set but still has a slight wobble when you gently shake the ramekin.
- Remove the ramekins from the water and let them cool.
- Refrigerate for at least 30 minutes to an hour to let them firm up completely. Decorate as preferred.
Baking in the oven
- Preheat the oven to 325° F / 170°C (150°C if you are using a fan assisted oven) and set a rack in the middle position
- Place the water filled pan with the ramekins into the oven
- Bake - For larger 8 oz (240 ml) ramekins, bake for 30 minutes
- For smaller 4 oz (120 ml) ramekins, bake for 25 - 28 minutes
- Bake until it is set but still has a slight wobble when you gently shake the ramekin.
- Remove the ramekins from the water and let them cool for about 15 minutes
- Refrigerate for at least 30 minutes to an hour to let them firm up completely. Decorate as preferred.
Storing
- In the refrigerator: Covered for up to 2 days
- The mixture makes about 2 ½ cups (600 ml)
- I used 3 ramekins with an 8 oz (240 ml) capacity, filling each with about ¾ cup (200 ml)
- For more servings or smaller portions: use ramekins with a 4 oz (120 ml) capacity, you’ll get 5-6 ramekins, each filled with about ½ cup (120 ml)
Want even more delicious recipes? Subscribe free to receive new post notifications emailed to you. Or follow along on Facebook, Pinterest, and Instagram. If you love sharing recipes please come and join my All about cooking and baking Facebook group or Subscribe to my YouTube channel


Leave a Reply