Easy Vanilla Cherry Cupcakes with Smooth Buttercream (no powdered sugar)
Easy Vanilla Cherry Cupcakes - soft vanilla sponge cupcakes filled with cherry jam and topped with a smooth buttercream without the need for powdered sugar.
Servings 15 cupcakes
Ingredients
For the smooth buttercream
- ⅓ cup all purpose flour (same as plain flour -UK OR cake flour)
- 1 cup white granulated sugar
- 1 cup warm milk
- 1 cup salted butter, softened (note 1)
- 1 teaspoon vanilla extract
- ¼ teaspoon salt (add ½ teaspoon if using unsalted butter)
For the cupcakes
- 2 cups all purpose flour (same as plain flour -UK OR cake flour)
- 1 teaspoon baking powder (note 2)
- ¼ teaspoon baking soda (bicarbonate of soda)
- 2 large eggs
- 1 cup white granulated sugar
- ½ teaspoon salt
- 1 cup plain unflavored yogurt or sour cream
- ½ cup vegetable oil
- 1 teaspoon vanilla extract
- 1 cup cherry preserve or jam (for filling)
Instructions
For the Smooth Buttercream
- Place all purpose flour and white granulated sugar in a saucepan over medium heat. Cook, stirring constantly, for 20 seconds.⅓ cup all purpose flour, 1 cup white granulated sugar
- While whisking constantly, slowly pour in the warm milk.1 cup warm milk
- As the milk heats up, stir constantly to prevent the mixture from forming lumps and sticking to the base of the saucepan. Cook until thick and smooth in texture (see image 3 for texture).
- Remove from the heat and cover with plastic wrap (cling wrap) pressing it down onto the surface to prevent a skin from forming.
- Allow the mixture to cool entirely at room temperature. For a quicker cooling process, take it off the heat and spread it into a wide, shallow pan. The mixture should reach room temperature within an hour. (See note 3)
- After the flour mixture has fully cooled, it should have a thick texture.
- Add the butter to a large bowl. Remember that the butter should be soft, but not melty. When you press your finger on the butter, it should leave an indent. However, it still needs to be cool enough to avoid ending up with shiny grease on your fingers.1 cup salted butter, softened
- Beat the butter for about 2 minutes with a handheld or stand mixer for about 2 minutes on medium speed until just creamy.
- Gradually add the cooled and thickened flour mixture, one tablespoon at a time, and beat.
- Continue incorporating the flour mixture, beating between each addition until you've added it all.
- After all the flour mixture has been incorporated, add vanilla extract and salt. Then whip the mixture for 2 to 3 minutes.1 teaspoon vanilla extract, ¼ teaspoon salt
- Now, the mixture should have achieved a light and fluffy consistency .
- Keep covered in a cool area of your kitchen or refrigerate until ready to use.
Prepare and bake the cupcakes
- Preheat the oven to 356° F (180° C / 160° C fan) Line a cupcake or muffin pan with cupcake liners. (note 4)
- In a medium bowl, sift together all-purpose flour, baking powder, and baking soda (bicarbonate of soda), then set it aside.2 cups all purpose flour, 1 teaspoon baking powder, ¼ teaspoon baking soda
- In a separate large bowl, beat together eggs, white granulated sugar and salt with an electric mixer on high speed.2 large eggs, 1 cup white granulated sugar, ½ teaspoon salt
- Ensure that you continue beating for 4 - 5 minutes or until the mixture is pale in color.
- Add yogurt or sour cream, vegetable oil and vanilla extract. Beat on low speed until just combined, about 30 seconds.1 cup plain unflavored yogurt or sour cream, ½ cup vegetable oil, 1 teaspoon vanilla extract
- Add the sited flour, ⅓ at a time, beating on low speed with each addition just until combined. Do not overmix or cupcakes will turn out dense. You can also use handheld whisk to mix in the flour.
- Once combined, the mixture should create a thick, smooth-textured batter.
- Scoop the batter evenly into the cupcake liners, filling them up to two-thirds of the way to the top. Be careful not to overfill, as this may lead to the batter overflowing during the baking process.
- Bake at 356° F / 180° C (160° C fan) for 20-25 minutes, or until the tops are golden and a toothpick inserted into the center comes out clean.
- Let cool for 10 minutes in the pan then remove and continue cooling on a wire rack.
- While the cupcakes are still a bit warm, use a paring knife to gently hollow out the center of each cupcake or use an apple corer for this purpose. The slight warmth of the cupcakes makes the process of coring or cutting into the center easier.
- Don’t remove the cake all the way at the bottom though. We are just looking to make a well in the cupcake.
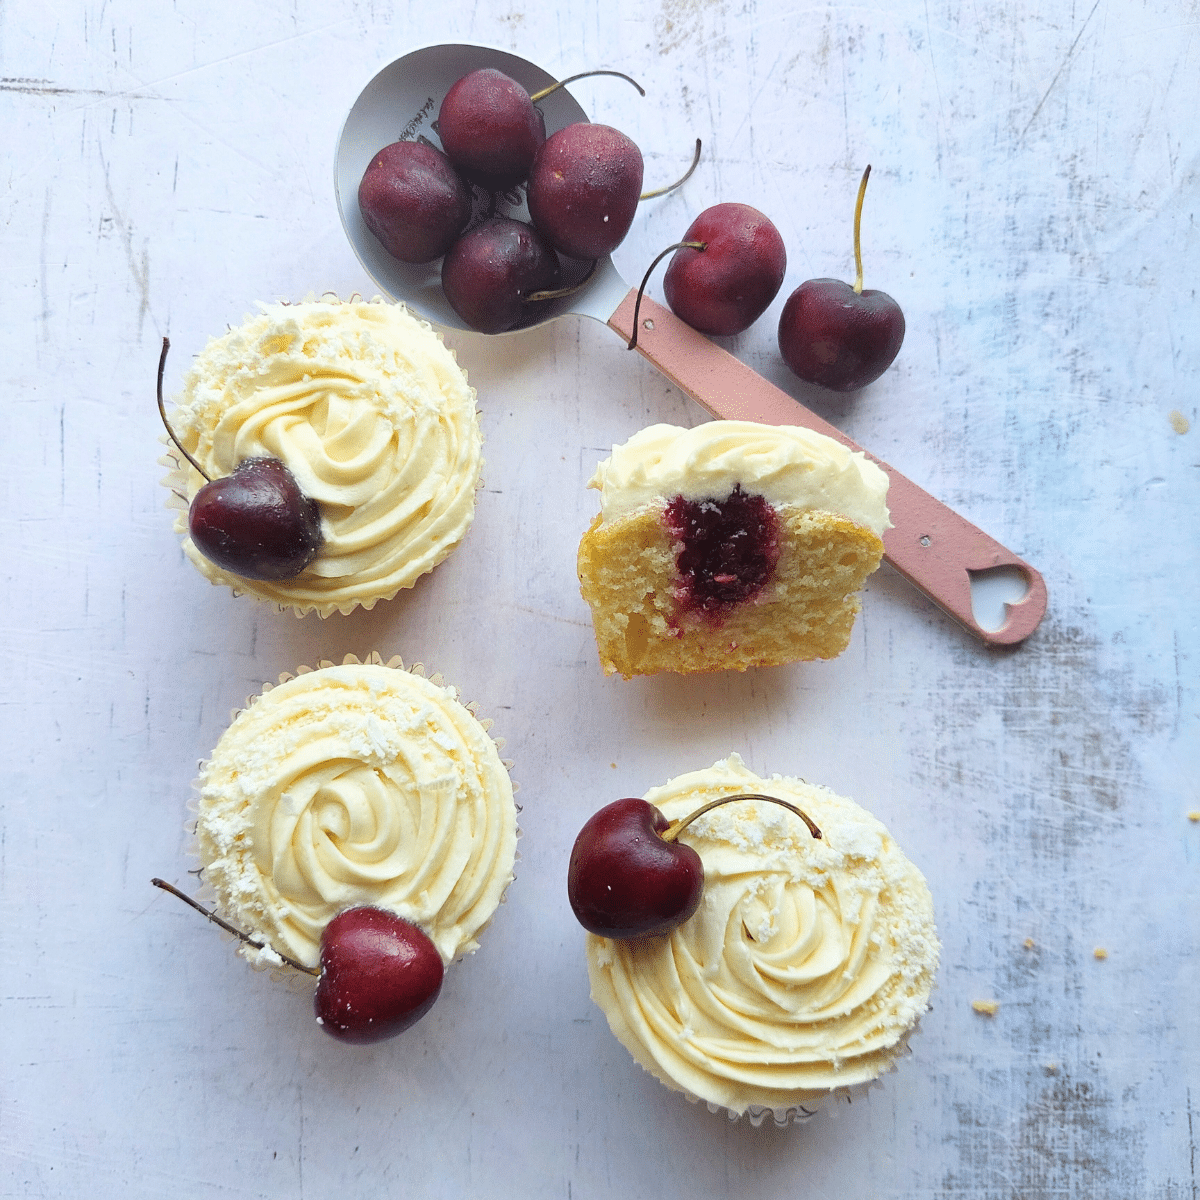
- Spoon or pipe about ¼ to ½ teaspoon cherry jam or preserve into the center of each cupcake.
- Place the prepared buttercream into a piping bag with your preferred nozzle and pipe it over the cupcakes. Alternatively, you can simply spread the frosting over the cupcakes instead of piping.
- Garnish with your choice of a fresh, maraschino, or candy/glacé cherry, and add white chocolate shavings if you prefer.
Storage
- At room temperature: cupcakes frosted with the buttercream can be stored in an airtight container for up to one day.
- In the refrigerator: The frosted cupcakes will last up to 5 days in an airtight container in the refrigerator. Let the cupcakes come to room temperature before serving.
- Freezing: Cupcakes, without buttercream and filling can be frozen for up to 3 months.
- Buttercream: If you don't plan to use the buttercream right away, refrigerate it. You can prepare and store the buttercream in the refrigerator for 7 days or freeze it for up to 4 months.
Notes
1.Butter temperature: Remember that the butter should be soft, but not melty. When you press your finger on the butter, it should leave an indent. However, it still needs to be cool enough to avoid ending up with shiny grease on your fingers.
2.Avoid heaping the spoon when measuring baking powder and baking soda. Ensure it remains level for accurate quantities. This is important as too much will affect the taste and texture of the cupcakes.
3. I usually use the time when the mixture is cooling to get the cupcakes ready.
4. Grease the insides of the cupcake paper liners: This is optional, but I guarantee, it works like a charm.
Give the paper liners a quick spritz of nonstick cooking spray before filling them. It works very well to prevent the baked cupcakes from sticking when unwrapped, even while they’re still warm
Give the paper liners a quick spritz of nonstick cooking spray before filling them. It works very well to prevent the baked cupcakes from sticking when unwrapped, even while they’re still warm
Nutrition
Serving: 1cupcake | Calories: 348kcal | Carbohydrates: 43g | Protein: 6g | Fat: 17g | Saturated Fat: 10g | Polyunsaturated Fat: 1g | Monounsaturated Fat: 5g | Trans Fat: 0.5g | Cholesterol: 71mg | Sodium: 312mg | Potassium: 105mg | Fiber: 1g | Sugar: 28g | Calcium: 62mg | Iron: 1mg
Tried this recipe?Mention @thegardeningfoodie or tag #thegardeningfoodie!