Chocolate Magic Custard Cake
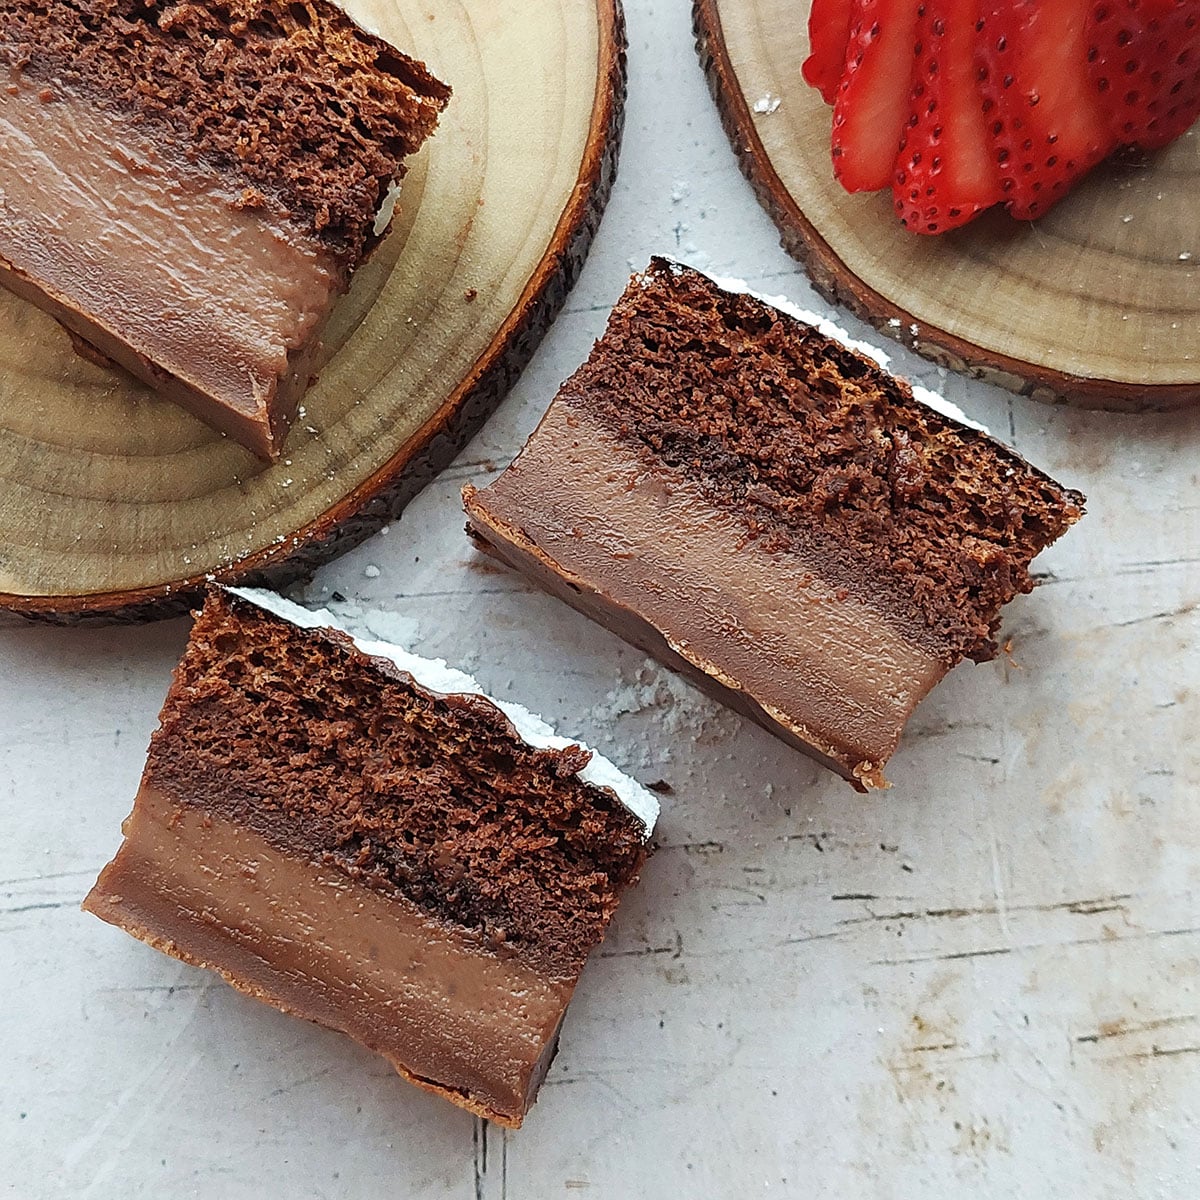
Chocolate Magic Custard Cake transforms into 3 layers of decadence with just one batter! Poured into a baking pan it bakes up separately into a fudgy bottom, custard middle and chocolate sponge cake top.
Servings 9 slices
Ingredients
For the egg yolk mixture
- 4 egg yolks at room temperature (see note)
- ⅔ cup granulated white sugar
- 1 teaspoon vanilla extract
- ½ cup / 1 stick salted butter, melted (see notes)
- 2 cups of milk at room temperature or lukewarm (see notes)
- ¾ cup cake or all-purpose flour (see notes if you prefer a gluten-free option)
- ⅓ cup unsweetened cocoa powder
For the egg white mixture
- 4 egg whites
- 1 Tablespoon white granulated sugar
- ½ teaspoon salt
Instructions
- Grease and line an 8×8-inch (20x20cm) baking pan with parchment paper. Leave an overhang of parchment paper making it easy to lift out the cake after baking
- Separate the eggs. Yolks in one bowl and whites in another.
Make the Egg yolk mixture
- Add sugar and vanilla extract to the bowl with the yolks. Beat until the mixture turns pale and creamy (about 4 to 5 minutes)
- Pour in the cooled melted butter and mix for 1 minute on low speed.
- Sift in the flour and unsweetened cocoa powder. Beat or whisk to combine.
- Slowly pour in the milk while beating the mixture and until just combined.
- Set the bowl aside.
Preheat the oven
- Preheat the oven now to 325° F / 170°C (150°C if you are using a fan assisted oven)
Make the Egg white mixture
- Rinse out and dry the whisk or beaters (if you were using for the yolk mixture)
- Beat the egg whites on medium speed for 1 minute. Then add in the 1 Tablespoon white granulated sugar and salt.
- Continue beating for about 4 minutes. When the beaters are lifted from the bowl, the whites should now form stiff peaks. Be careful not to overbeat the egg whites past this stage. Or the result will be curdled egg whites.
Combine the egg yolk mixture with the egg white mixture
- Use a spatula to transfer the beaten egg whites to the yolk mixture. Fold the beaten whites (½ of the mixture at a time) gently into the yolk mixture with a spatula.
- Don't worry if you see a few specks of egg white on the surface. You don't want to overbeat it. The mixture will look thin and quite runny even as you pour it into the baking pan. This is also perfectly normal.
Bake
- Pour the mixture into your prepared pan and bake in the preheated oven for 40-45 minutes. see notes
- If the top is browning too quickly before its baked, then shape foil into a dome and place it over the cake. It should not touch the batter.
- Check the cake at 40 minutes. The top of the cake should be firm to the touch.
- To make sure that its baked, very gently, shake the tin. There should be no movement of batter beneath the top of the cake. If there is, simply place it back into the oven, cover with foil (so that the top does not burn). Check on it every 5 minutes until firm.
- Once baked, turn the oven off. Leave the cake in the oven for 5 minutes with the door slightly open. This prevents the cake from collapsing too harshly due to the sudden temperature change. You can wedge a wooden spoon between the door which will help keep it open.
Remove from the oven and cool to room temperature
- Remove the cake from the oven, leave it in the pan to cool for about 30 minutes.
Refrigerate for 1 hour
- Leaving the cake in the pan, refrigerate for 1 hour, allowing the custard to set. The cake will shrink down slightly as it cools, and this is normal
Slice and serve
- Remove the cake from the fridge, sift cocoa powder or powdered sugar over the top if you like. Use the overhang of the parchment paper to lift the cake out of the pan. Then slice into portions and serve. (See notes)
Video
Notes
- Please see the visual step by step pictures and read the helpful info in the post above before making this recipe to ensure success.
- This recipe requires the use of large-sized eggs..
- If you forgot to take the eggs out of the fridge earlier, you can get it to room temperature within a few minutes.
- Here's how: Place the cold eggs in a bowl of lukewarm water, not boiling. Ensure that they are covered with the water. Within about 10 minutes the eggs should reach room temperature.
- I use salted butter in this recipe plus I also scooped in an additional ½ teaspoon of salt into the egg whites.
- If you are using unsalted butter: Then add ¼ teaspoon of salt to the flour and cocoa powder when sifting. Also add that ½ teaspoon of salt into the egg whites as well.
- Melt the butter in the microwave or stovetop. You just want it to melt, not boil or bubble. Remove it off the stove while it still has a few slightly solid pieces. Then stir, the heat in the pot will help melt the remaining solid pieces. Leave to cool for about 5 minutes before using. The butter should only be slightly warm, not hot.
To make sure that its baked, very gently, shake the tin. There should be no movement of batter beneath the top of the cake. If there is, simply place it back into the oven, cover with foil (so that the top does not burn). Check on it every 5 minutes until firm. Serving: The slices can be enjoyed either cold straight out of the fridge or left to reach room temperature before serving. Eaten cold, the texture of the entire cake is firmer. At room temp, the texture of the cake is softer and the custard creamier. Storing Store the cake in an airtight container in the refrigerator for up to 7 days. Serve cold or leave to warm to room temperature before serving. Eaten cold, the texture of the entire cake is firmer. At room temperature, the texture of the cake is softer and the custard creamier. Can I make this Chocolate Magic Custard Cake Gluten Free?
Absolutely, just ensure you are using the correct gluten free ingredients:
It's extremely important for individuals with gluten allergies or gluten intolerance, to opt for brands that are officially certified as gluten-free. I tested this cake with Bob's Red Mill 1-to-1 Gluten-Free Baking Flour, and the outcome was great. This flour already has xanthan gum, so don't add any more or the cake might end up too dense.
If you go with a different brand, just read the packaging to make sure you're getting gluten-free baking flour that works well for cakes, cupcakes, muffins, and brownies, and ideally has xanthan gum already added into it. Although cocoa powder is naturally gluten free, there's a possibility of cross-contamination in the location where it was manufactured.
Check out the ingredients label to get allergen details. This step is essential for figuring out if a product might have been manufactured in a facility that handles other ingredients containing gluten.
If you're gluten intolerant, choose certified gluten-free brands.
Nutrition
Serving: 1slice | Calories: 259kcal | Carbohydrates: 28g | Protein: 6g | Fat: 14g | Saturated Fat: 4g | Polyunsaturated Fat: 3g | Monounsaturated Fat: 6g | Trans Fat: 0.01g | Cholesterol: 79mg | Sodium: 298mg | Potassium: 173mg | Fiber: 1g | Sugar: 19g | Calcium: 87mg | Iron: 1mg
Tried this recipe?Mention @thegardeningfoodie or tag #thegardeningfoodie!