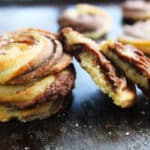
Chocolate Vanilla Danish Butter Cookies
Enjoy these Chocolate Vanilla Danish Butter Cookies with their rich buttery flavor and light crisp texture. Made using just six basic ingredients to create bakery-style cookies that are melt in your mouth deliciousness.Please read the above post for additional tips and information regarding this recipe
Servings 15 cookies
Ingredients
- ½ cup butter, very soft see note 1
- ¼ cup powdered sugar / icing sugar see note 2
- 1 teaspoon vanilla extract
- 1 cup all purpose OR cake flour
- 2 Tablespoons milk preferably full fat milk
- ¼ teaspoon salt
Divide the dough in half - Add the following to one half of the dough
- 2 Tablespoons unsweetened cocoa powder
- 1 Tablespoon milk preferably full fat milk
Instructions
- Line a cookie sheet with parchment/baking paper.
Make the vanilla dough
- Cream the butter REALLY WELL for about 5 to 8 minutes. Add the powdered sugar and beat for another 2 minutes. The creamed butter and sugar should be light in color and fluffy in texture.
- Add the vanilla extract and milk and beat until just combined.
- Sift the flour into the creamed butter mixture. Fold it in gently with a spatula to form a very soft dough
Make the chocolate dough
- Divide the dough in two and place half of it into a separate bowl.
- To one-half of the dough add sifted cocoa powder and milk. Mix in until well combined and smooth.
Pipe the dough to form the cookies
- Insert a 1M tip into a piping bag or use an open star tip which is a bit wider making piping the dough a bit easier.
- Use a spatula to spread the vanilla dough alongside half the edge of the piping bag. See video or pictures above for visual clarity.
- Do the same with the chocolate dough, spreading it alongside the other half of the piping bag.
- The chocolate and vanilla dough should display side by side in the piping bag.
- Pipe the dough to create swirls onto the lined baking sheet.
- The first cookie you pipe may be all one color dough but you should begin to see both colors come out after that one.
Refrigerate the unbaked piped cookies
- Place the sheet of unbaked cookies into the refrigerator for 30 minutes. This allows the very soft butter in the cookies to harden. Allowing the butter to harden, prevents the dough from spreading while baking. This ensures that the cookies keep their defined and beautiful piped shape.
Bake
- Bake in a preheated oven of 350°F / 180°C (160°C fan) for 15 minutes or until the edges begin to turn a golden color.
- Remove from the oven and leave the cookies on the baking sheet to cool for 10 minutes before serving or store in an airtight container.
Video
Notes
- The butter should be very soft which will make piping much easier. Soft butter also creates light crisp cookies. I usually leave the butter out of the refrigerator overnight to achieve the best consistency. Use this method to soften the butter if you do forget to get out of the refrigerator early. Soften butter by pouring a cup of hot water (not boiling) into a saucepan with a metal bowl set on top. The bottom of the bowl should not touch the water. Put the butter into the bowl. Allow to soften for about 2 minutes or just until the butter is soft but not melted. Keep an eye on it so the butter doesn’t start to melt.
- This type of sugar is used because it dissolves quickly when mixed with butter. Powdered sugar contains cornstarch responsible for giving these cookies that amazing light, crisp, melt in your mouth texture.
Nutrition
Serving: 1cookie | Calories: 62kcal | Carbohydrates: 5g | Fat: 6g | Sugar: 2g | Iron: 1mg
Tried this recipe?Mention @thegardeningfoodie or tag #thegardeningfoodie!
